## In Flashduty
***
You can obtain an integration push URL through either of these two methods:
### Using Private Integration
Choose this method when you don't need to route alert events to different channels - it's simpler.
Expand
1. Go to the Flashduty console, select **Channel**, and enter a specific channel's details page
2. Select the **Integrations** tab, click **Add Integration** to enter the integration page
3. Choose **Zabbix** integration, click **Save** to generate a card
4. Click the generated card to view the **push URL**, copy it for later use
### Using Shared Integration
Choose this method when you need to route alerts to different channels based on alert event payload information.
Expand
1. Go to the Flashduty console, select **Integration Center => Alert Events** to enter the integration selection page
2. Select **Zabbix** integration:
* **Integration Name**: Define a name for this integration
3. Configure the default route and select the corresponding channel (after the integration is created, you can go to `Route` to configure more routing rules)
4. Click **Save** and copy the newly generated **push URL** for later use
5. Done
## In Zabbix
***
* [7.x version](#v7)
* [5.x\~6.x version](#v5)
* [3.x\~4.x version](#v4)
1. Media type is a transport channel used for sending notifications and alerts in Zabbix. Enter the terminal and download the complete configuration using the following command:
```
wget --header="Referer: https://console.flashcat.cloud" https://download.flashcat.cloud/flashduty/integration/zabbix/zbx_mediatype_flashcat_v7.yml
```
2. Log in to the Zabbix console, select `Alert > Media Types`, click the Import button in the top right corner, enter the editing page, select the configuration file downloaded above, and click Import to complete the import
3. Return to the Media Types page to see the imported media type. Click the name to enter the editing page, complete the URL, zabbix\_url, and HTTPProxy content:
* `URL`: webhook push request address, simply copy the integration push URL
* `zabbix_url`: Zabbix console address, copy directly (if your page is configured with tomcat/nginx forwarding path, please include it), the system will append trigger\_id and other parameters to generate alert detail page links
* `HTTPProxy`: If your Zabbix Server cannot directly access Flashduty services, you can set this parameter to a proxy address
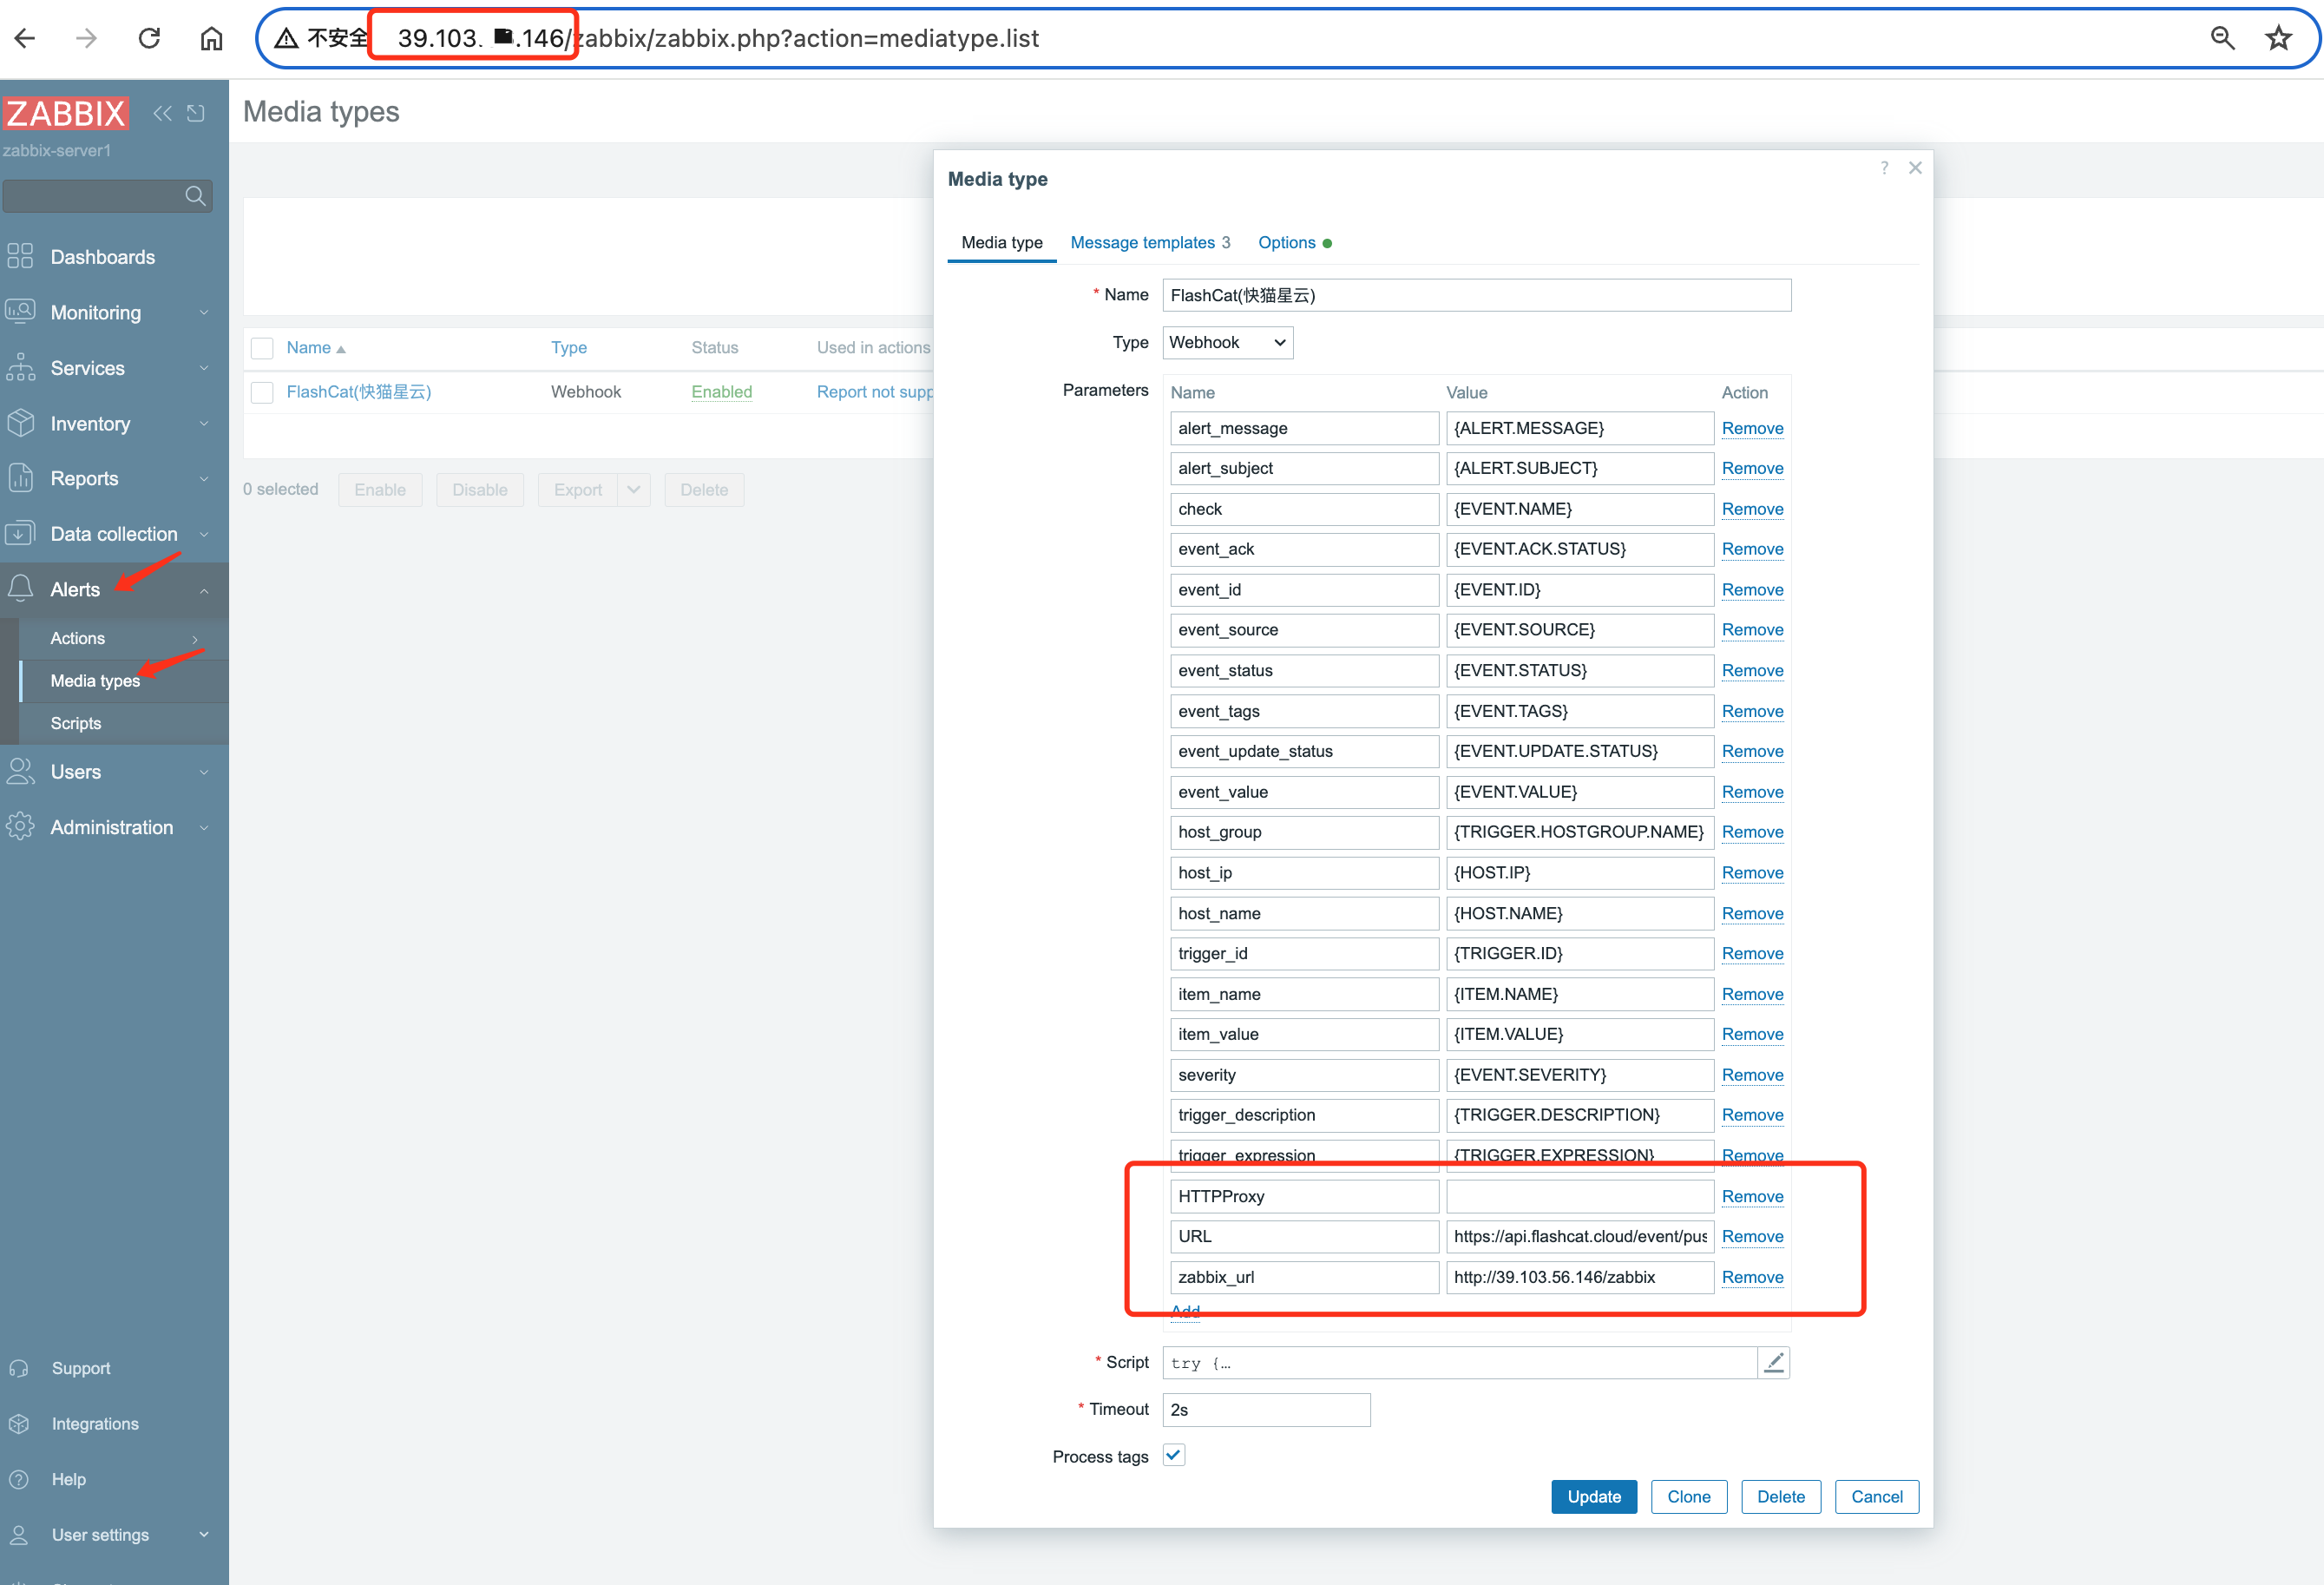
4. Click Update to save the configuration
#### Step 2: Associate Media Type with User
The media type must be associated with a user to send events. The user must have at least read permission for hosts. It is recommended to associate directly with the Admin user. Taking the Admin user as an example:
1. Log in to the Zabbix console, select `Users > Users`, select Admin user, select media, select Add to enter the editing window:
* Type: Select the Flashduty media type created above
* Send To: Fill in Flashduty
* Keep other configurations unchanged using default settings
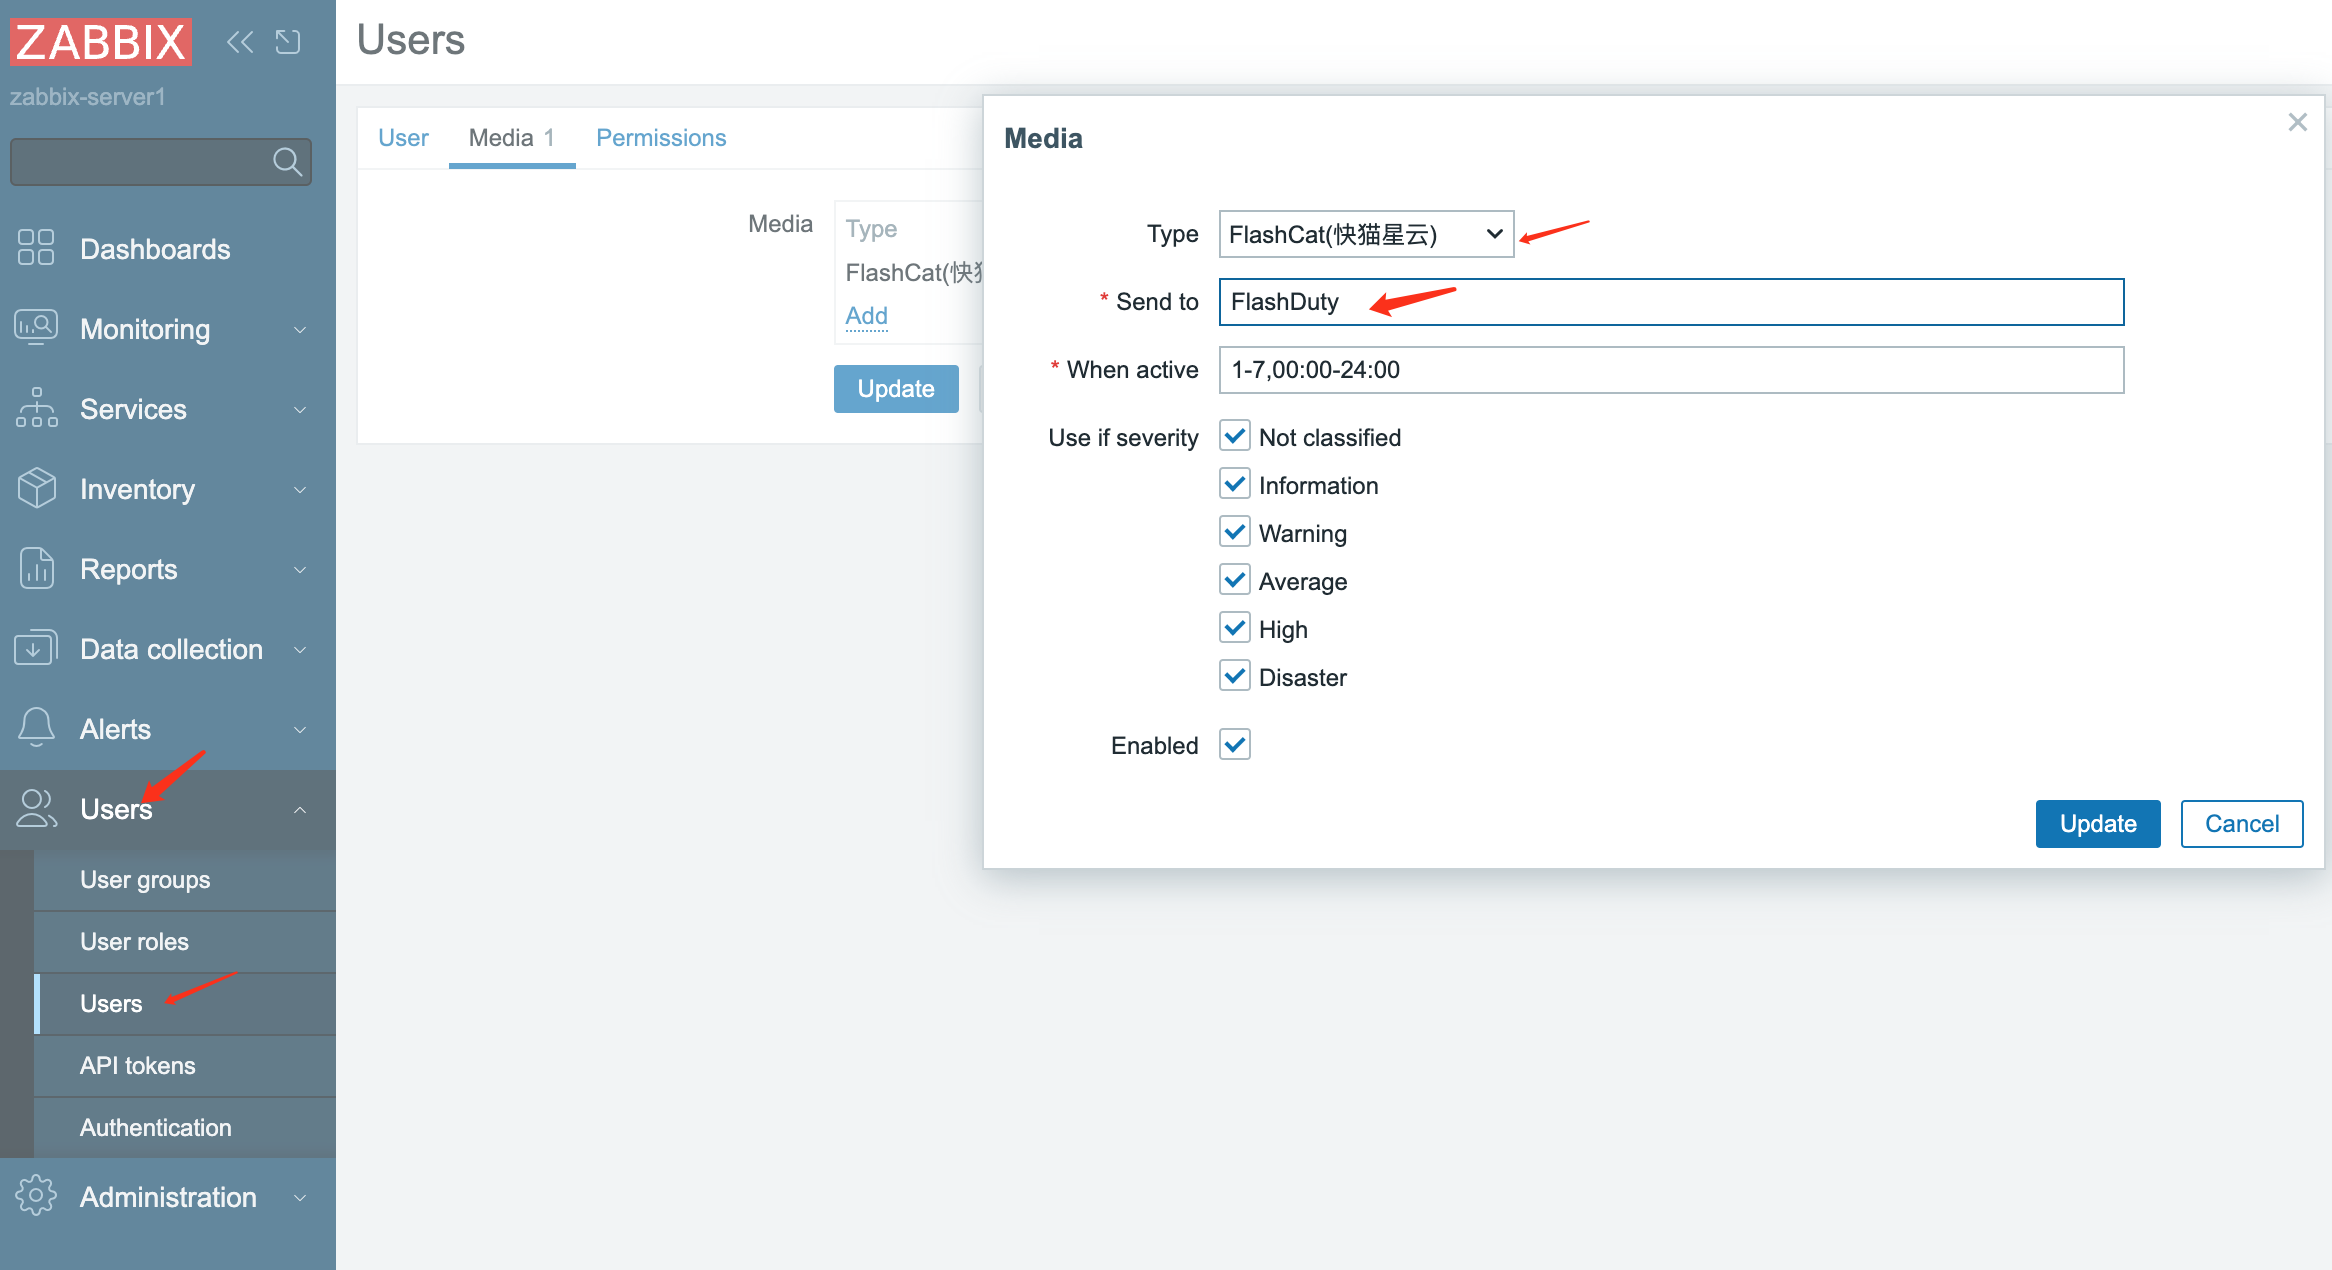
2. Click Add button to exit the add media window
3. Click Update button to exit the edit user page
#### Step 3: Create Action
Sending notifications is one of the operations executed by actions in Zabbix. Therefore, to establish a notification, log in to the Zabbix console, select `Alerts > Actions > Trigger actions`, then:
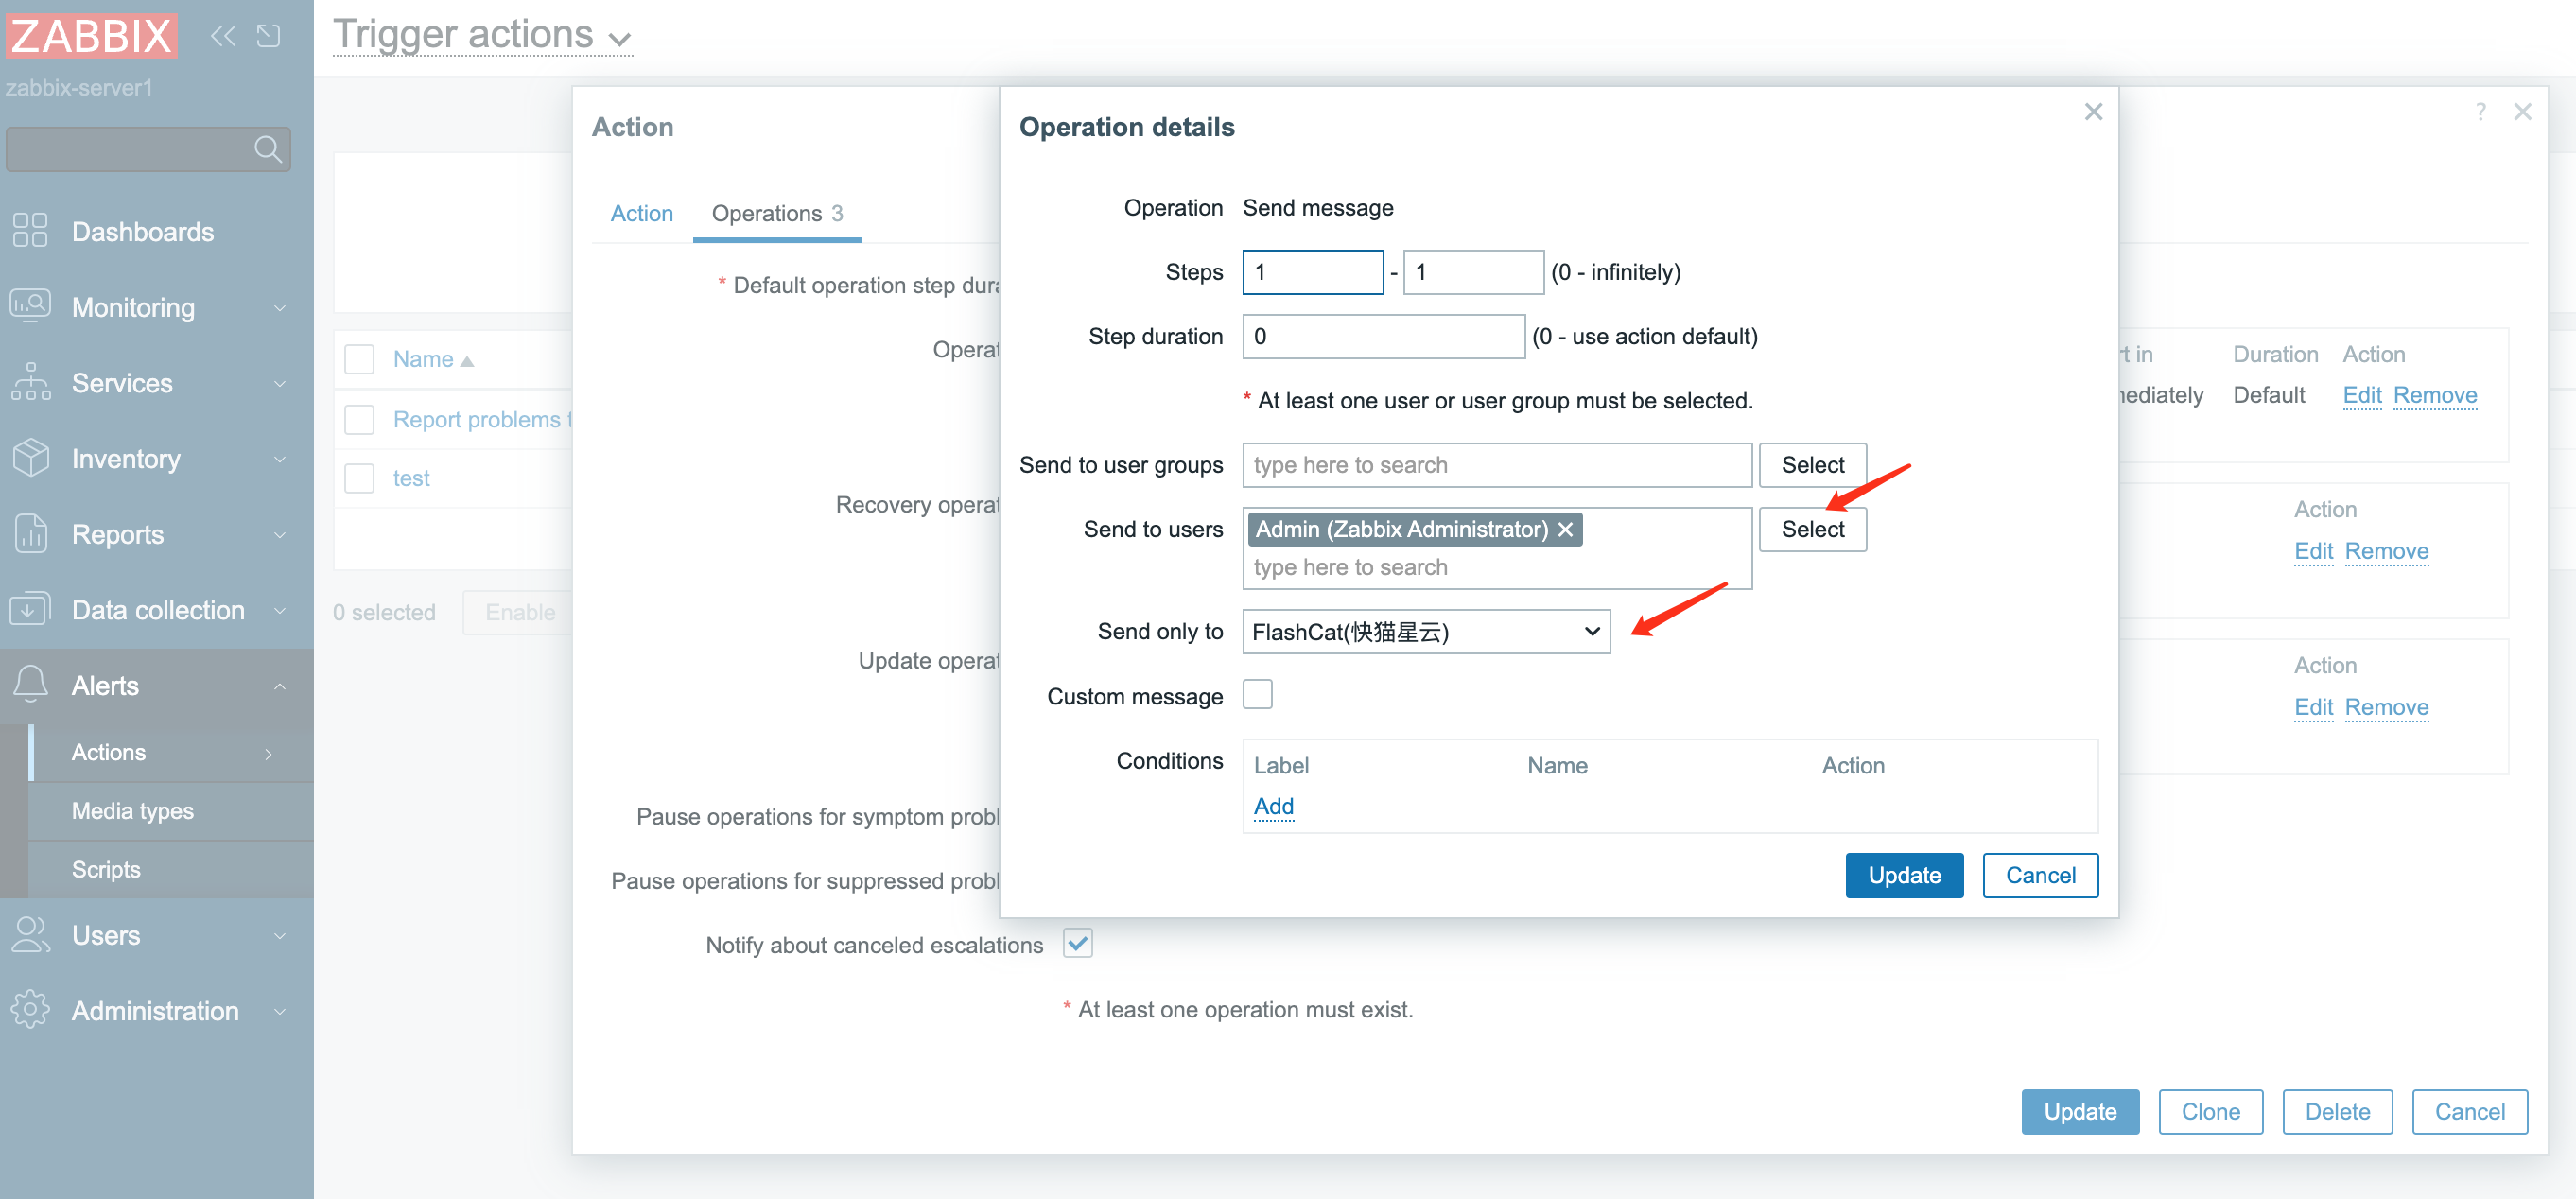
1. Click `Create action` to enter the action editing page
* Name: Fill in "Send To Flashduty"
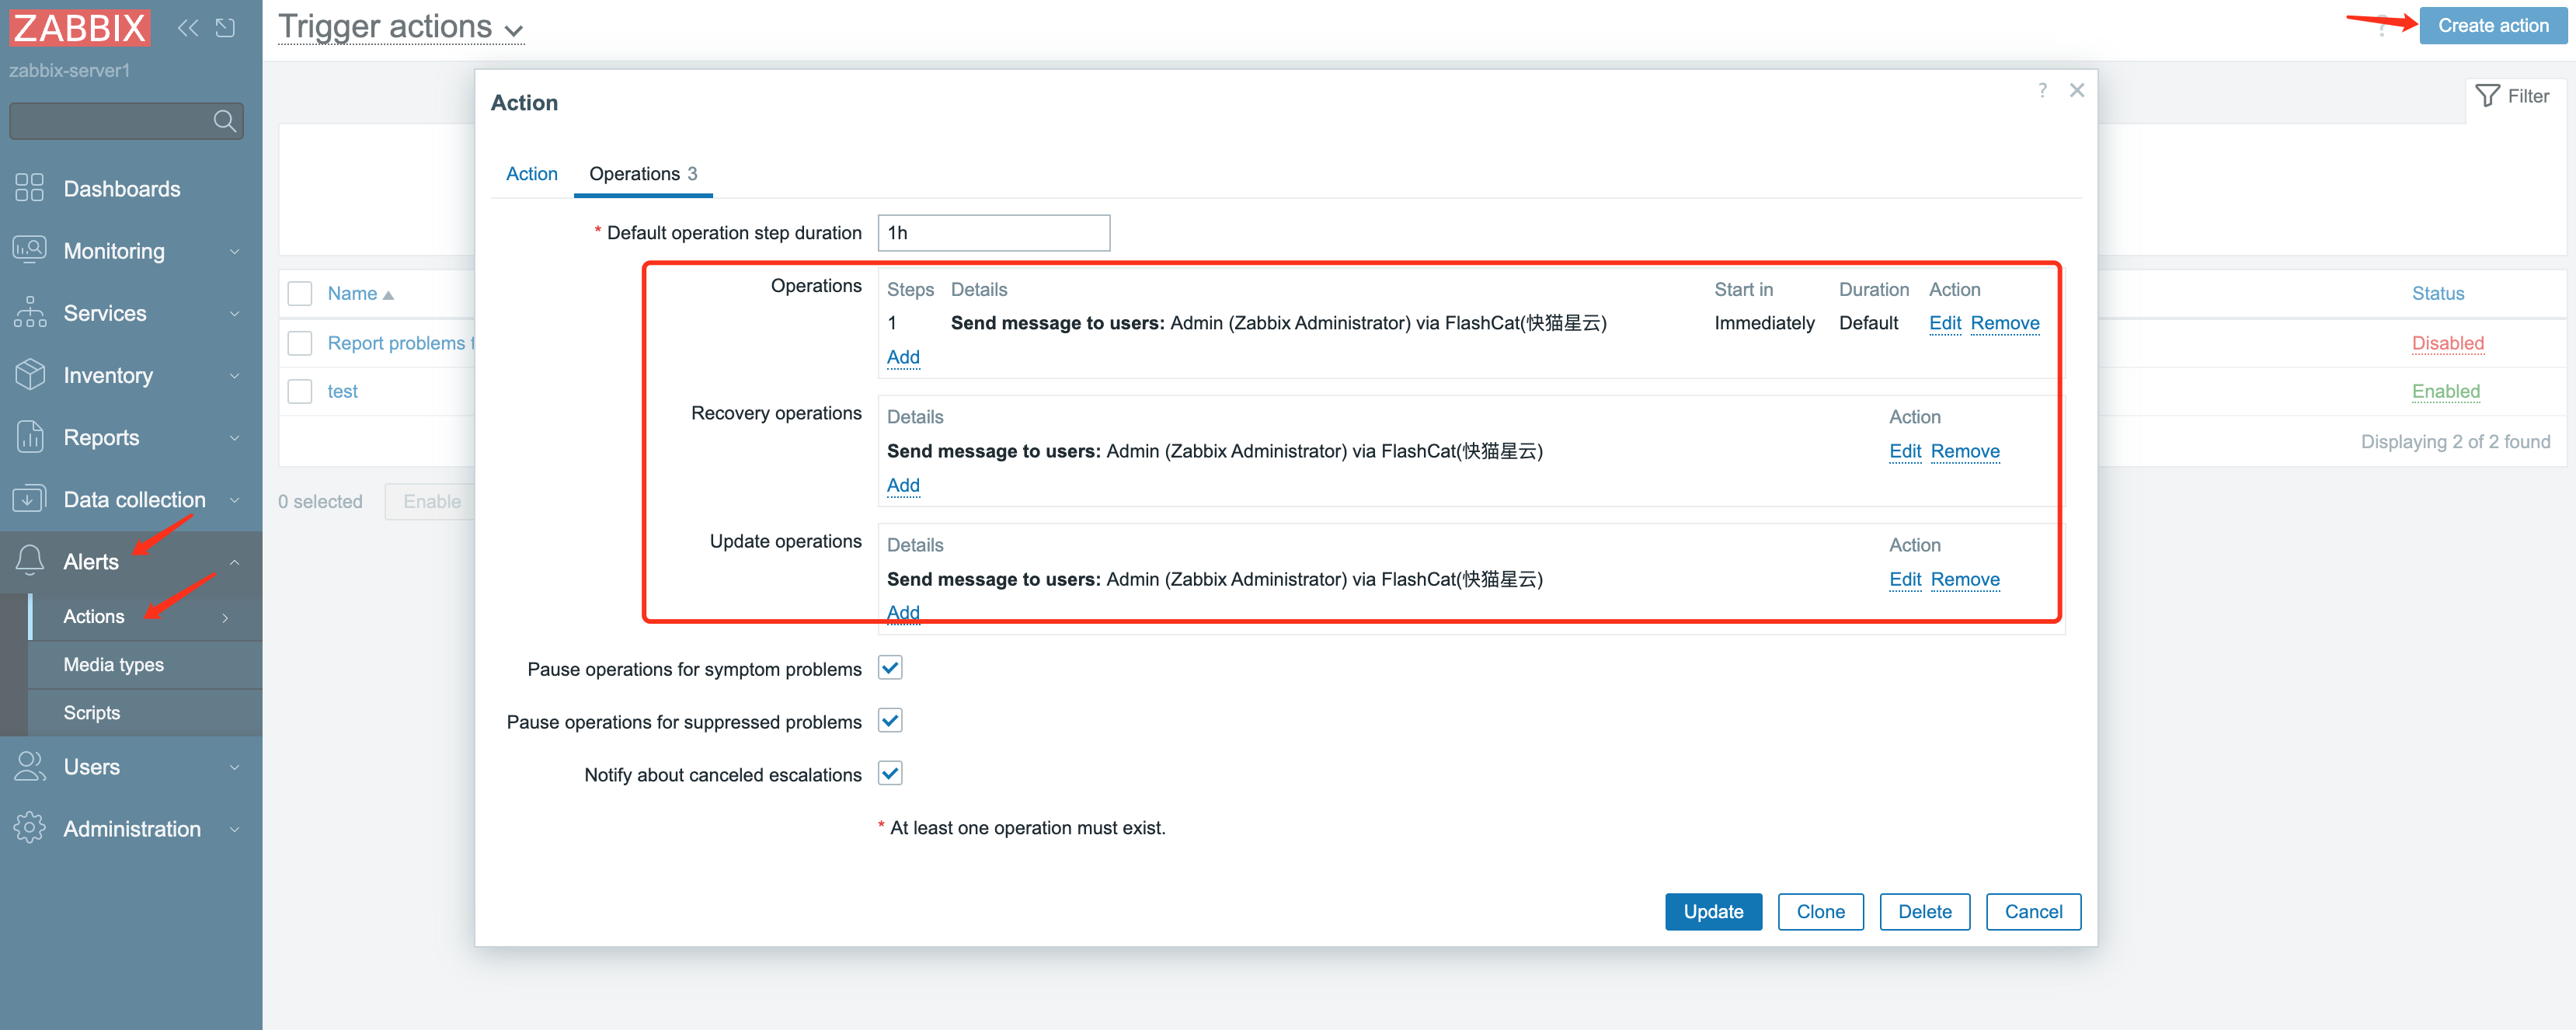
2. Select `Operations`, add notification sending configurations for three scenarios respectively:
* In the Operations configuration item, click Add button to enter the configuration window
* Send to users: Select the user newly created or configured above
* Send only to: Select Flashduty media type
* Keep other configurations as default
* Click Add button to complete this configuration item
* Repeat the above steps to complete the configuration of `Recovery operations` and `Update operations`
#### Step 4: Send Events to Flashduty
Log in to the Zabbix console, select `Monitoring > Problems` to view the latest alert list.
1. Click Actions, you can see the message notification results in the popup
2. Find the Flashduty corresponding log, if the Status is `Sent`, it means the notification was successful. Otherwise, troubleshoot according to the prompts

3. Return to the integration list, if the latest event time is displayed, it means the configuration is successful and events are being received
4. Done
### Version 5.x\~6.x
#### Step 1: Define Flashduty Media Type
1. Media type is a transport channel used for sending notifications and alerts in Zabbix. Enter the terminal and download the complete configuration using the following command:
```
// 5.x version XML configuration:
wget --header="Referer: https://console.flashcat.cloud" https://download.flashcat.cloud/flashduty/integration/zabbix/zbx_mediatype_flashcat_v5.xml
// 6.x version YAML configuration:
wget --header="Referer: https://console.flashcat.cloud" https://download.flashcat.cloud/flashduty/integration/zabbix/zbx_mediatype_flashcat_v6.yml
```
2. Log in to the Zabbix console, select `Administration > Media Types`, click the Import button in the top right corner, enter the editing page, select the configuration file downloaded above, and click Import to complete the import
3. Return to the Media Types page to see the imported media type. Click the name to enter the editing page, complete the URL, zabbix\_url, and HTTPProxy content:
* `URL`: webhook push request address, simply copy the integration push URL
* `zabbix_url`: Zabbix console address, copy directly (if your page is configured with tomcat/nginx forwarding path, please include it), the system will append trigger\_id and other parameters to generate alert detail page links
* `HTTPProxy`: If your Zabbix Server cannot directly access Flashduty services, you can set this parameter to a proxy address
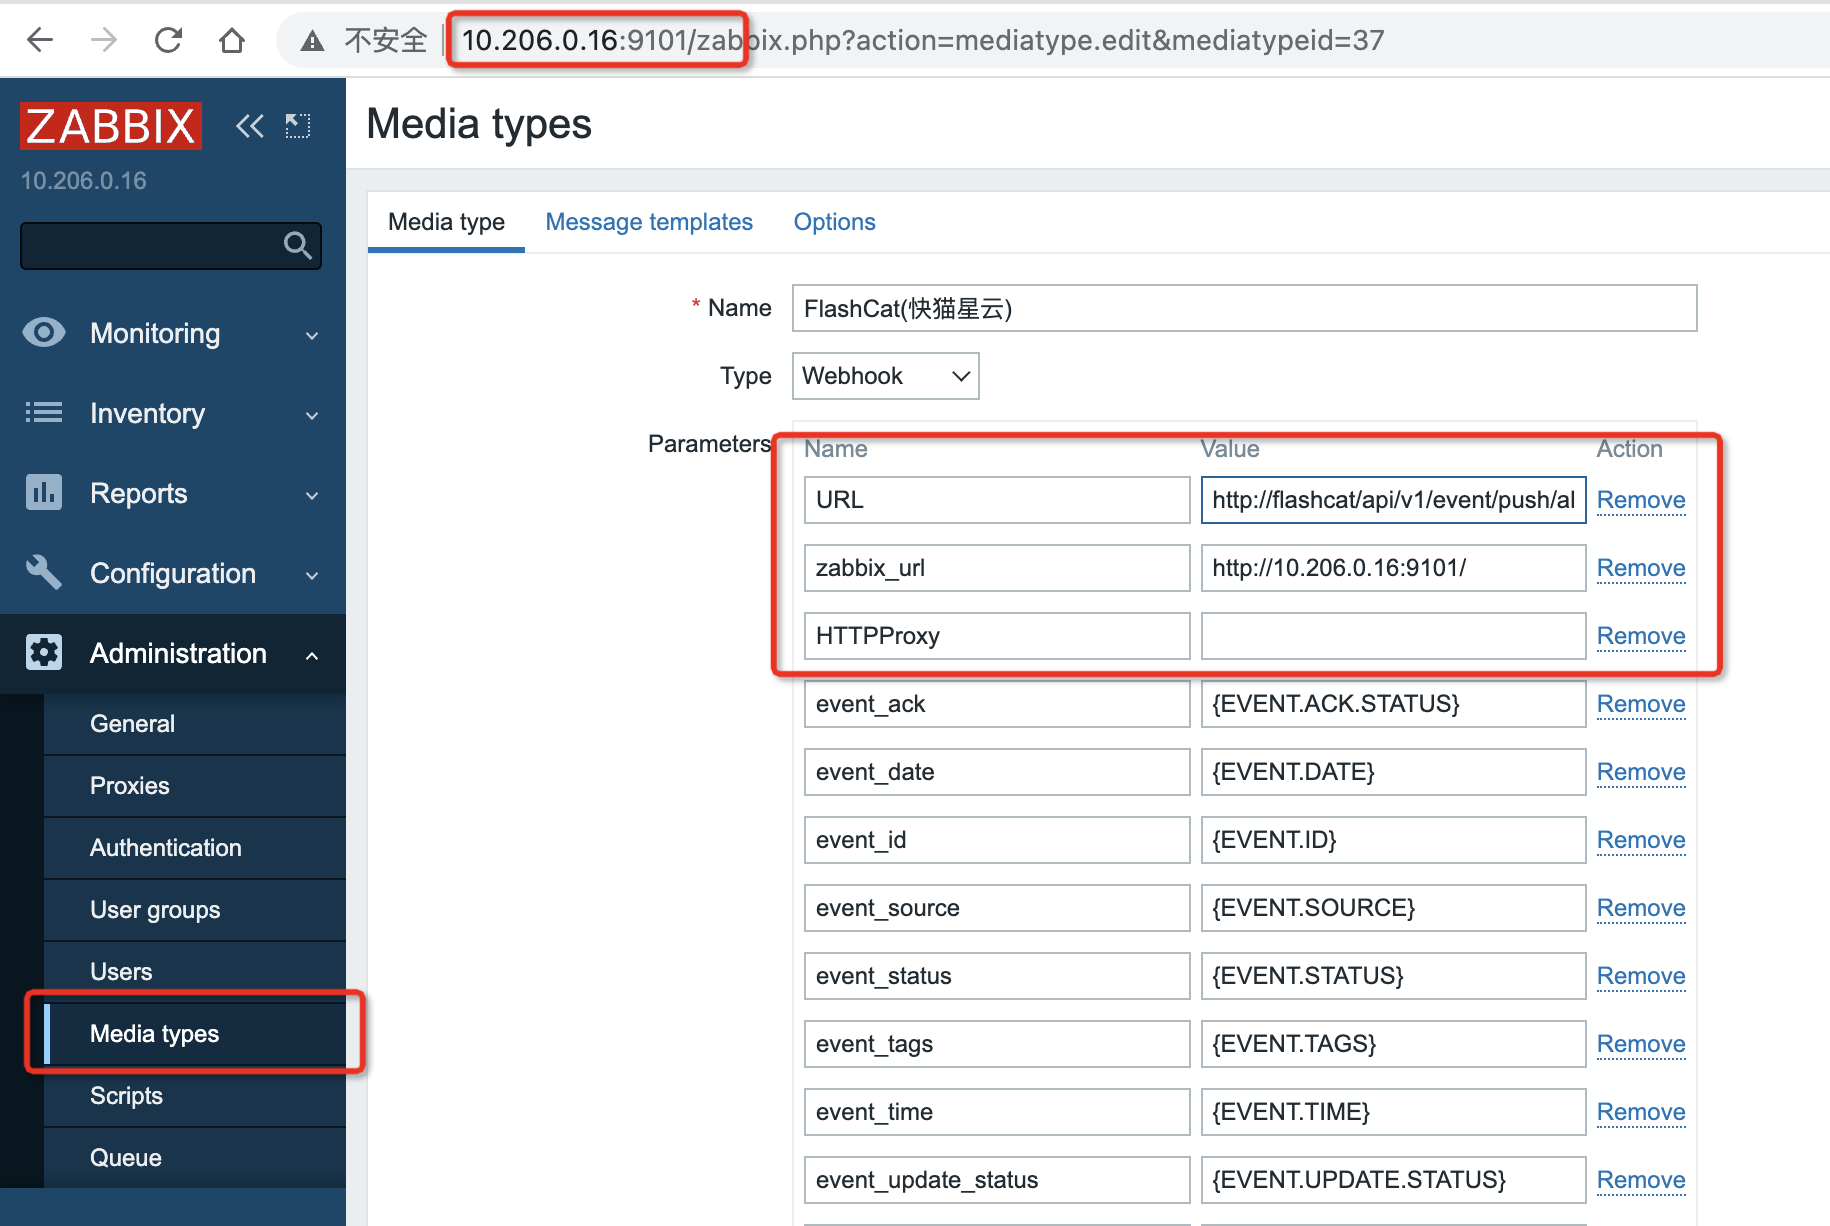
4. Click Update to save the configuration
#### Step 2: Associate Media Type with User
The media type must be associated with a user to send events. The user must have at least read permission for hosts. It is recommended to associate directly with the Admin user. Taking the Admin user as an example:
1. Log in to the Zabbix console, select `Administration > Users`, select Admin user, select media, select Add to enter the editing window:
* Type: Select the Flashduty media type created above
* Send To: Fill in N/A
* Keep other configurations unchanged using default settings
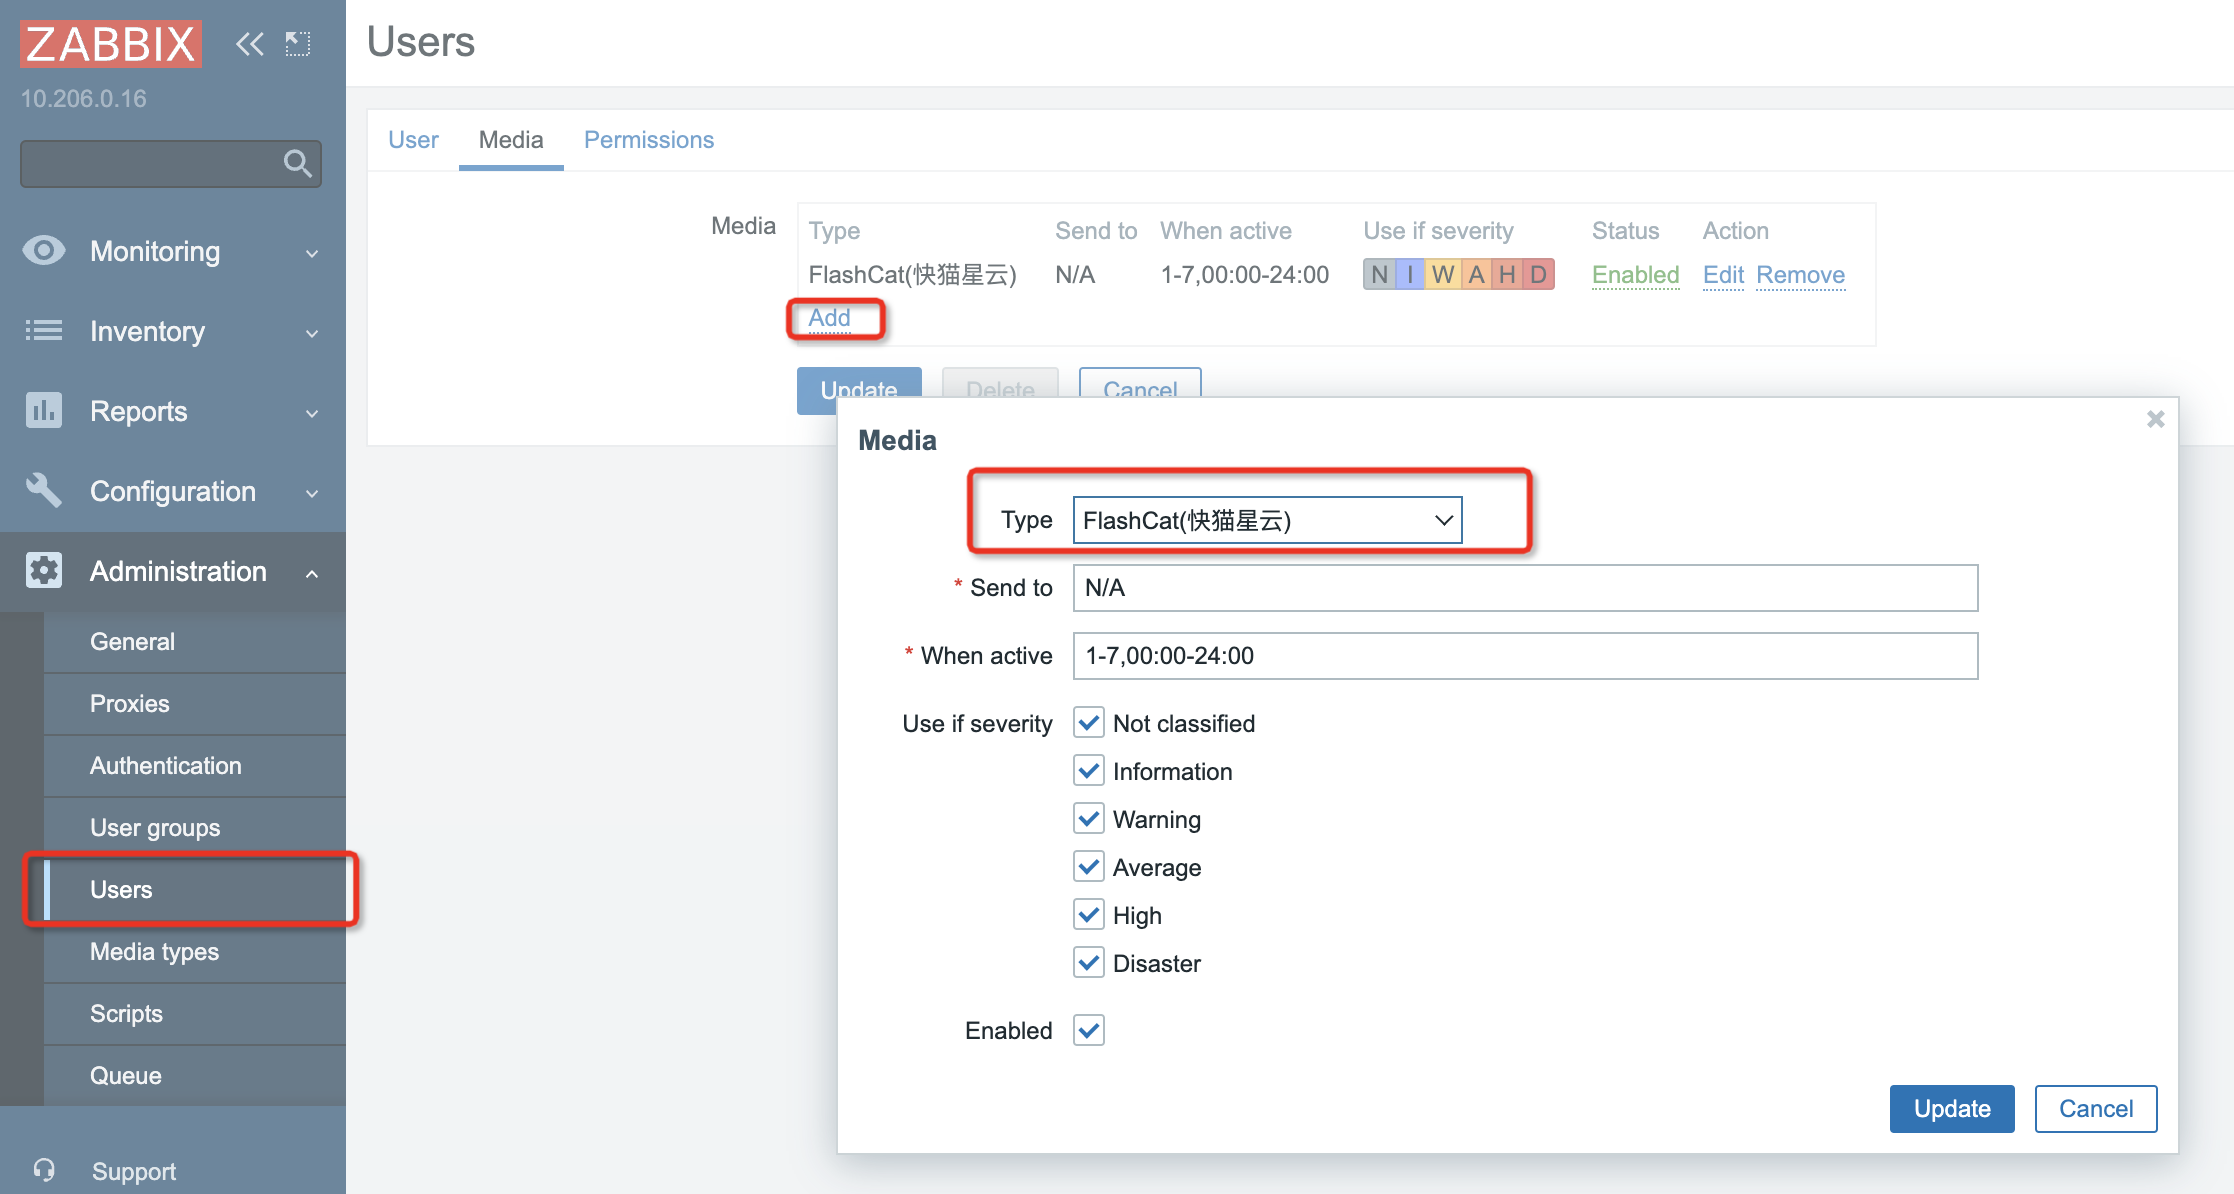
2. Click Add button to exit the add media window
3. Click Update button to exit the edit user page
#### Step 3: Create Action
Sending notifications is one of the operations executed by actions in Zabbix. Therefore, to establish a notification, log in to the Zabbix console, select `Configuration > Actions`, then:
1. Click `Create action` to enter the action editing page
* Name: Fill in "Send To Flashduty"
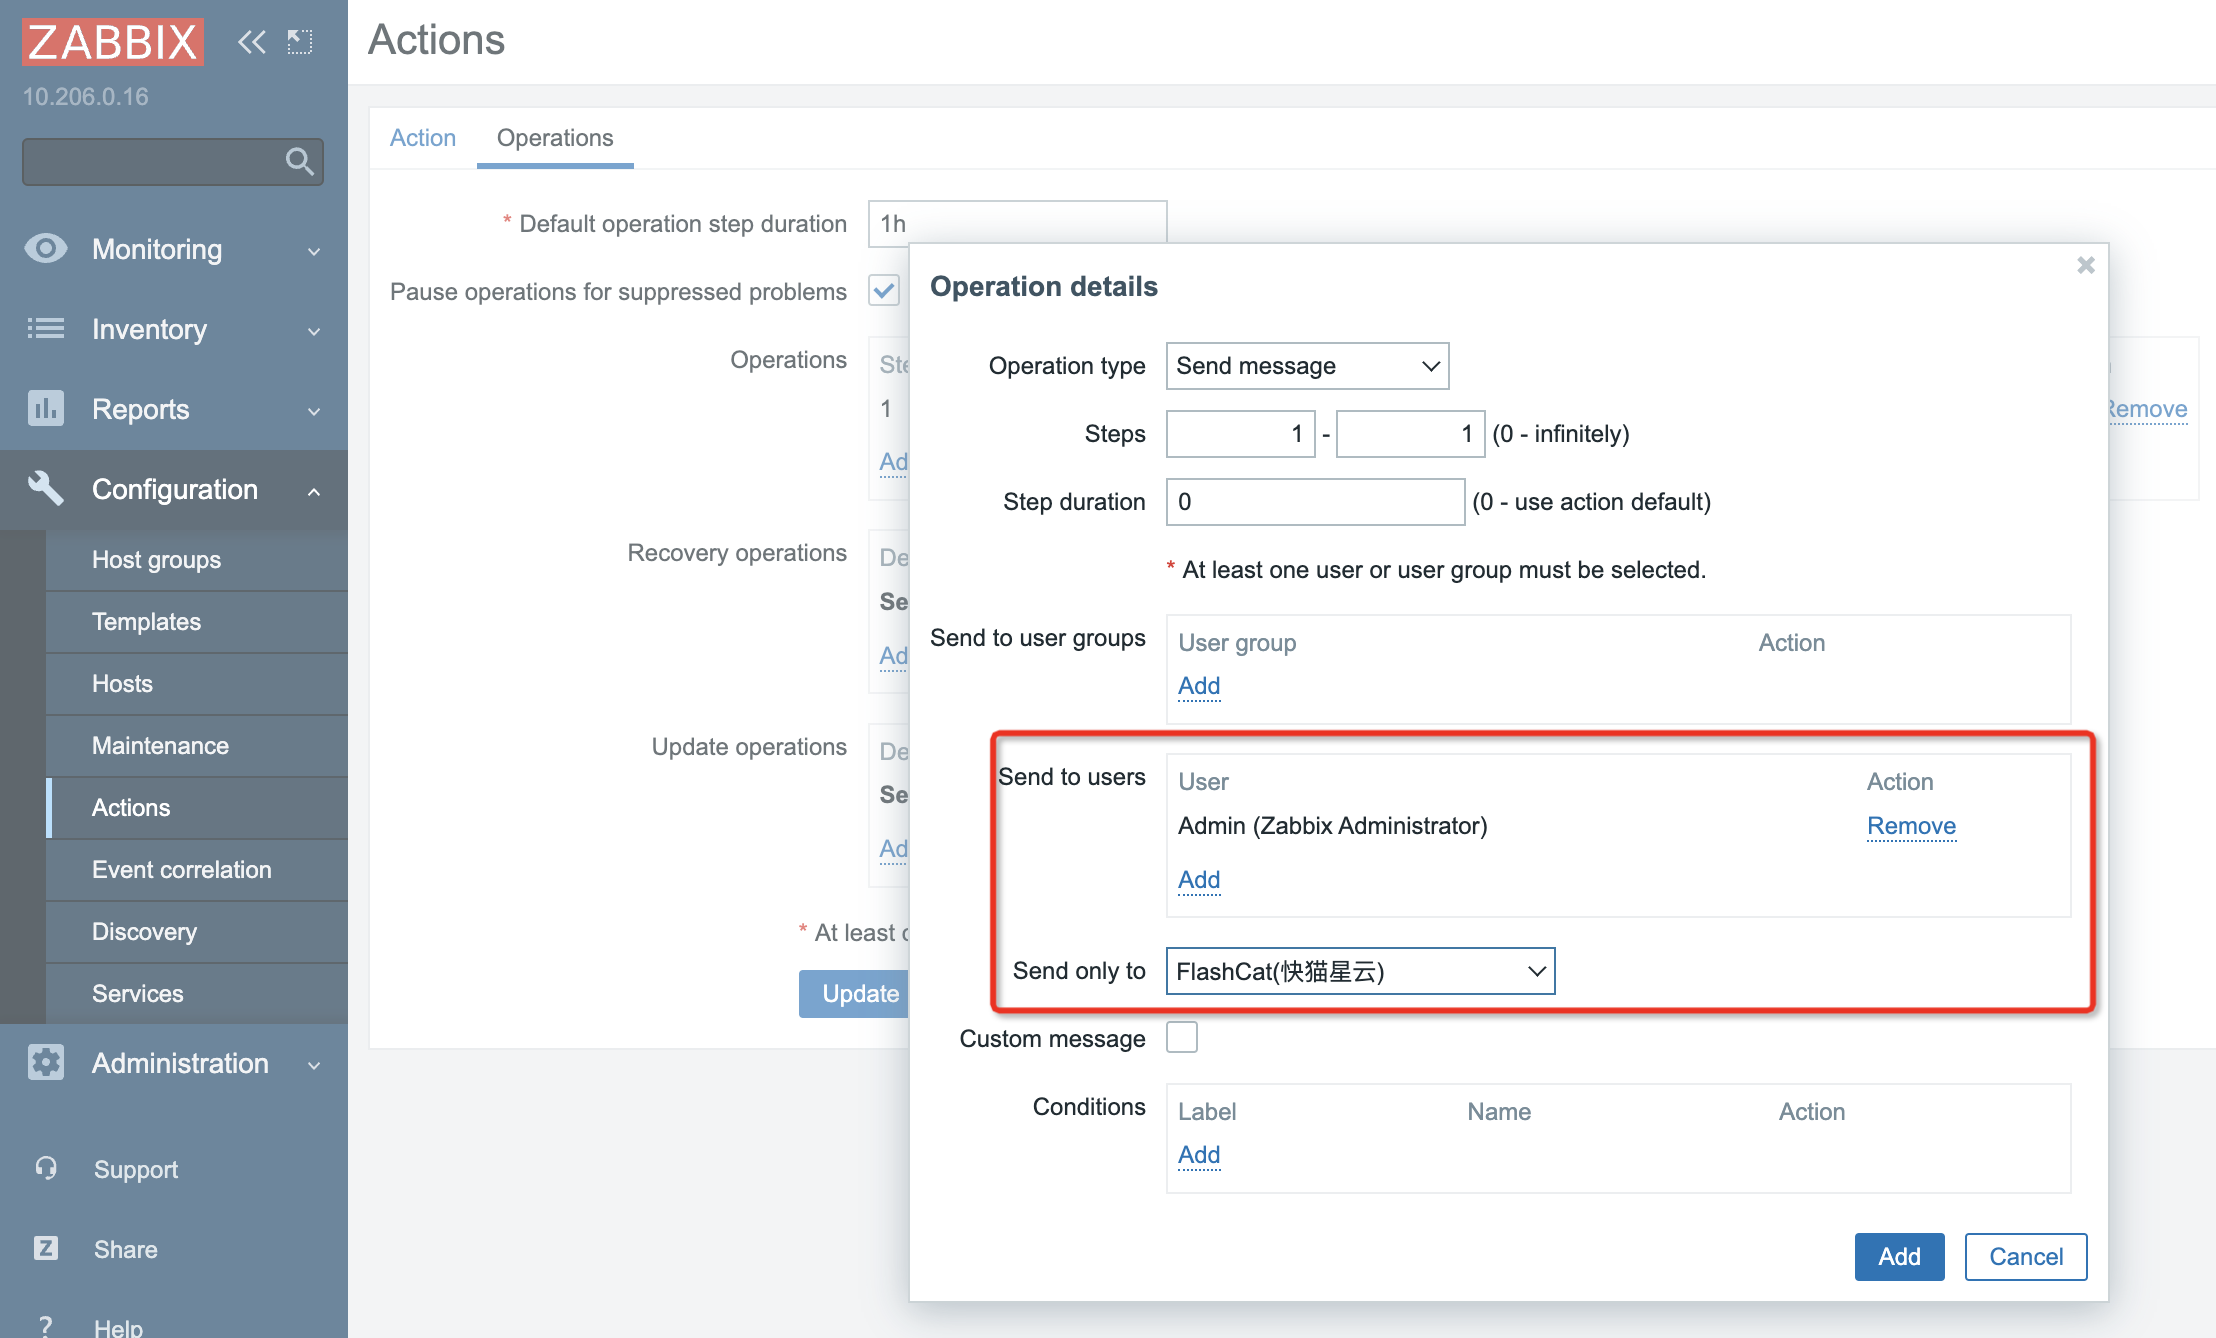
2. Select `Operations`, add notification sending configurations for three scenarios respectively:
* In the Operations configuration item, click Add button to enter the configuration window
* Send to users: Select the user newly created or configured above
* Send only to: Select Flashduty media type
* Keep other configurations as default
* Click Add button to complete this configuration item
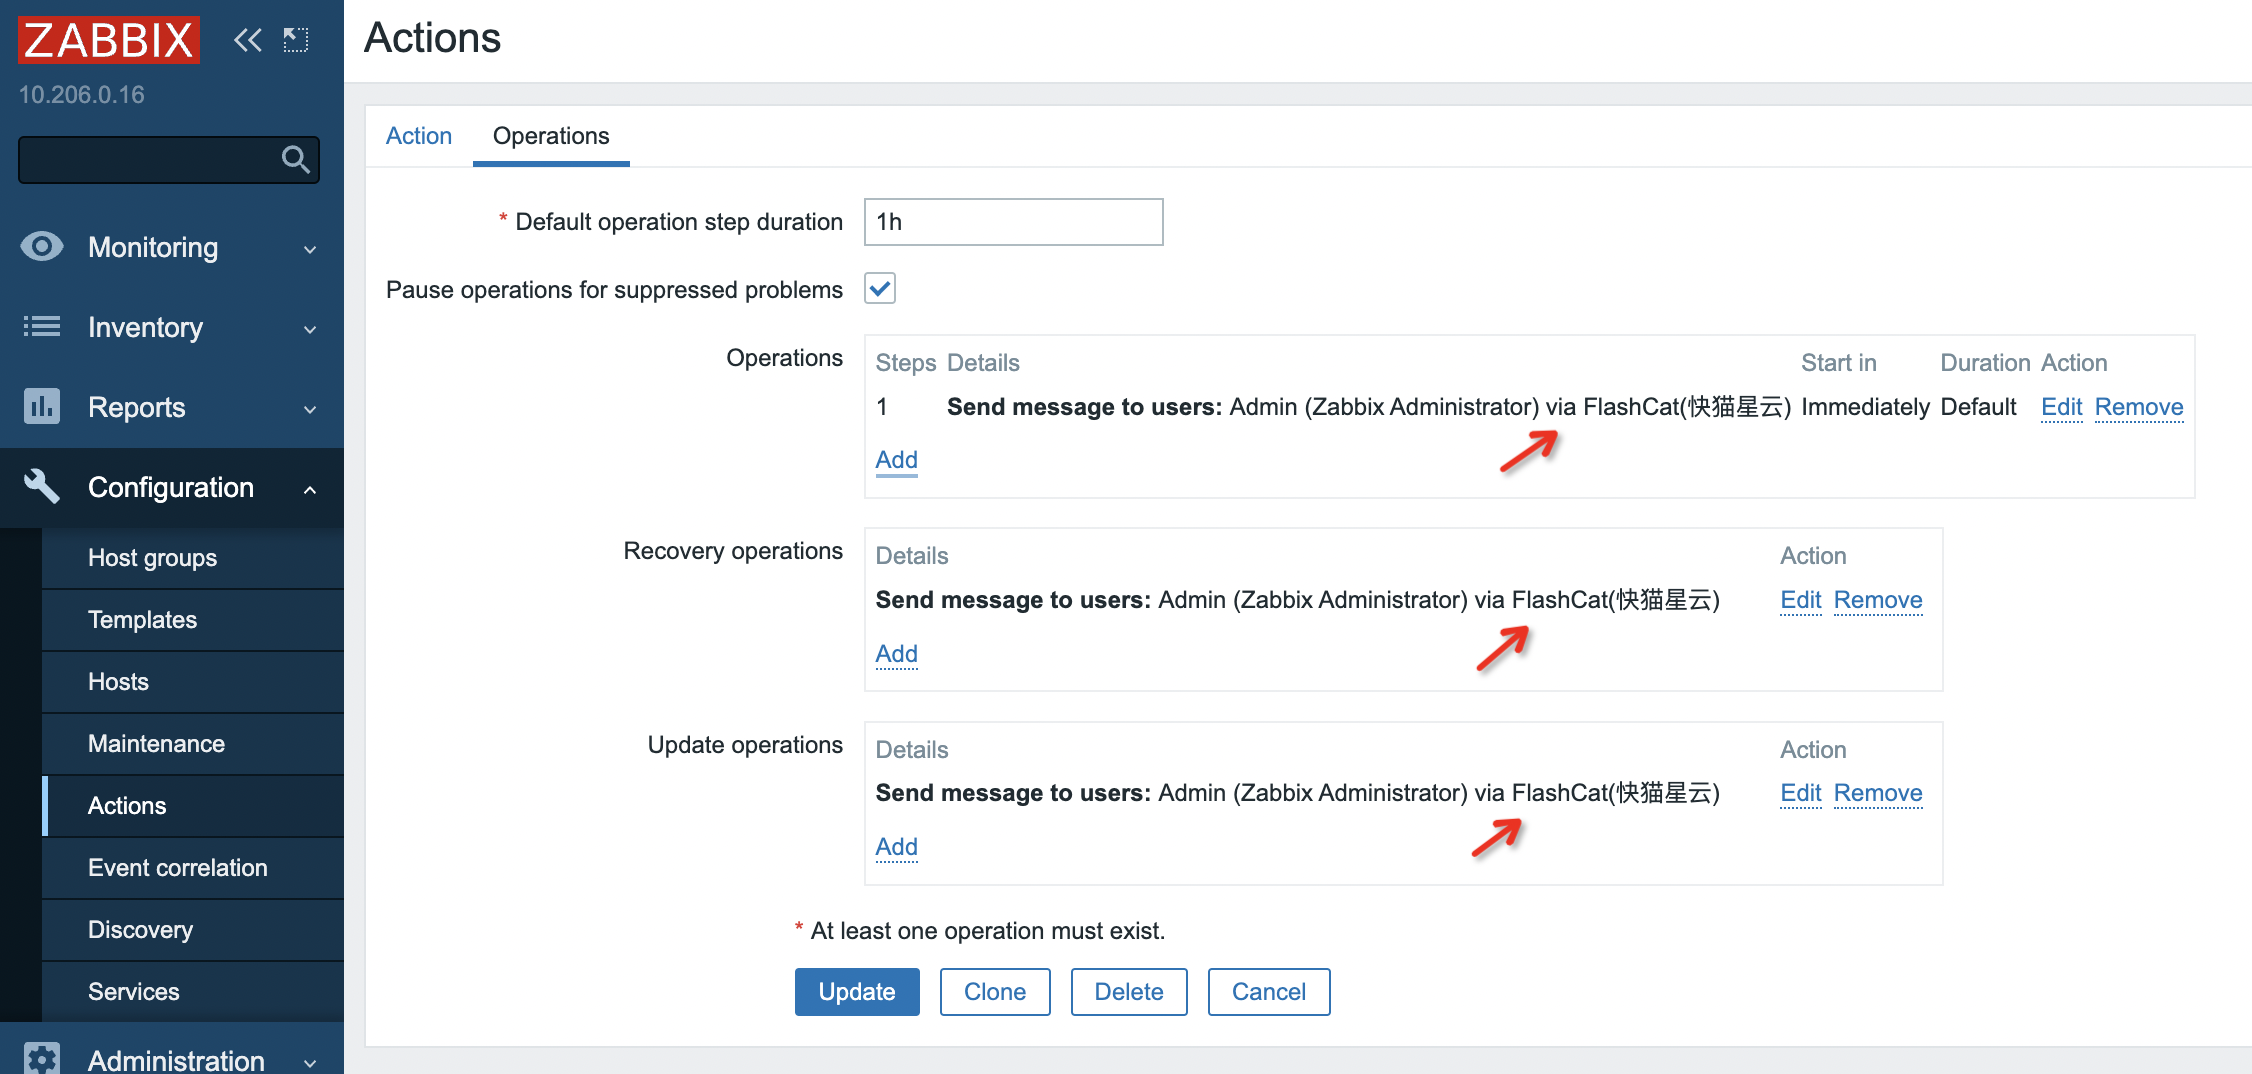
* Repeat the above steps to complete the configuration of `Recovery operations` and `Update operations`
#### Step 4: Send Events to Flashduty
Log in to the Zabbix console, select `Monitoring > Problems` to view the latest alert list.
1. Click Actions, you can see the message notification results in the popup
2. Find the Flashduty corresponding log, if the Status is `Sent`, it means the notification was successful. Otherwise, troubleshoot according to the prompts
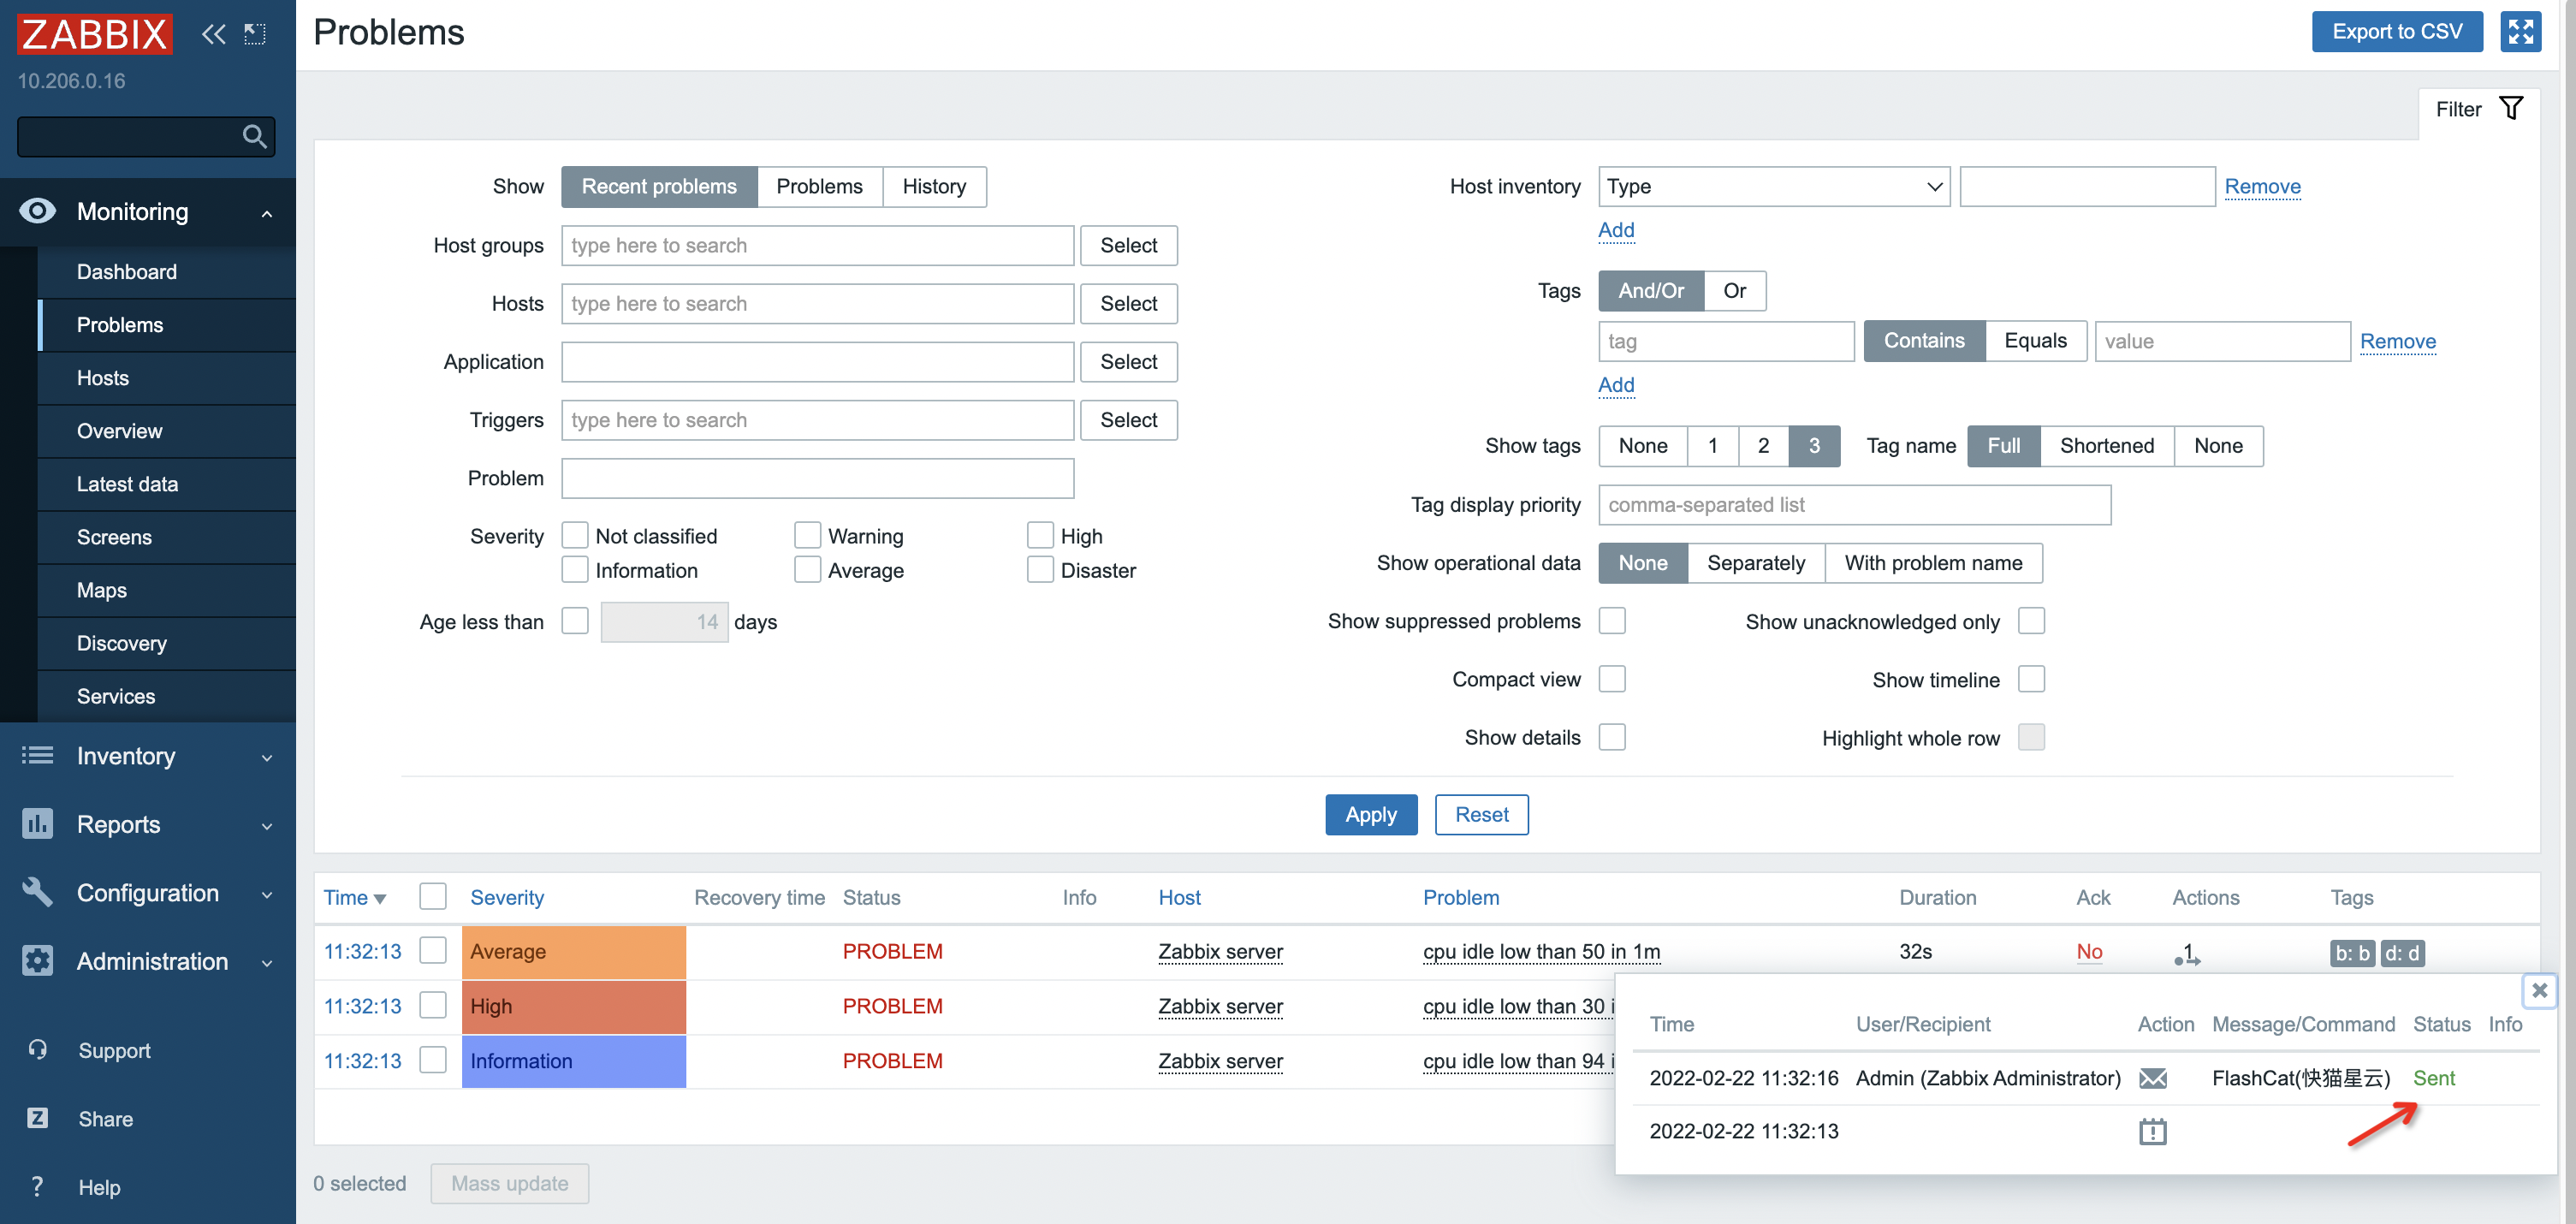
3. Return to the integration list, if the latest event time is displayed, it means the configuration is successful and events are being received
4. Done
### Version 3.x\~4.x
#### Step 1: Define Flashduty Media Type
1. Log in to the Zabbix console, select `Administration > Media Types`, click `Create media type` button in the top right corner to enter the editing page
2. On the editing page, select `Script` for Type, fill in the following content for Parameter in order (do not adjust the order, leave empty if no value, the script gets parameter values in sequence):
* `{ALERT.SUBJECT}`: Alert title, keep as first parameter
* `{ALERT.MESSAGE}`: Alert message, keep as second parameter
* `Flashduty webhook push URL`, simply copy the integration push URL, keep as third parameter
* `Zabbix console address`, copy directly (if your page is configured with tomcat/nginx forwarding path, please include it), used to generate alert detail page links. Leave empty if none, keep as fourth parameter
* `HTTPProxy`: If your Zabbix Server cannot directly access Flashduty services, you can set this parameter to a proxy address. Leave empty if none, keep as fifth parameter
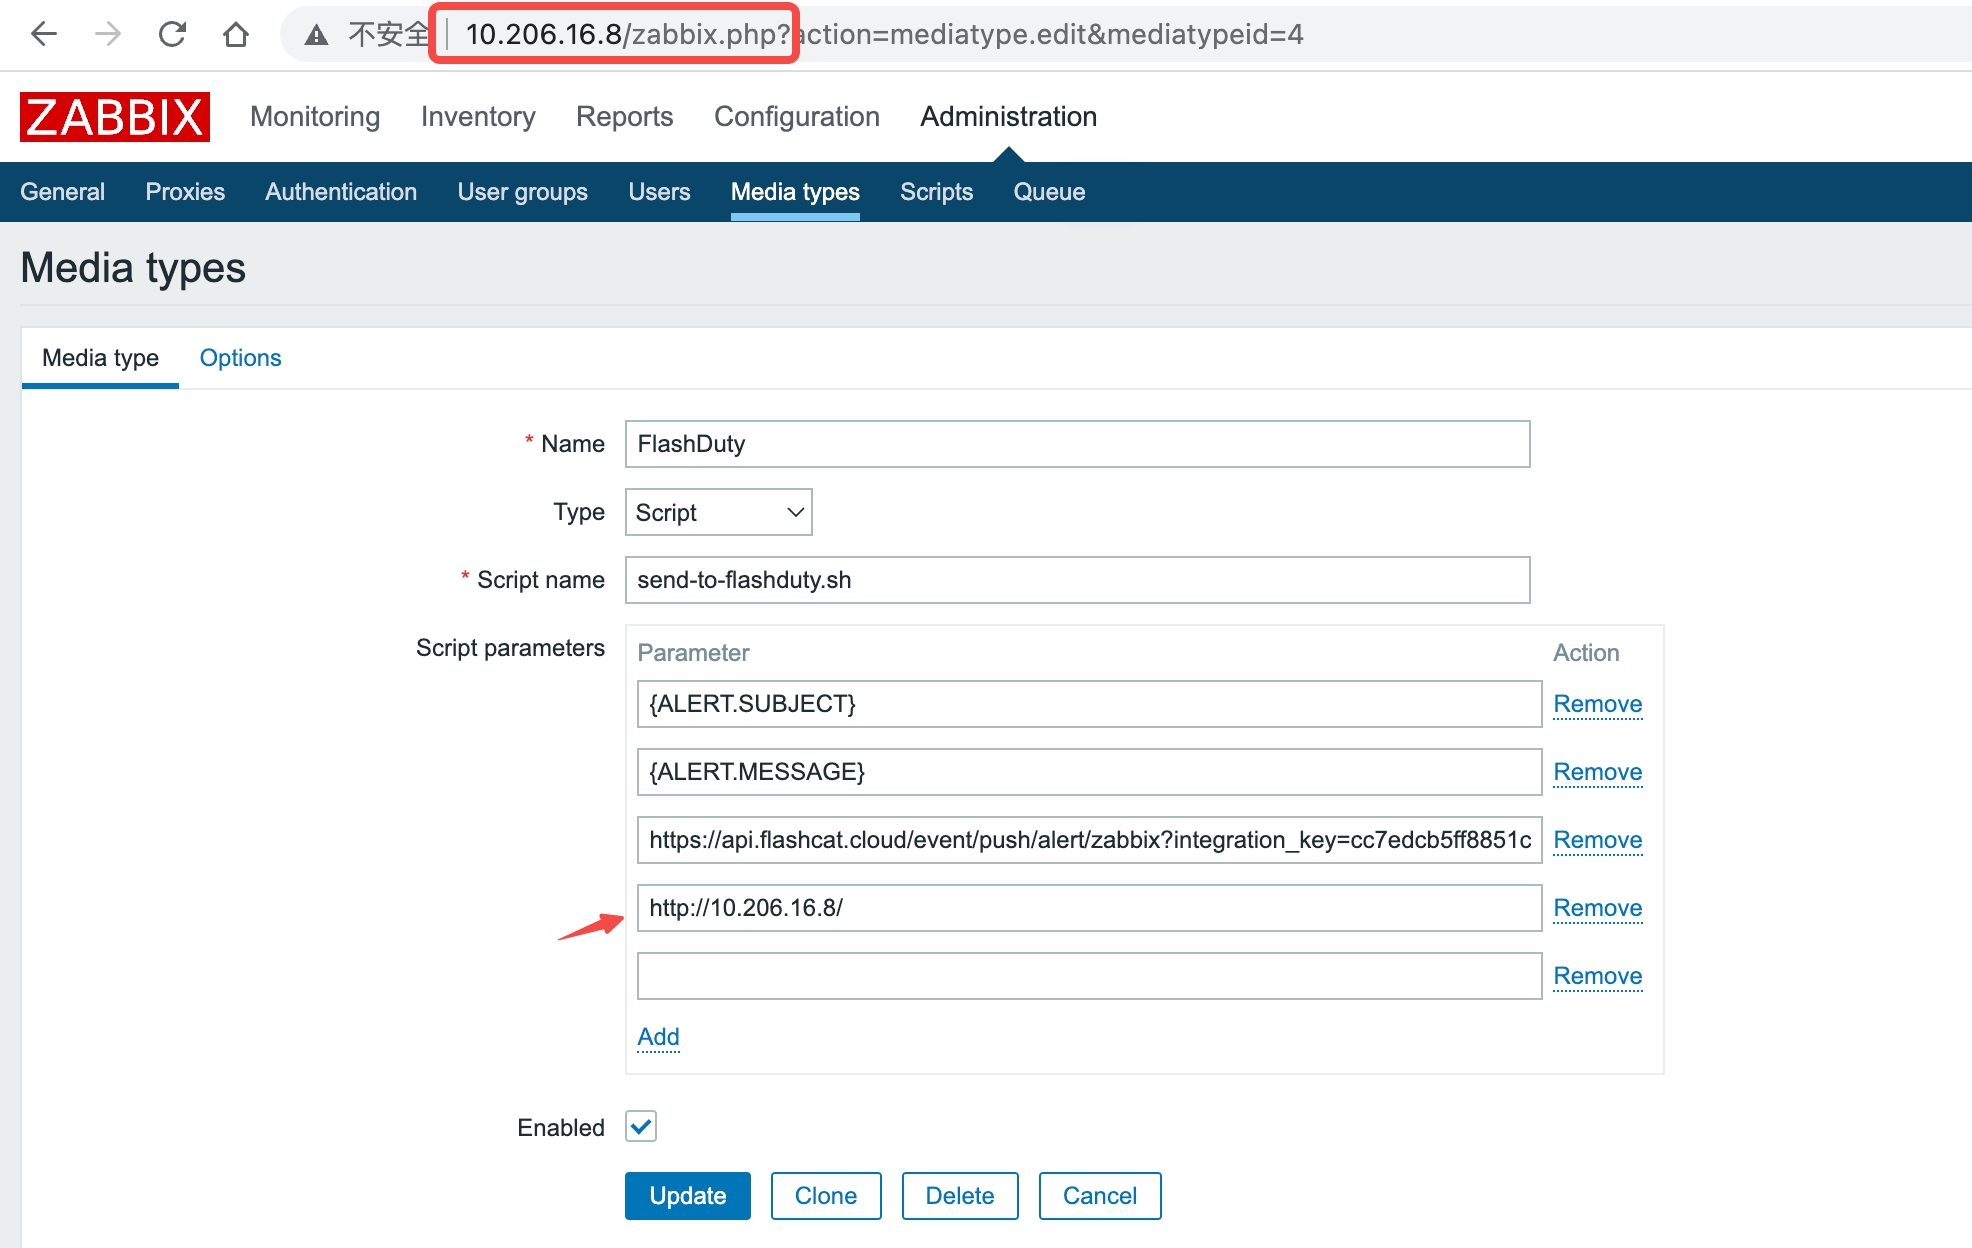
3. Fill in `send-to-flashduty.sh` for `Script name`
4. Click Update to save the configuration
5. Log in to the Zabbix server host, execute the following commands:
```
#1. Enter alert script loading directory (specific address configured in Zabbix Server configuration file `AlertScriptsPath` variable, usually `/usr/lib/zabbix/alertscripts`)
cd /usr/lib/zabbix/alertscripts
#2. Download script
wget --header="Referer: https://console.flashcat.cloud" https://download.flashcat.cloud/flashduty/integration/zabbix/send-to-flashduty.sh
#3. Change script to executable status
chmod +x send-to-flashduty.sh
```
6. Note that `the script uses curl and jq commands`, ensure that the Zabbix server process can find and execute these two commands, if not you need to install them as needed
#### Step 2: Associate Media Type with User
The media type must be associated with a user to send events. The user must have at least read permission for hosts. It is recommended to associate directly with the Admin user. Taking the Admin user as an example:
1. Log in to the Zabbix console, select `Administration > Users`, select Admin user, select media, select Add to enter the editing window:
* Type: Select the Flashduty media type created above
* Send To: Fill in N/A
* Keep other configurations unchanged using default settings
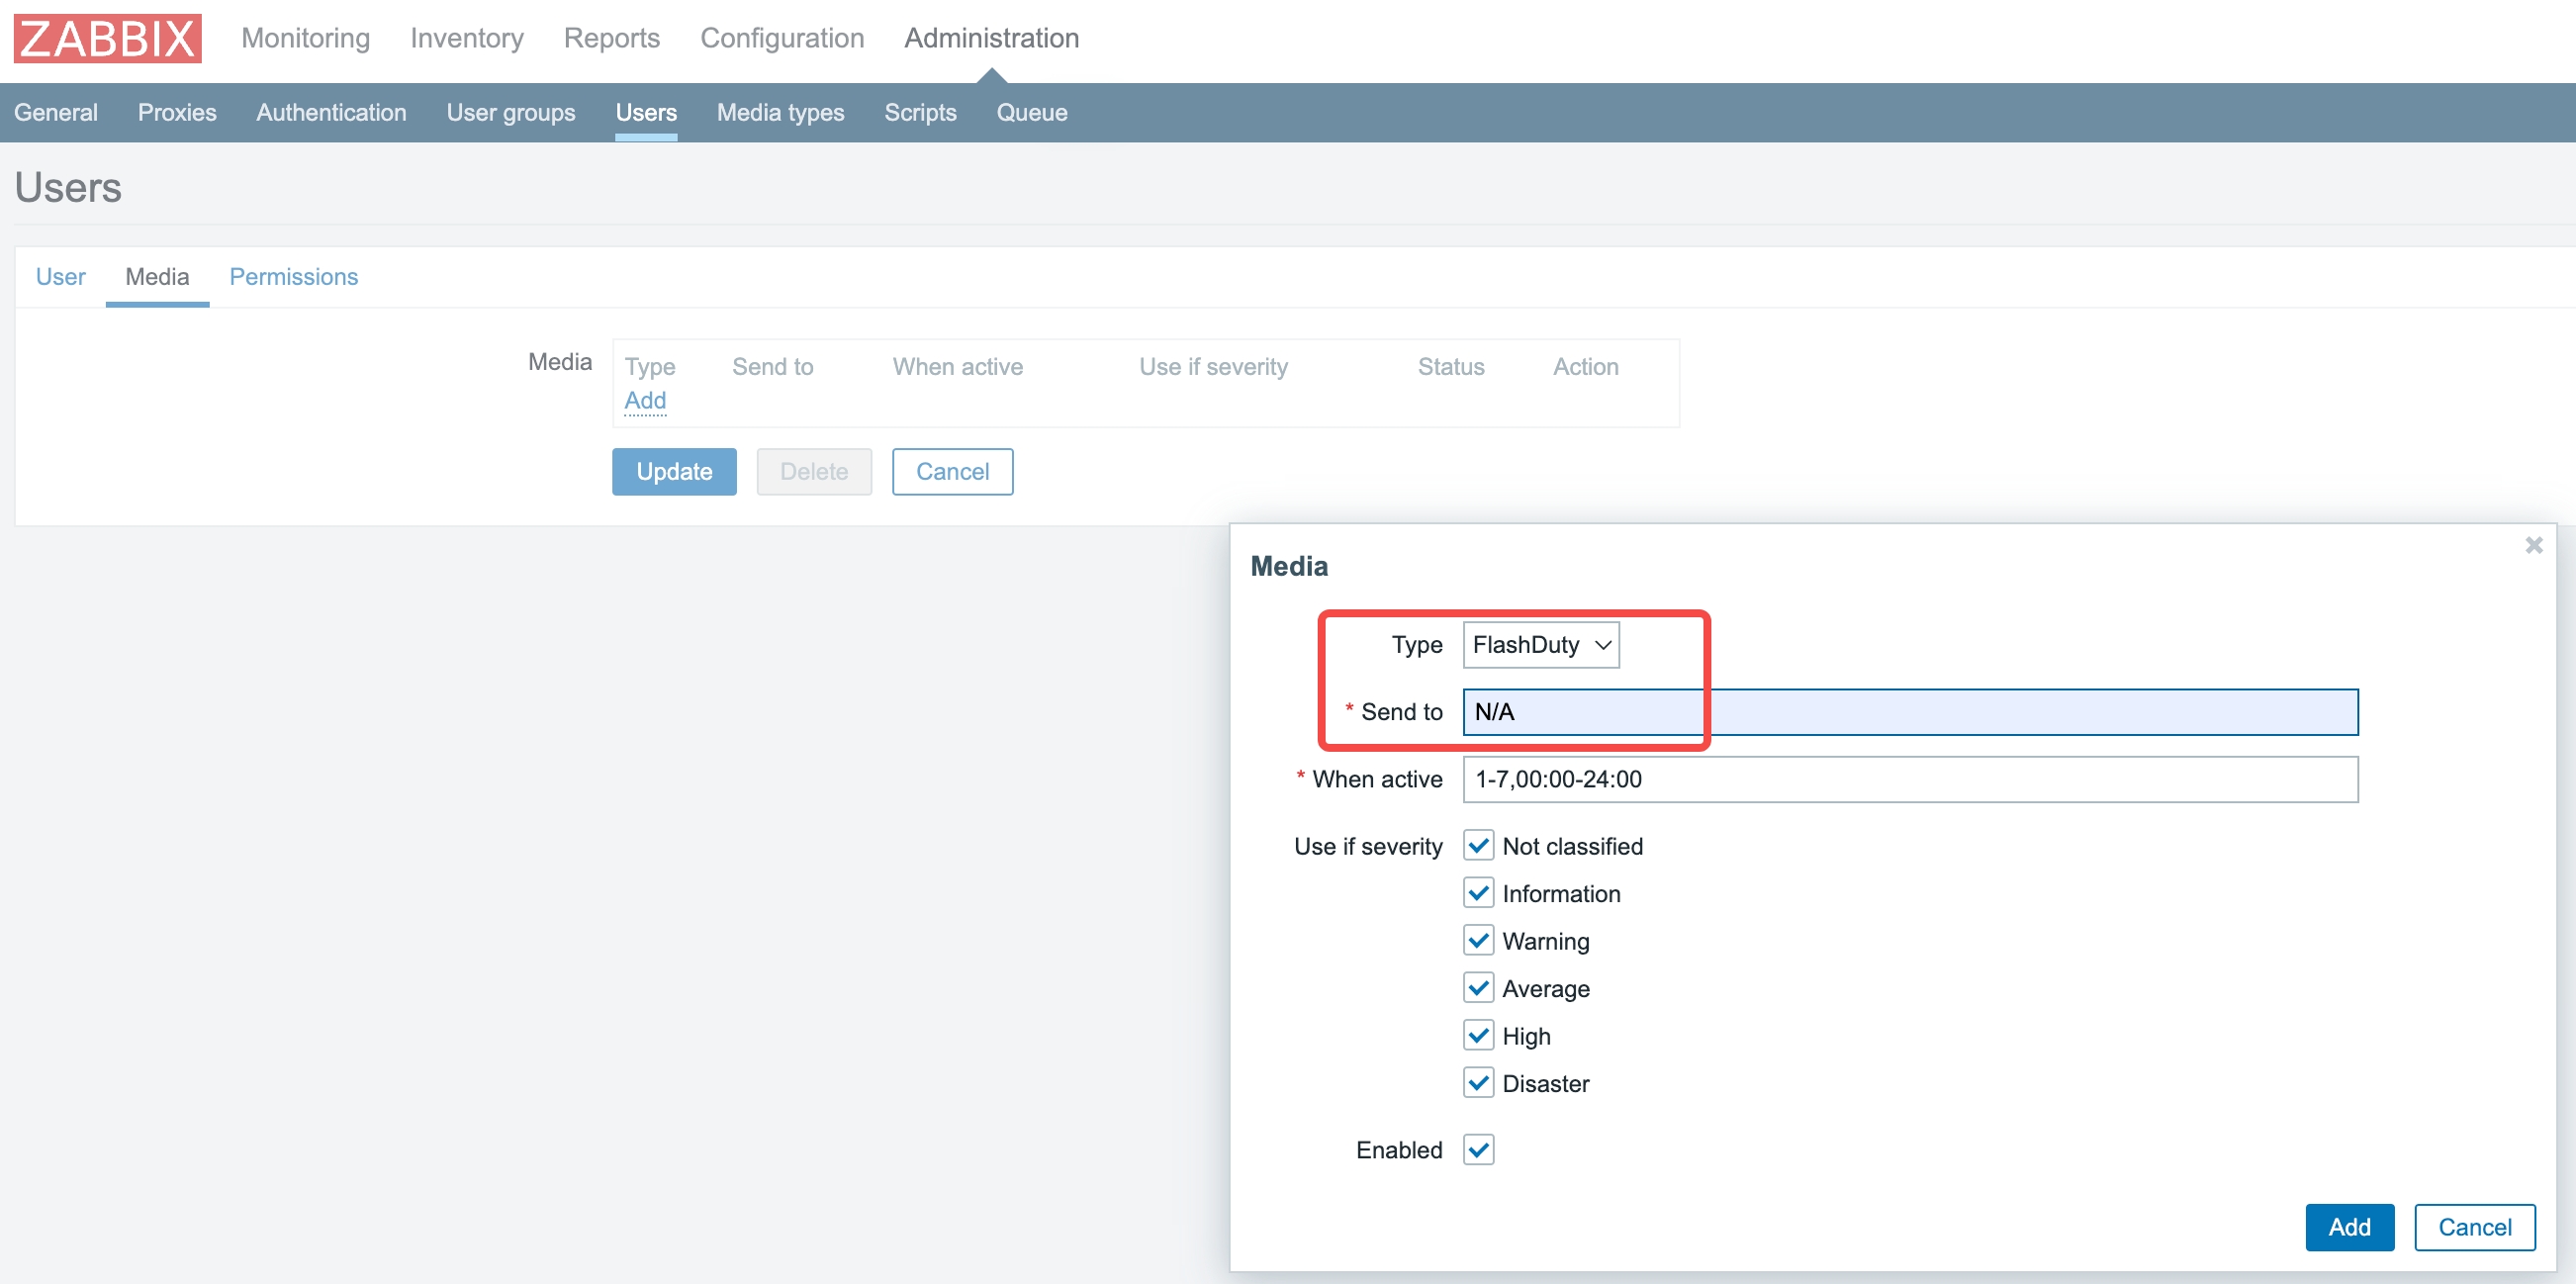
2. Click Add button to exit the add media window
3. Click Update button to exit the edit user page
#### Step 3: Create Action
Sending notifications is one of the operations executed by actions in Zabbix. Therefore, to establish a notification, log in to the Zabbix console, select `Configuration > Actions`, then:
1. Click `Create action` to enter the action editing page
* Name: Fill in "Send To Flashduty"
2. Select `Operations`, update notification user configurations for three scenarios respectively:
* In the Operations configuration item, click Add button to enter the configuration window
* Send to users: Select the user newly created or configured above
* Send only to: Select Flashduty media type
* Keep other configurations as default
* Click Add button to complete this configuration item
* Repeat the above steps to complete the configuration of `Recovery operations` and `Update operations`
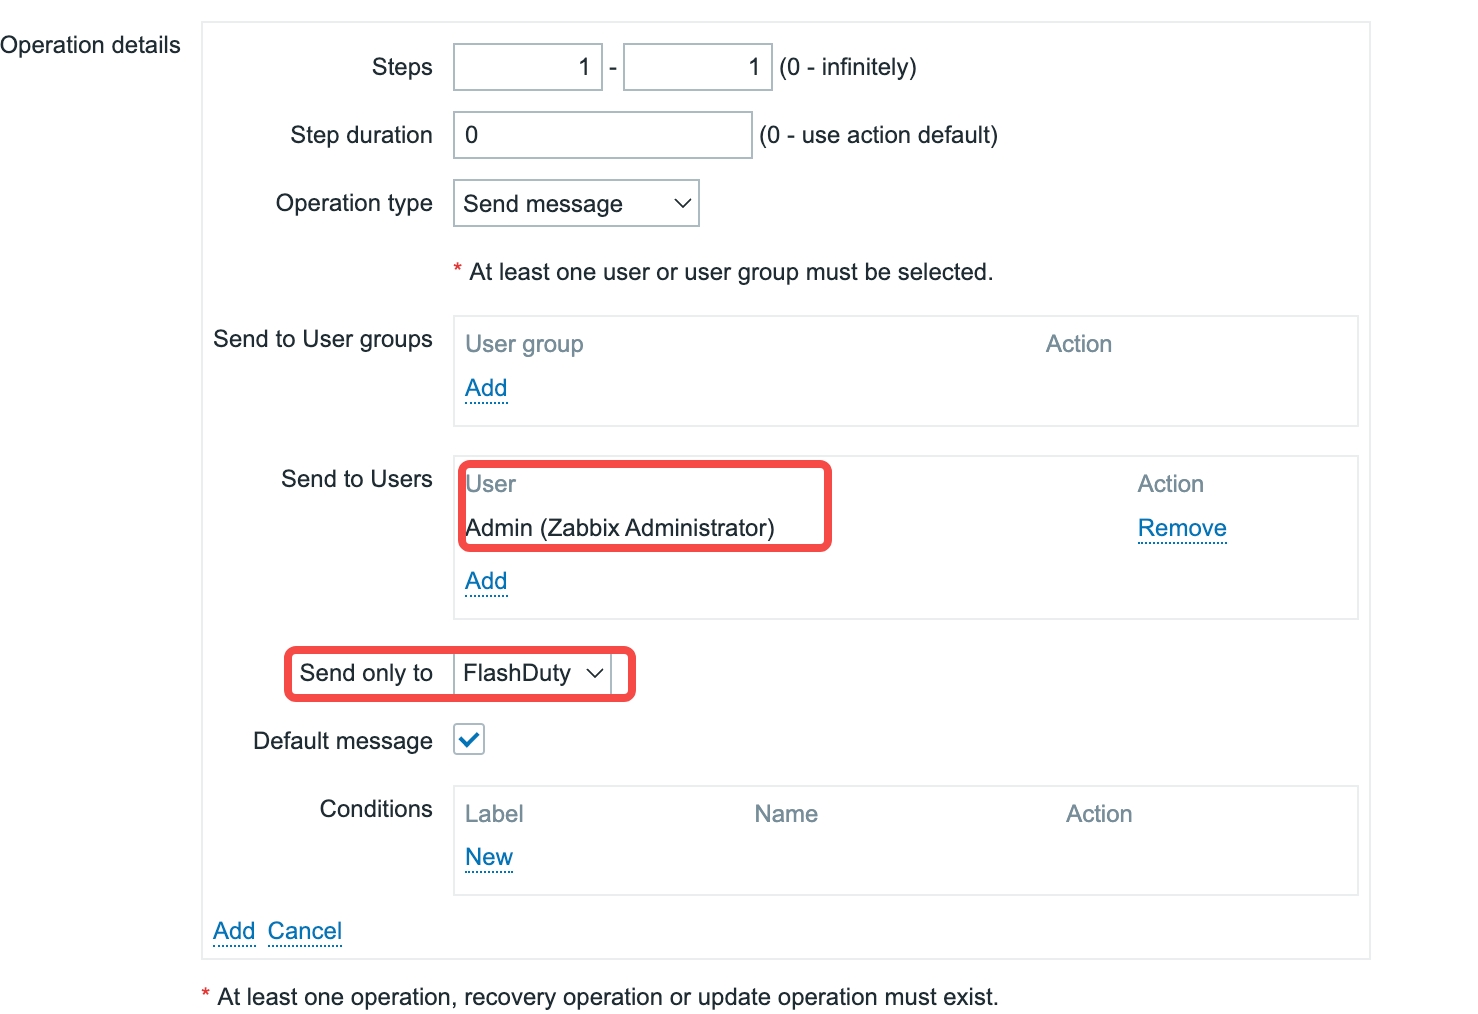
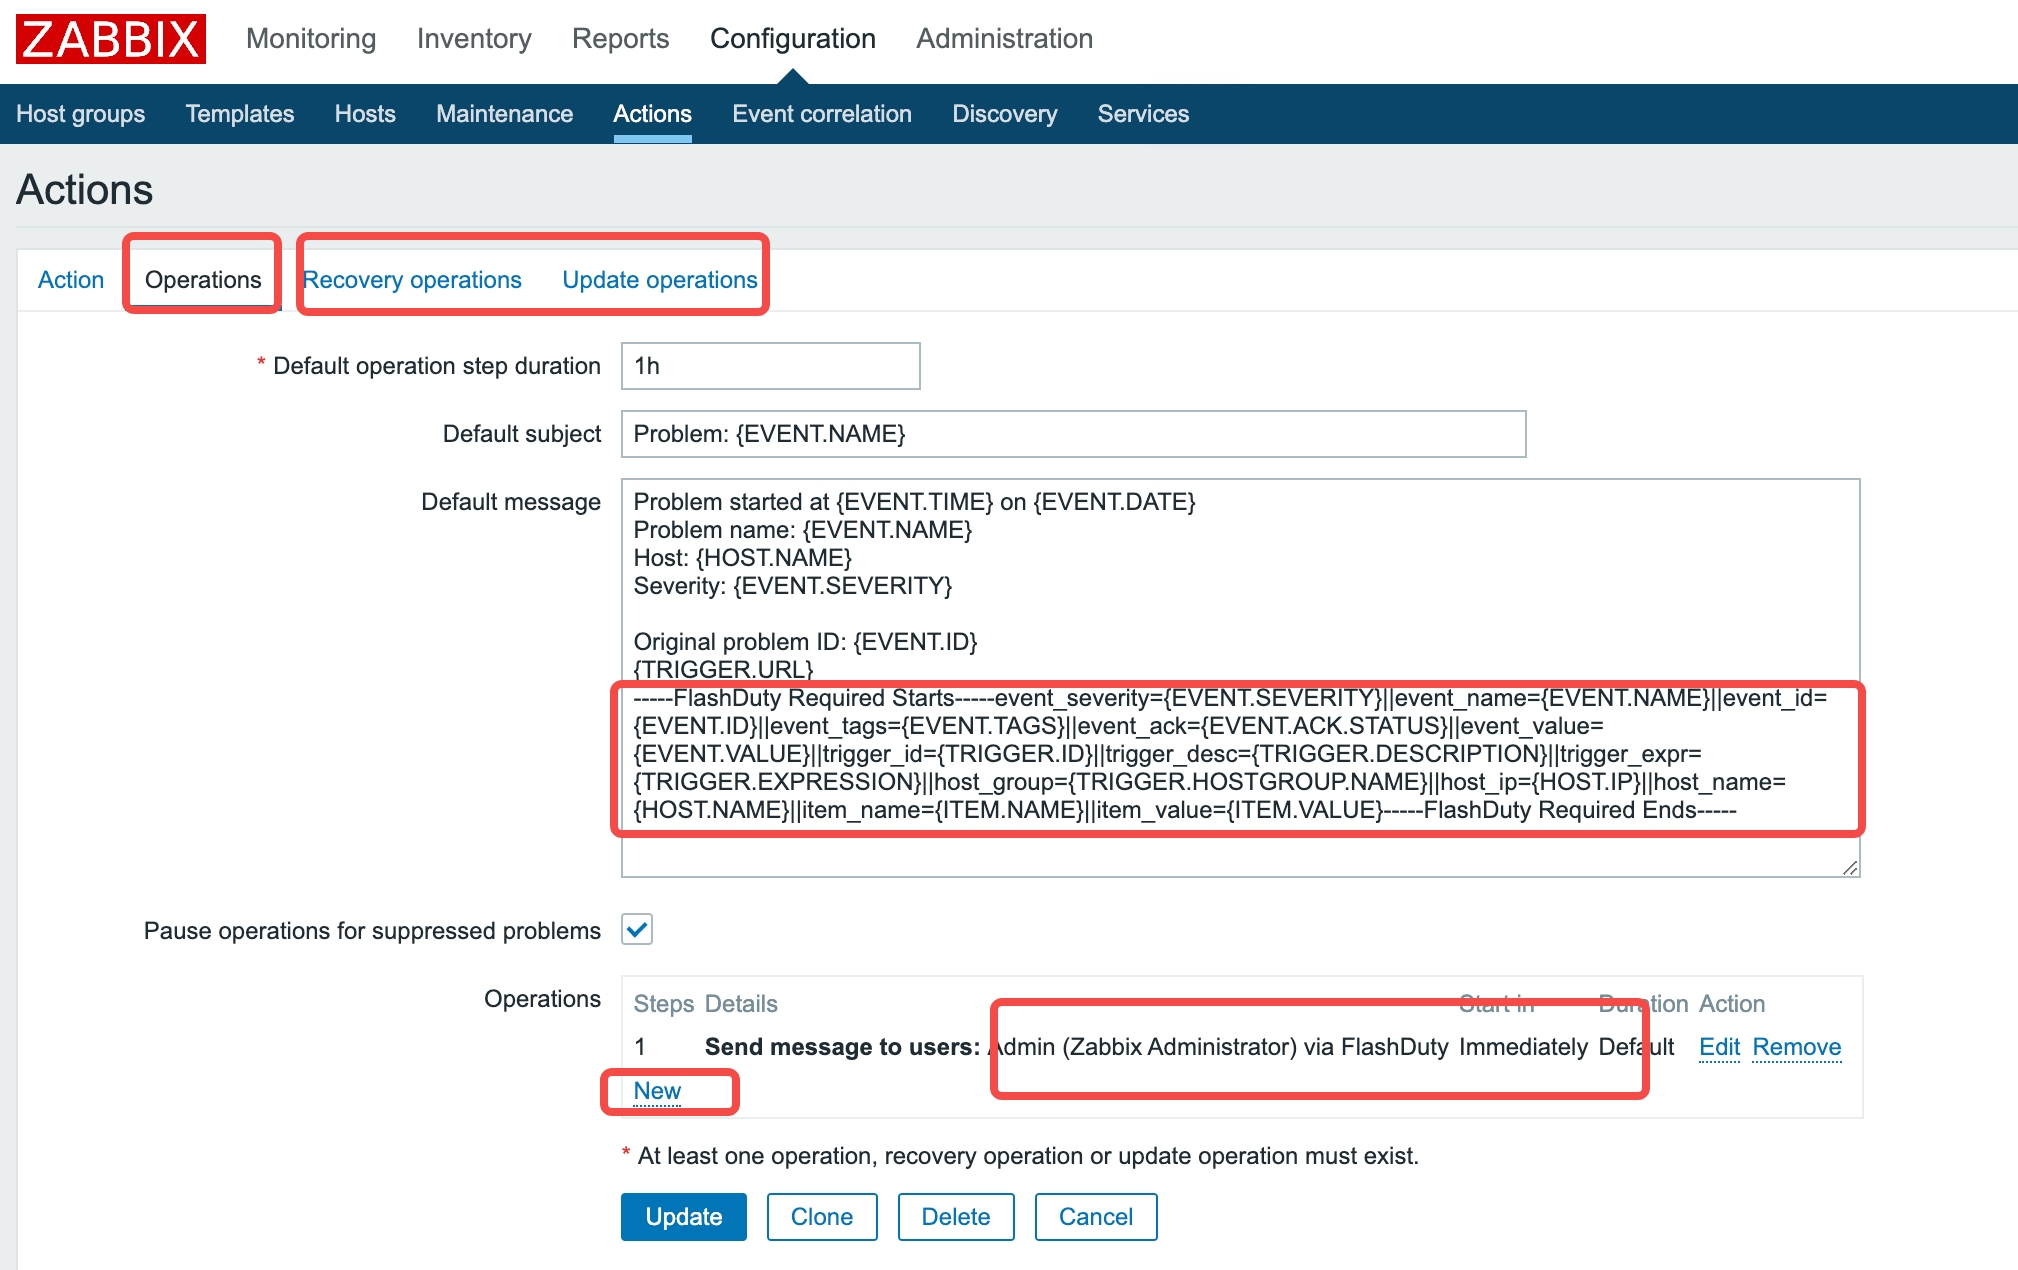
3. Select `Operations`, update notification content configurations for three scenarios respectively:
* **In the Default Message configuration item, completely copy the following content and paste it after the default content**. Flashduty will parse corresponding text after receiving events to find alert attribute information:
```
-----Flashduty Required Starts-----event_severity={TRIGGER.SEVERITY}||event_name={TRIGGER.NAME}||event_id={EVENT.ID}||event_tags={EVENT.TAGS}||event_ack={EVENT.ACK.STATUS}||event_value={EVENT.VALUE}||trigger_id={TRIGGER.ID}||trigger_desc={TRIGGER.DESCRIPTION}||trigger_expr={TRIGGER.EXPRESSION}||host_group={TRIGGER.HOSTGROUP.NAME}||host_ip={HOST.IP}||host_name={HOST.NAME}||item_name={ITEM.NAME}||item_value={ITEM.VALUE}-----Flashduty Required Ends-----
```
* Repeat the above steps to complete the configuration of `Recovery operations` and `Update operations`
#### Step 4: Send Events to Flashduty
Log in to the Zabbix console, select Monitoring > Problems to view the latest alert list.
1. Click Actions, you can see the message notification results in the popup
2. Find the Flashduty corresponding log, if the Status is Sent, it means the notification was successful. Otherwise, troubleshoot according to the prompts

3. Return to the integration list, if the latest event time is displayed, it means the configuration is successful and events are being received
4. Done
## II. Status Mapping
Zabbix to Flashduty alert severity mapping:
| Zabbix | Flashduty | Status |
| -------------- | --------- | -------- |
| Disaster | Critical | Critical |
| High | Critical | Critical |
| Average | Warning | Warning |
| Warning | Warning | Warning |
| Information | Info | Info |
| Not classified | Info | Info |