> ## Documentation Index
> Fetch the complete documentation index at: https://docs.flashduty.com/llms.txt
> Use this file to discover all available pages before exploring further.

# Authing

> Configure OIDC, SAML2.0, or CAS protocol via Authing platform for single sign-on

[Authing](https://www.authing.cn/) is a provider of identity recognition and access control management. Through the Authing platform, you can login to the Flashduty management console using OIDC, SAML2.0, or CAS protocols.

## Preparation

<Steps>
  <Step title="Login or Register Authing">
    If you're a new user, you need to create a user pool first—follow the prompts to create one.
  </Step>

  <Step title="Create Application">
    * Select standard web application
    * Fill in application name
    * Fill in authentication URL (the URL to redirect to during SSO login)

    ![Create application](https://api.apifox.com/api/v1/projects/4169655/resources/436934/image-preview)
  </Step>

  <Step title="Record Information">
    ![Application info](https://api.apifox.com/api/v1/projects/4169655/resources/436952/image-preview)

    | Field              | Description                              |
    | ------------------ | ---------------------------------------- |
    | App ID             | Corresponds to Flashduty's Client ID     |
    | APP Secret         | Corresponds to Flashduty's Client Secret |
    | Issuer             | Corresponds to Flashduty's Issuer        |
    | Authentication URL | The URL to redirect to during SSO login  |
  </Step>
</Steps>

## Protocol Configuration

<Tabs>
  <Tab title="OIDC Protocol">
    ### 1. Enable Single Sign-On Configuration

    Open [Flashduty](https://console.flashcat.cloud) console and enable single sign-on configuration.

    ![Enable SSO](https://api.apifox.com/api/v1/projects/4169655/resources/436946/image-preview)

    ### 2. Configure Information

    Copy Authing application information to the corresponding fields:

    ![Configure info](https://api.apifox.com/api/v1/projects/4169655/resources/436951/image-preview)

    Copy the Redirect URL domain to Authing's login callback URL:

    ![Callback URL](https://api.apifox.com/api/v1/projects/4169655/resources/436957/image-preview)

    ### 3. Modify Authing Configuration

    Change id\_token signing algorithm to **RS256**:

    ![Signing algorithm](https://api.apifox.com/api/v1/projects/4169655/resources/436961/image-preview)

    Configure login control:

    ![Login control](https://api.apifox.com/api/v1/projects/4169655/resources/436964/image-preview)

    Modify permissions:

    ![Permission config](https://api.apifox.com/api/v1/projects/4169655/resources/436967/image-preview)

    ### 4. Create User and Test Login

    <Note>
      Flashduty only supports user email association, so users need to be created with email.
    </Note>

    Create user in Authing:

    ![Create user](https://api.apifox.com/api/v1/projects/4169655/resources/436973/image-preview)

    Test login using SSO URL:

    ![Test login](https://api.apifox.com/api/v1/projects/4169655/resources/436976/image-preview)

    <Tip>
      You can also visit `console.flashcat.cloud` to login via SSO.
    </Tip>

    After SSO URL redirects to the login page, use the user created in Authing to login to Flashduty console:

    ![Login page](https://api.apifox.com/api/v1/projects/4169655/resources/436980/image-preview)
  </Tab>

  <Tab title="SAML2.0 Protocol">
    <Tip>
      You can create a new application or modify an existing one. This demonstration modifies an existing application.
    </Tip>

    ### 1. Protocol Configuration

    Select SAML2.0:

    ![Select SAML](https://api.apifox.com/api/v1/projects/4169655/resources/436984/image-preview)

    Change Flashduty's single sign-on protocol to SAML and copy the ACS URL:

    ![Copy ACS](https://api.apifox.com/api/v1/projects/4169655/resources/436987/image-preview)

    Copy the ACS URL to Authing application, then save and modify the protocol type:

    ![Save config](https://api.apifox.com/api/v1/projects/4169655/resources/436989/image-preview)

    ### 2. Configure in Flashduty

    Download metadata data—click the link and save locally:

    ![Download metadata](https://api.apifox.com/api/v1/projects/4169655/resources/436990/image-preview)

    Upload to Flashduty's single sign-on configuration and save:

    ![Upload metadata](https://api.apifox.com/api/v1/projects/4169655/resources/436991/image-preview)

    ### 3. Test Login

    Test by referring to the OIDC protocol login process:

    ![Test login](https://api.apifox.com/api/v1/projects/4169655/resources/436980/image-preview)

    <Warning>
      Configuration involves both platforms. Be careful not to miss key information. If you have any issues during configuration, contact Flashduty technical support for assistance.
    </Warning>
  </Tab>

  <Tab title="CAS Protocol">
    ### 1. Enable Single Sign-On Configuration

    Open [Flashduty](https://console.flashcat.cloud) console and enable single sign-on configuration.

    ![Enable SSO](https://api.apifox.com/api/v1/projects/4169655/resources/436946/image-preview)

    ### 2. Configure Information

    Copy Authing application information to the corresponding fields:
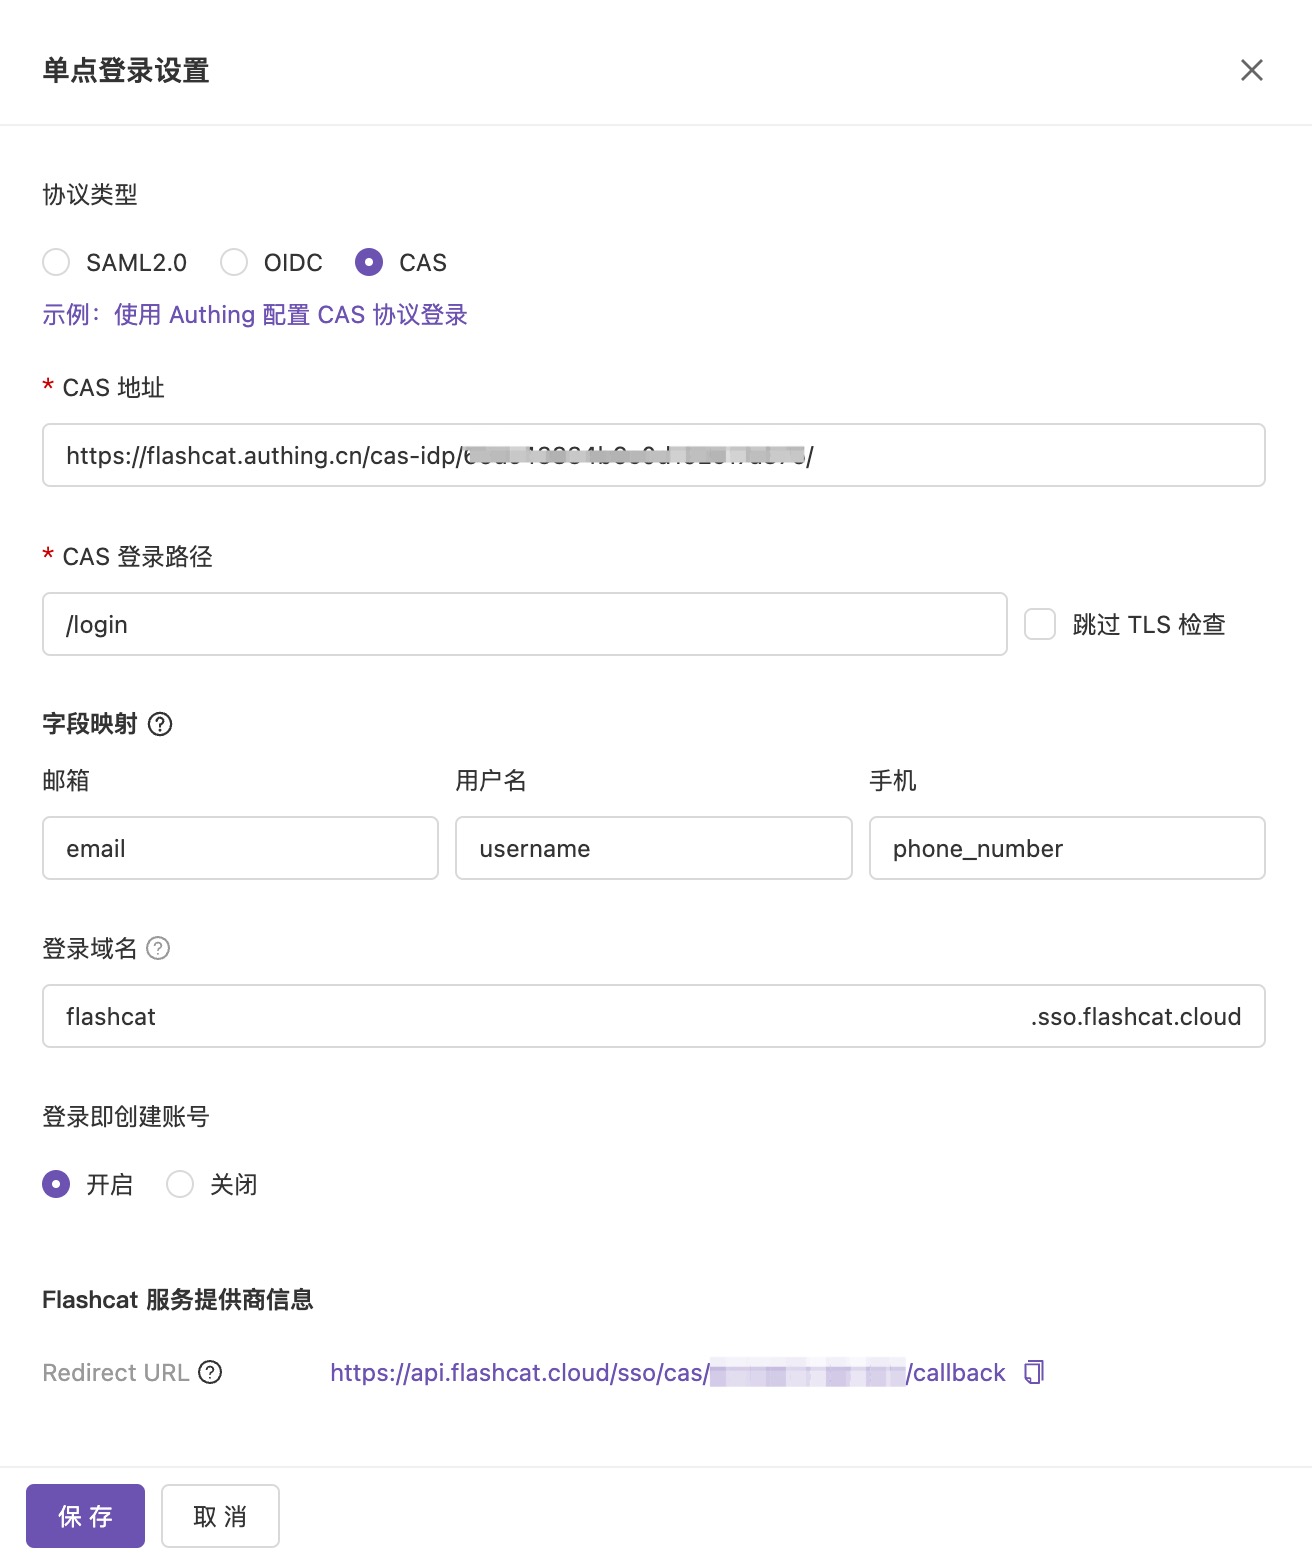
    ![CAS config](https://fcpub-1301667576.cos.ap-nanjing.myqcloud.com/flashduty/kb/cas-duty-conf.jpg)

    Copy the Redirect URL to Authing's login callback URL:
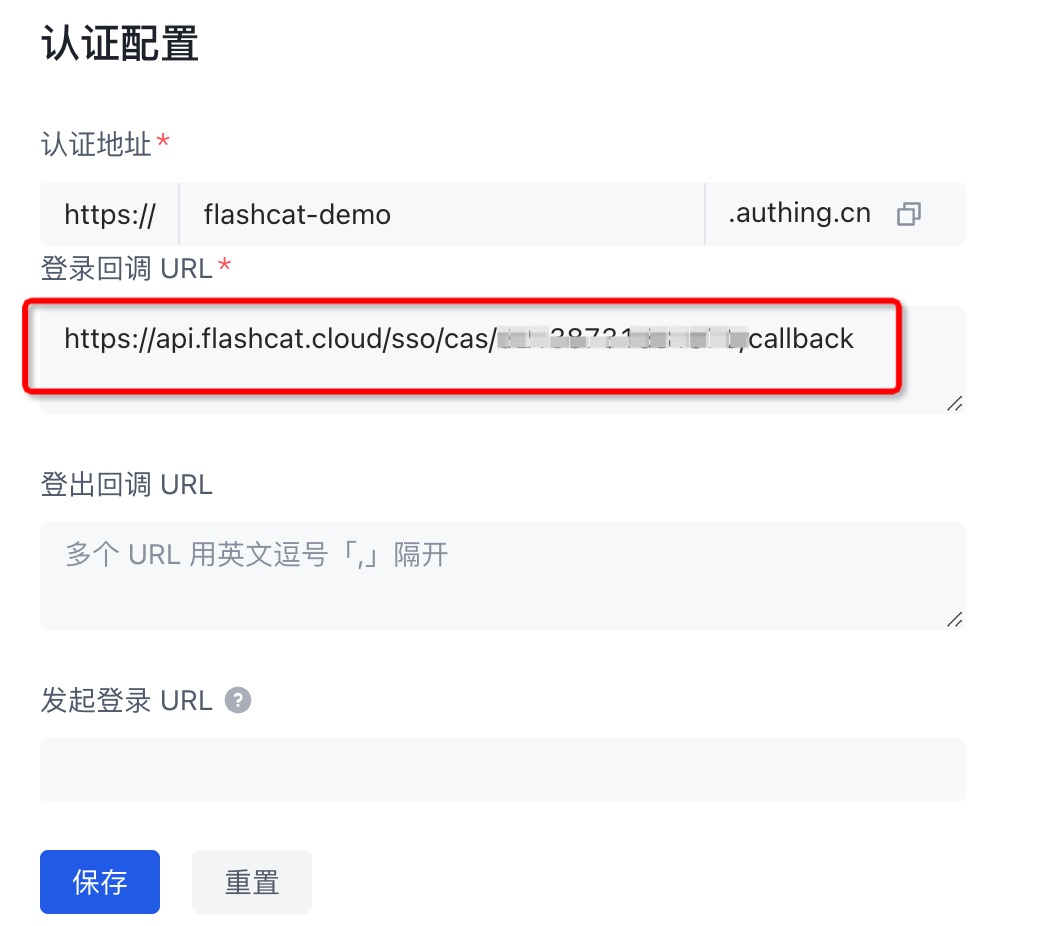
    ![Callback URL](https://fcpub-1301667576.cos.ap-nanjing.myqcloud.com/flashduty/kb/cas-auth-callback.jpg)

    ### 3. Modify Authing Configuration

    Configure as shown:

    ![Authing config](https://fcpub-1301667576.cos.ap-nanjing.myqcloud.com/flashduty/kb/cas-auth-conf.jpg)

    Configure login control:

    ![Login control](https://api.apifox.com/api/v1/projects/4169655/resources/436964/image-preview)

    Modify permissions:

    ![Permission config](https://api.apifox.com/api/v1/projects/4169655/resources/436967/image-preview)

    ### 4. Create User and Test Login

    <Note>
      Flashduty only supports user email association, so users need to be created with email.
    </Note>

    Create user in Authing:

    ![Create user](https://api.apifox.com/api/v1/projects/4169655/resources/436973/image-preview)

    Test login using SSO URL:

    ![Test login](https://fcpub-1301667576.cos.ap-nanjing.myqcloud.com/flashduty/kb/cas-login.jpg)

    After SSO URL redirects to the login page, use the user created in Authing to login to Flashduty console:

    ![Login page](https://api.apifox.com/api/v1/projects/4169655/resources/436980/image-preview)
  </Tab>
</Tabs>