

Overview
A RUM application is a container for frontend performance monitoring data, used to collect, store, and analyze real user experience data from frontend applications. An application represents a monitored frontend project, which can be a website, mobile app, or single-page application. Each application has its own uniqueapplicationId and clientToken, used to identify data sources and ensure data security. After the application is created, you need to integrate the SDK into your frontend code to start data collection and monitoring.
Application Permissions
To meet the data security requirements of different business scenarios, RUM applications provide flexible access level settings:In private applications, if other members need to view content, they can be temporarily authorized to access it by sharing the incident link.
Create Application
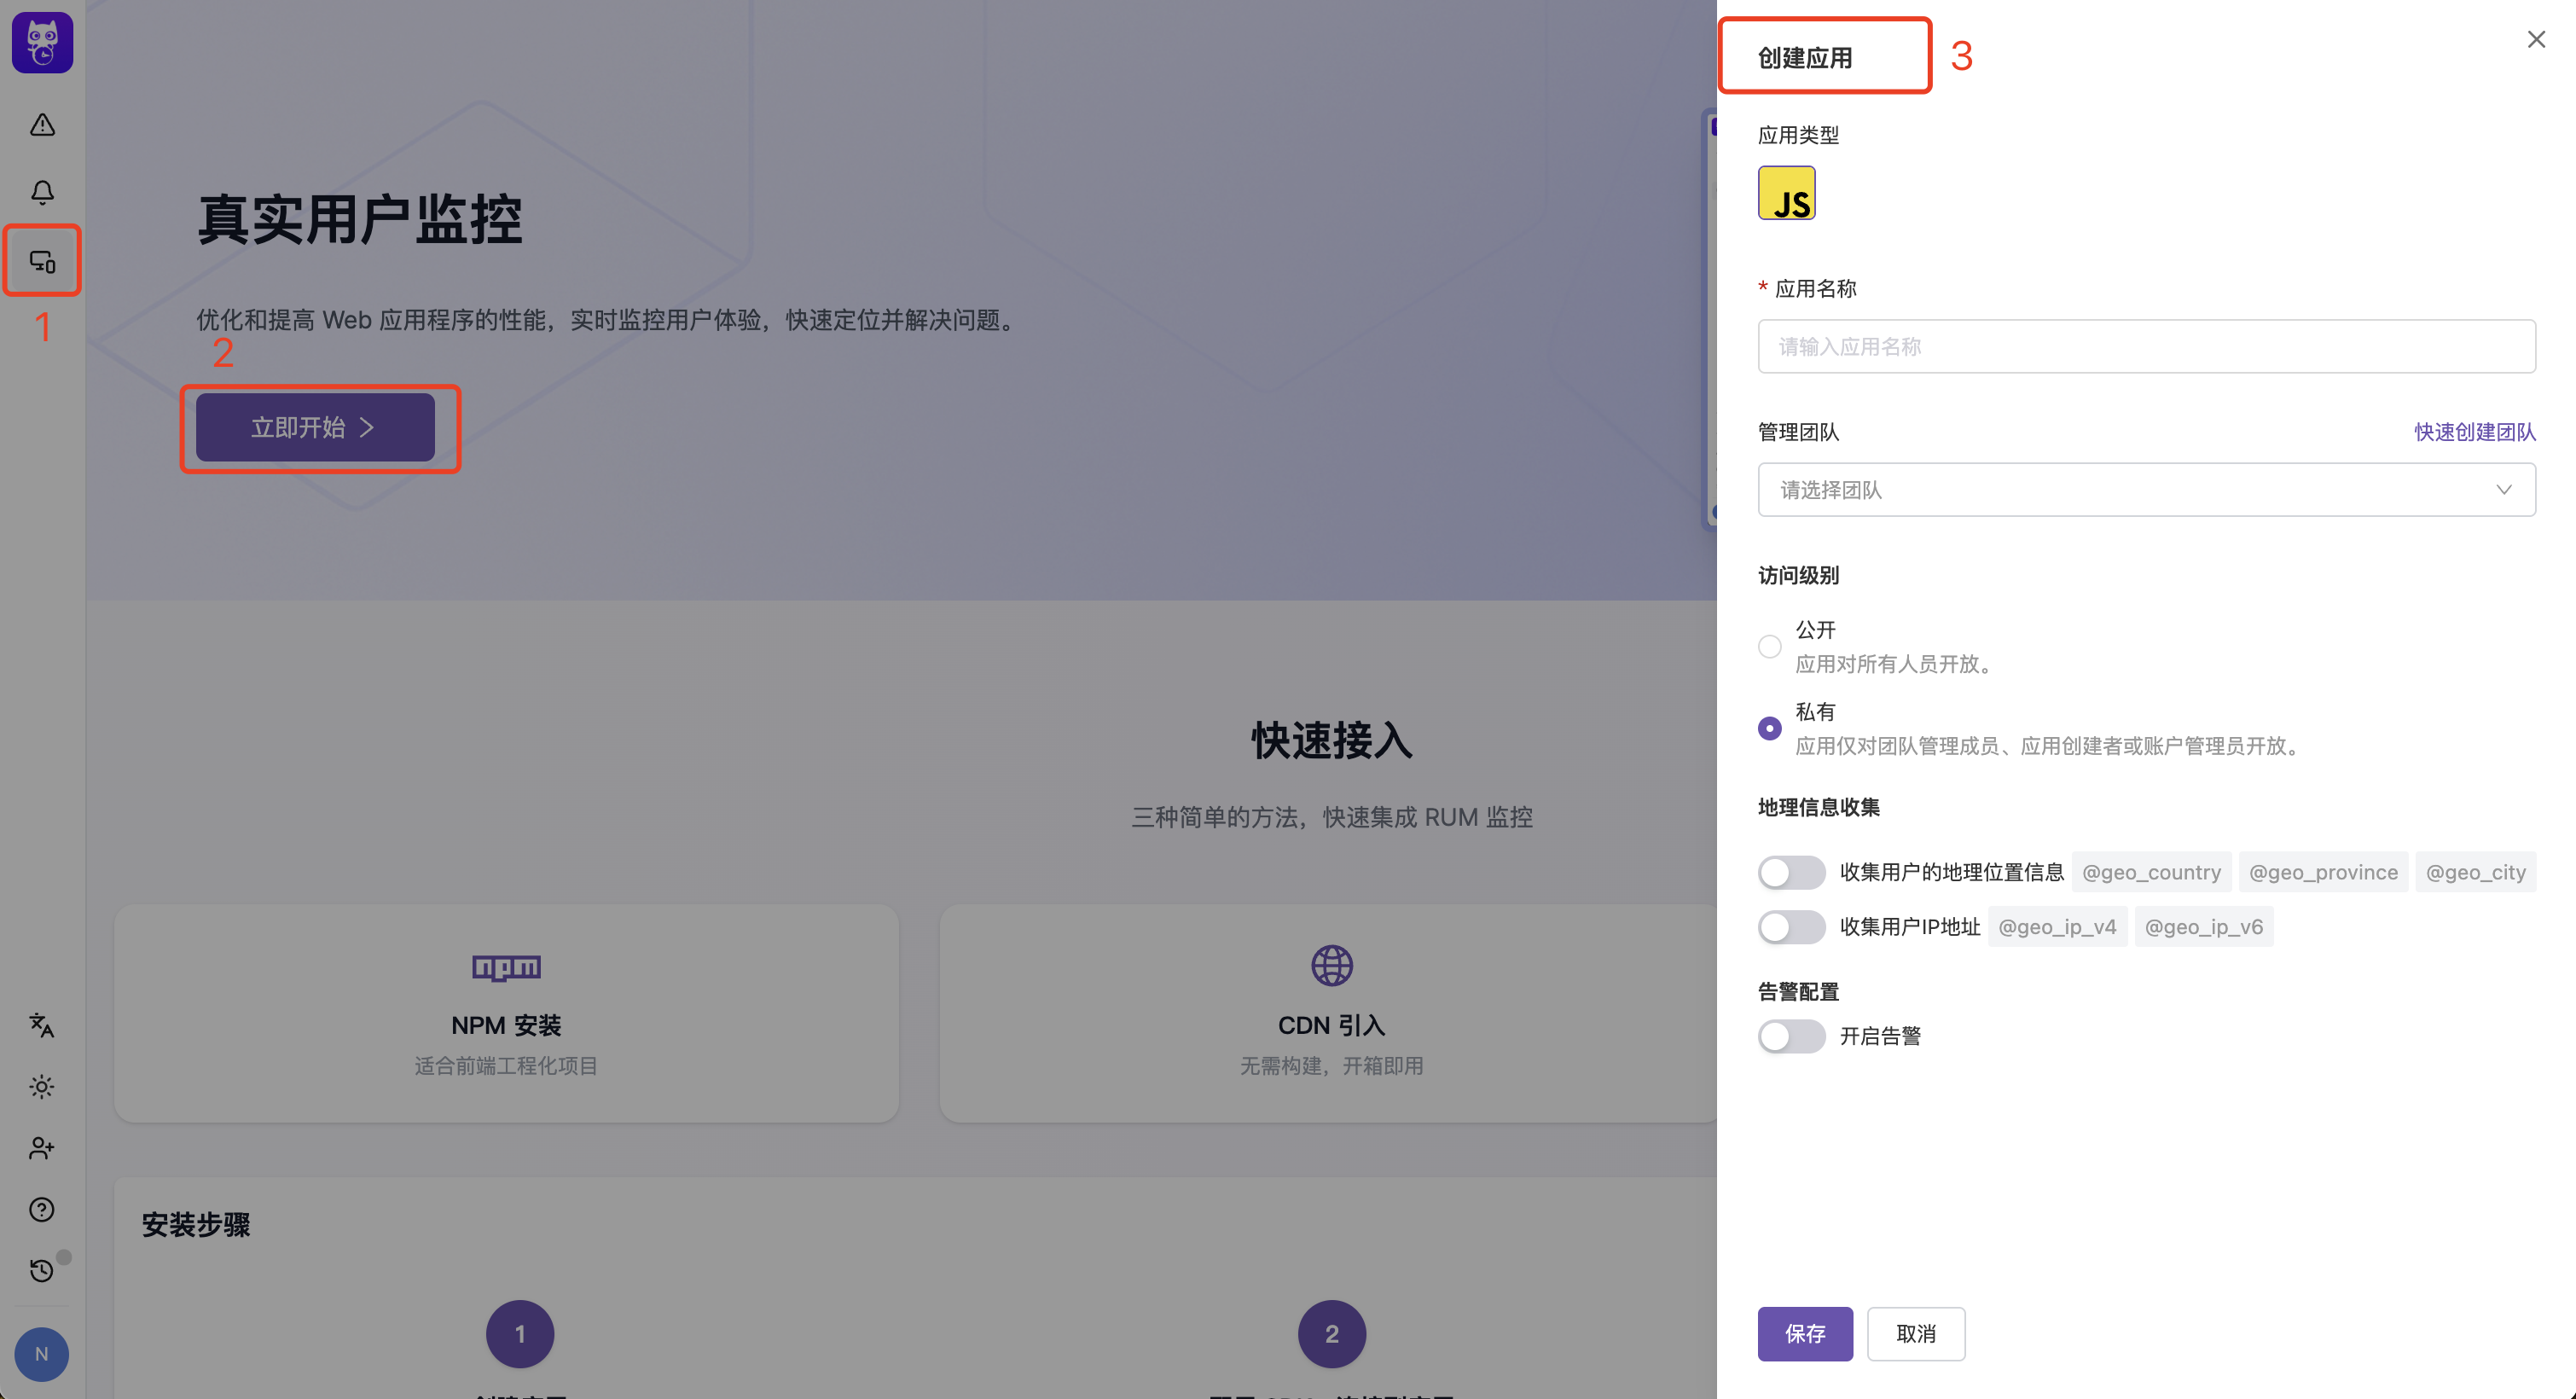
RUM Application Creation Interface
1
Select Application Type
Select the frontend technology type corresponding to the application, currently supporting JavaScript (JS), Android, iOS, HarmonyOS, Flutter, WeChat Mini Program, Electron, and React Native.
2
Set Management Team
Specify the management team for this application.
3
Configure Geo-information
By default, automatic collection of user geo-location data is enabled. To disable automatic collection of client IP or geo-location data, turn off the geo-information collection switch.See Data Collection.
4
Configure Alerts
By default, alert notifications are automatically enabled to facilitate timely handling of errors.See Issue Alerts.
SDK Configuration
You can modify parameters and preview the initialization code in real-time in Application Configuration > SDK Configuration to quickly integrate the SDK. The console provides detailed integration guides for each platform:- JavaScript (Web): After configuring parameters like service name, preview the
flashcatRum.init()initialization code in real-time - Android: Shows complete integration steps including adding Gradle dependencies (
cloud.flashcat:dd-sdk-android-coreandcloud.flashcat:dd-sdk-android-rum), initializing the SDK inApplication.onCreate()with RUM enabled, and optional WebView tracking integration - iOS: Shows complete integration steps including adding Swift Package Manager dependency (
fc-sdk-ios, from version 0.6.0), initializing the SDK inAppDelegate.didFinishLaunchingWithOptionswith RUM enabled, and optional WebView tracking integration - Flutter: The Flutter SDK wraps the Android/iOS native SDKs, so one integration monitors both platforms. See Flutter SDK Integration
- WeChat Mini Program: Fill in
env,service,version, andsessionSampleRatein the form, and theflashcatRum.init()snippet built on@flashcatcloud/miniprogram-rumis generated and previewed in real time (see “WeChat Mini Program SDK Configuration Assistant” below) - Electron: Provides a step-by-step integration guide — install
@flashcatcloud/electron-sdkin the main process and complete initialization insideapp.whenReady()(this must finish before any window is created; with the wrong ordering the SDK reports no error but collects no data). To capture page views, user actions, network requests, and JS errors inside your windows, optionally integrate@flashcatcloud/browser-rumin the renderer process, whose data is handed to the main process over an IPC bridge for unified reporting. When bundling the main process with Vite / webpack / esbuild, you can also add the corresponding plugin to keep the SDK’s runtime dependencies. See Electron SDK Integration - React Native: Provides a four-step integration guide — install
@flashcatcloud/mobile-react-nativeplus the view-tracking package matching your navigation library (@flashcatcloud/mobile-react-navigationor@flashcatcloud/mobile-react-native-navigation) and runpod install; wrap the Metro config withwithDatadogMetroConfigso release bundles and their sourcemaps carry a Debug ID; initialize the SDK as early as possible at the app entry (serviceNameis required, otherwise Android and iOS split into two services); start automatic view tracking once the navigation container is ready. See React Native SDK Integration
applicationId and clientToken, so you can copy the code directly into your project.
Service Definition
A service is an independent, deployable code repository that maps to a set of pages.- Monolithic Application
- Micro-frontend/Multi-page Application
If your application is built as a whole, your RUM application only needs one service name.
WeChat Mini Program SDK Configuration Assistant
When the application type is WeChat Mini Program, Application Configuration > SDK Configuration displays a dedicated Mini Program integration wizard: fill in the form on the left and a ready-to-copy initialization snippet is generated on the right in real time.Form Fields
No save action is needed — the preview snippet updates as you type.
applicationId and clientToken are filled in automatically by the system; you do not need to set them by hand.Two-Step Integration
1
Add Dependency
Install the SDK in your Mini Program project and run the npm build through WeChat DevTools:
2
Copy the Initialization Snippet
Use the copy button at the top-right of the right-hand code block, then paste the generated snippet into your Mini Program’s
app.js:Link Integration
Link Integration lets you associate RUM events with external systems, such as distributed tracing platforms, log search, object storage that stores crash log packages, or internal troubleshooting systems. After you configure links, RUM generates jump links from the event type and event context and shows them as Related Links in event details. Link Integration is available from the Link Integration tab on the application details page and applies to every application type. Members with the RUM Application Update permission can add, edit, enable, disable, or delete link configurations.Built-in Tracing
The built-in Tracing card is the default Link Integration entry. It links thetrace_id on resource events to your backend tracing system.
1
Enter the jump link
In the Link Integration tab, find the Tracing card and enter the jump link for your tracing system. You can use the
${trace_id} variable in the link. RUM replaces it with the actual Trace ID from the resource event when it displays the link.For example: https://your-tracing-system.com/trace/${trace_id}2
Enable Tracing
After you save the jump link, turn on the Tracing switch. The switch cannot be enabled until a jump link is configured.
Built-in Tracing only matches resource events, and it appears only when the event contains
trace_id. The jump link must start with http:// or https://.Add External Links
Besides built-in Tracing, you can add custom external links for different event types.1
Add a link
In the Link Integration tab, select Add external link, then enter the link name and the jump link.
2
Choose applicable event types
Choose the event types where this link should appear. The supported types are Crash, Error, View, Action, Resource, and Session.A crash is an error event: selecting Error matches both regular errors and crashes, while selecting Crash matches only crash events.
3
Insert variables and preview
Insert variables in the Jump link, such as
${session_id}, ${error_id}, or ${trace_id}. The page previews the final URL with sample values so you can verify that the template matches your external system’s query format.Available Variables
Link Integration extracts variables from the current event context and substitutes them into the URL template.
Not every variable resolves on every event type. The editor validates availability against the event types you select: variables that cannot resolve under the current event types appear in the variable list as dashed grey chips, and hovering them shows which event types cannot resolve them.
Availability is judged by whether the event type’s table carries the field, not by whether a particular event happens to have a value: available only means the event type can resolve a value, never that every event does. Crashes are error events, so they share the error column.
${variable} text is kept. The sample preview (sample data) omits the sample values of unavailable variables, so the preview matches what production actually resolves.
View Related Links
When an event matches an enabled link configuration, you can open the external system from these locations:- RUM Explorer event details: the Related Links dropdown appears in the top-right corner for event details such as Session, View, Action, Error, and Resource
- Error event details: matching related links appear as embedded cards in the details area, with copy and open actions
- Issue error samples: matching related links appear below the error sample, so you can jump from an Issue directly to logs, tracing, or another troubleshooting system
Privacy Settings
Privacy settings allow you to control the scope of user privacy data collected by the RUM SDK, meeting data compliance requirements for different regions.Remote Configuration
The Remote Configuration tab lets you adjust collection and privacy parameters online, without code changes or a new release. When enabled, the configuration on this page overrides SDK initialization settings. When disabled, clients fall back to their SDK initialization settings and data collection continues uninterrupted.- Remote Configuration is currently available for Browser, iOS, Android, Flutter and WeChat Mini Program applications. Other platform types will be enabled as their SDKs ship support.
- On SaaS the feature is rolled out account by account. If the Remote Configuration tab is not visible on the application detail page, contact support to enable it. On private deployments it is available by default.
Configuration values
The two on-error options are independent: On delivers
true, Off delivers false, and Use SDK setting omits the field so the corresponding init() option applies (off if unset). Browser applications require Web SDK 0.3.0 or later with remoteConfigurationEnabled: true at initialization. Turning off on-error capture does not affect sessions selected by ordinary sampling. See Web SDK on-error session capture for scope, billing, and limitations.
iOS, Android, Flutter, and WeChat Mini Program applications also show the Remote Configuration tab, but their SDKs read only the session sample rate and custom configuration keys (none of them has Session Replay; the other values are neither delivered nor effective). Every SDK has to opt in with remoteConfigurationEnabled: true at initialization (off by default; an application that has not opted in never requests the configuration). On iOS this requires SDK 0.6.0 or later, see iOS SDK Advanced Configuration; on Android it requires SDK 0.7.0 or later, see Android SDK Advanced Configuration; on Flutter it requires flashcat_flutter_plugin 0.2.0 or later, see Flutter SDK Advanced Configuration.
Conditional rules
Conditional rules are a protocol-reserved capability that the current console version does not yet let you edit: there is no rule editor on the page, and when you save a configuration the rules already stored on the server are passed through untouched — saving never clears them. Rule editing will open up in a later version. For reference, the protocol semantics: besides the default values, a configuration can deliver different values to different clients based on conditions —- Match conditions support the
env,app_version, andsdkdimensions, ANDed with exact comparison; a dimension the SDK does not report can never match. Each match value is at most 256 bytes. - Rules are evaluated top-down and the first fully matching rule wins; its overrides are merged on top of the defaults, and fields the rule does not set keep the default values.
- Each application supports at most 20 rules.
Publishing and activation
- Before publishing, the page shows a per-field diff against the live configuration and lets you inspect the raw JSON. You can optionally fill in a change note (at most 255 characters, e.g. “lower the sample rate during the sale event”), which is stored on the version and shown in the change history. Publishing creates a new version.
- Activation is fixed to next new session: sessions already running are unaffected, and new sessions gradually pick up the configuration — clients that support remote configuration usually finish switching within about 4 hours after a publish.
- Immediate activation (the client ends the running session as soon as the new configuration arrives and starts a fresh one under it) is a protocol-reserved capability that the current console version does not offer; it will open up in a later version. For urgent situations — stopping an over-collection flood or ramping collection up right away — call the SDK’s
stopSession()to end the current session so the configuration takes effect with the next one as soon as possible. - The protocol also reserves a refresh on foreground switch (
refresh_on_foreground): when on, the client re-fetches the configuration every time it returns to the foreground instead of waiting for a poll. It is off by default — every client requesting at the same foreground moment concentrates load on the configuration endpoint, the same shape as a release herd — and is meant only for applications that genuinely need a change to land within minutes. The switch cannot be set in the console yet and will open up in a later version.
Version history and adoption
- Change history keeps the most recent 50 versions; older versions are cleaned up automatically and cannot be rolled back to. Each entry shows who made the change and the change note (if one was left). You can revert any retained version to make it the current configuration; a revert also produces a new version.
- A new version produced by a revert carries a content-equivalence label: if its configuration content is identical to an earlier version in the history, the history list marks it as equivalent to the earliest version with that content — a version-number jump does not mean the configuration content changed.
- The rollout panel shows adoption and rollout progress across recently arrived sampled sessions, with status labels waiting for new sessions (just published, no session has started under the current version yet), in effect (some sessions have switched), recent sessions switched (every session that arrived in the window is on the current version), no configuration received (none of the recent sessions reported a configuration version — usually the SDK has remote configuration disabled or is too old), no data (no new sessions in the window), and no adoption detected (published for over about 8 hours and still not on the current version); slices that did not report a configuration version are labeled not reported (SDK too old or config never fetched). Clicking View details opens the event explorer on this batch of sampled sessions. When fewer than 20 sampled sessions fall in the window, the panel shows the actual session counts only and does not estimate shares (shares are extrapolated from the sample rate, which is meaningless with too few samples).
Delete Application
If you no longer need an application, you can find the delete button at the bottom of the “Basic Info” tab in the application details.Next Steps
SDK Integration Guide
Learn how to integrate RUM SDK
Advanced Configuration
Learn about advanced configuration options for the SDK
Analytics Dashboard
View and analyze RUM data
WeChat Mini Program SDK
Learn how to integrate the RUM SDK into a WeChat Mini Program