

- Web (JavaScript): Upload
sourcemapfiles through Flashduty CLI - WeChat Mini Program: Upload the
sourcemap.zipgenerated byminiprogram-ci get-dev-source-mapthrough Flashduty CLI - HarmonyOS: Upload the ArkTS
sourceMaps.map, optionalnameCache.json, and native.sosymbol files through@flashcatcloud/hvigor-plugin - Android: Automatically upload ProGuard/R8 mapping files and NDK symbol files through a Gradle plugin
- iOS: Upload dSYM symbol files through Flashduty CLI
- Flutter: Upload the Dart AOT symbol files (
.symbols) from--split-debug-infowith Flashduty CLI to restore obfuscated Dart stacks on Android. iOS native crashes use dSYMs, like standalone iOS apps - Electron: Upload Breakpad
.symsymbol files through Flashduty CLI, matched to native crash stacks by module Debug ID. See Electron Error Symbolication - React Native: On Android, the SDK’s Gradle script uploads the JS bundle sourcemap during the release build. On iOS, upload
main.jsbundleandmain.jsbundle.mapthrough Flashduty CLI (≥ 0.4.0) withsourcemaps upload-react-native. See Uploading React Native SourceMaps below
Generate SourceMap
Most modern build tools (such as Webpack, Rollup, or Vite) support generatingSourceMap.
- Webpack
- Vite
- Rollup
SourceMap generation in webpack.config.js:dist directory will contain bundle.js and the corresponding bundle.js.map file.Upload SourceMap
Use Flashduty CLI to uploadsourcemap files to the Flashduty server.
Install Flashduty CLI
Configure Upload Parameters
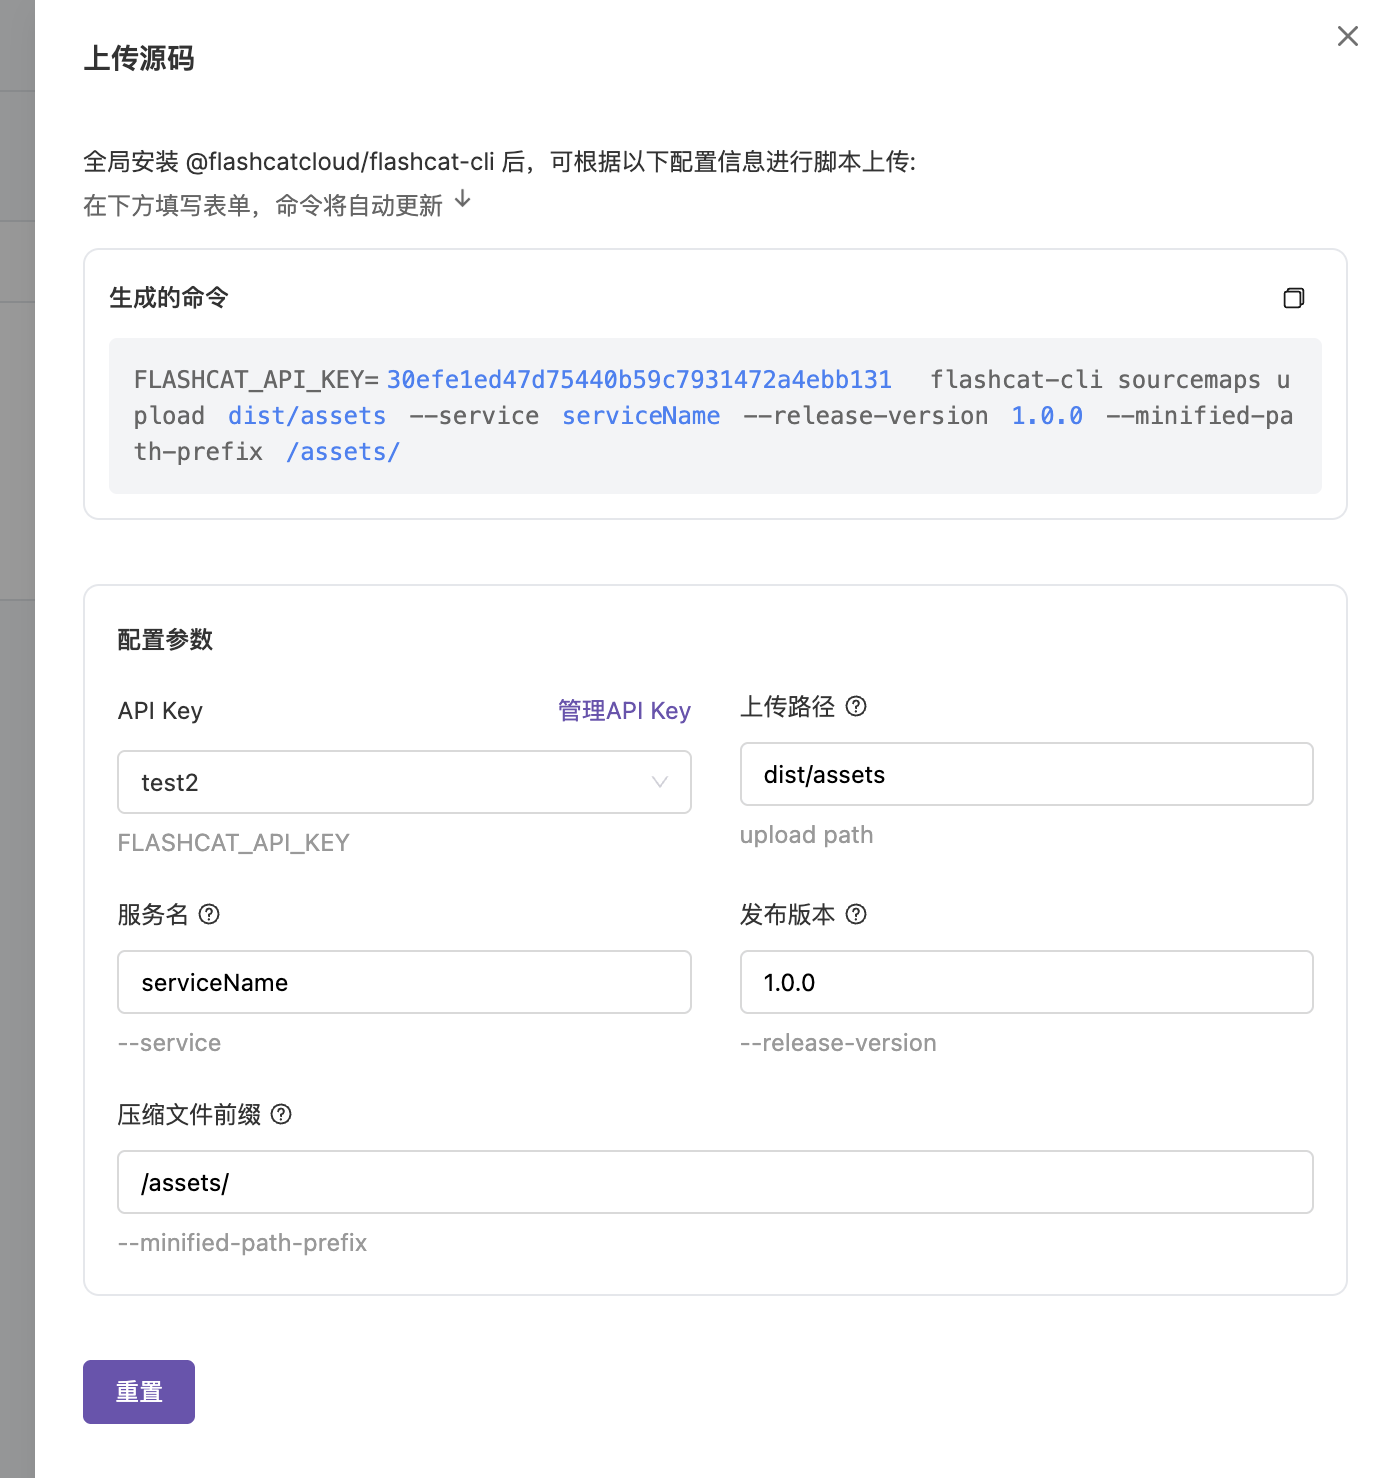
Execute Upload
FLASHCAT_SOURCEMAP_INTAKE_URL environment variable to upload symbol files to a custom intake, for example, FLASHCAT_SOURCEMAP_INTAKE_URL=https://rum.example.com flashcat-cli sourcemaps upload ... (protocol + domain, no path). When unset, uploads go to Flashduty SaaS. Once “Custom Upload Endpoint” is filled in, the panel-generated command includes this variable automatically.Upload WeChat Mini Program SourceMap
After a WeChat Mini Program is released, production error stacks usually contain only transformed file paths and line and column numbers. You can first useminiprogram-ci get-dev-source-map to generate sourcemap.zip, then upload it through Flashduty CLI. After upload, Flashduty matches Mini Program error stacks by service name, version, and file path, then shows restored source code locations in error details.
Generate the Mini Program SourceMap archive
miniprogram-ci get-dev-source-map in the Mini Program project to generate an uploadable sourcemap.zip file. This file path is used as the --sourcemap-zip parameter in the upload command.The default zip layout produced by miniprogram-ci get-dev-source-map already satisfies the following requirements, so you usually do not need to repackage it:- Main-package
.js.mapentries are placed under the__FULL__/directory, for example,__FULL__/app-service.js.map - Subpackage
.js.mapentries are placed under a directory named after the subpackage, for example,subpkg-a/chunk_0.appservice.js.map, and the directory name is recorded as the subpackage tag in metadata - Only entries with the
.js.mapsuffix are processed; other files (README, source files) are silently ignored - If the zip contains no
.js.mapentries, the upload fails withNo .js.map entries found in the sourcemap archive
.js.map may not exceed 50 MB decompressed; the aggregate decompressed size of the whole archive may not exceed 500 MB; the zip may not contain more than 5000 entries. Exceeding any of these limits returns HTTP 413.Configure upload parameters
my-mp. Error parsing uses this value to match the service in error events.1.2.3. Error parsing uses this value to match the version in error events.miniprogram-ci get-dev-source-map, such as ./sourcemap.zip.wxbad3e0a65782821c. Used to disambiguate uploads when multiple Mini Programs share the same service + version. Optional when only one Mini Program is involved.https://rum.example.com). Leave it empty to upload to Flashduty SaaS. When set, the generated command prepends FLASHCAT_SOURCEMAP_INTAKE_URL=<endpoint>.Execute upload
--appid is optional and is omitted from the generated command when the field is empty:Upload HarmonyOS symbols
HarmonyOS crash stacks can contain both ArkTS / JS frames and native.so frames. To restore both kinds in the console, upload these build artifacts:
sourceMaps.map: the primary ArkTS sourcemap bundlenameCache.json: optional, used to restore obfuscated identifier names- Unstripped native
.sofiles: used to symbolicate C/C++ crash stacks
hvigor configuration and upload command. service and version must exactly match what the application reports at runtime, otherwise the server cannot match the uploaded symbols to incoming crash events.
Install the hvigor plugin
hvigor/hvigor-config.json5 and let hvigor fetch it from npm:npm install -D @flashcatcloud/hvigor-plugin, but a HarmonyOS project root has no package.json, so run npm init -y first or npm installs into an unrelated project in a parent directory. See HarmonyOS SDK advanced configuration.Register the plugin in hvigorfile.ts
service, version, and apiKey settings into hvigorfile.ts:Run the upload after the build
--no-daemon is required when you configure the plugin from environment variables. Otherwise a reused hvigor daemon passes a stale environment, the API key reads as unset, and the upload is silently skipped:Upload Android Symbol files
After Android apps use ProGuard/R8 for code obfuscation, class names and method names in error stacks are replaced with meaningless short names. By uploading mapping files, Flashduty can restore obfuscated stacks to original code. For apps containing NDK native code, NDK symbol files also need to be uploaded to restore C/C++ layer stacks.Add Gradle Plugin
build.gradle:Configure API Key
flashcat-ci.json file in the project root:Configure Upload Options
flashcat block to your app module’s build.gradle. When fields are not set explicitly, the plugin reads versionName, versionCode, and the application ID from the Android build configuration.site: CN uses ci.flashcat.cloud. For private deployments, set sourcemapEndpoint to a custom intake endpoint (supported since 1.2.0); if the value omits the /sourcemap/upload path it is appended automatically. The three configuration sources are resolved in this order of precedence: flashcat {} extension config > flashcat-ci.json > the FLASHCAT_SOURCEMAP_INTAKE_URL environment variable. Once a custom endpoint is set, site is only used as a fallback and no longer affects the actual upload URL.Run Upload Tasks
uploadMapping<Variant> tasks for variants with obfuscation enabled. NDK symbol upload tasks are created when the project has a native build or when additionalSymbolFilesLocations is configured. If your project uses multiple flavors, run the upload task for each release variant.event.type=ndk_symbol_file, distinct from ProGuard mapping files which use event.type=jvm_mapping_file. Custom upload integrations that do not use the Gradle plugin must pass the correct type field.Upload iOS dSYM files
iOS apps generate dSYM (Debug Symbol) files during compilation, containing the debug symbol information needed to map memory addresses back to source code locations. After uploading dSYM files, Flashduty can restore addresses in crash stacks to readable function names, file names, and line numbers.Install Flashduty CLI
Obtain dSYM Files
- Xcode Local Build: Find
.dSYMfiles in the Xcode Build Products directory - Xcode Archive: Export dSYMs through the Organizer window
- App Store Connect: Download dSYMs from App Store Connect (requires enabling symbol upload in build settings)
Execute Upload
Upload Flutter Symbol files
When a Flutter app is built with--obfuscate, symbols in Dart exception stacks are stripped, leaving only address information. Upload the Dart AOT symbol files (app.<platform>-<arch>.symbols) from --split-debug-info. Flashduty matches each file’s GNU build-id to the build ID in the stack and restores Dart stacks on Android.
Build with obfuscation to generate the symbol directory
Configure Upload Parameters
FLASHCAT_API_KEY environment variable in the command.my-app. Keep it consistent with the service set at SDK initialization, so symbols are categorized by service in the console.1.0.0. Keep it consistent with the releaseVersion set at SDK initialization.https://rum.example.com). Leave it empty to upload to Flashduty SaaS. When set, the generated command prepends FLASHCAT_SOURCEMAP_INTAKE_URL=<endpoint>.Execute Upload
service and release-version do not participate in symbolication and only affect categorization and filtering in the console list. Symbol files support the arm, arm64, and x64 architectures, detected automatically from the .symbols filename. Every Dart code change produces a new build ID, so symbol upload must be part of every release build. For the full Flutter symbolication details, see Flutter SDK Advanced Configuration.Uploading React Native SourceMaps
React Native JS error stacks are de-minified with sourcemaps. Like Flutter, a React Native app runs one JS codebase on top of Android/iOS native code. Sourcemaps for the two platforms are stored separately, so same-named bundles never overwrite each other. The server matches by thereact-native type plus the platform (iOS / Android).
In App Management → Source Maps, select the React Native tab; the upload panel generates the relevant script for the selected platform:
Android: upload at build time
On Android, the SDK’s bundled Gradle script performs the upload during the release build (it shells out to flashcat-cli with the bundle Metro just produced). Pin the service name and apply the script inandroid/app/build.gradle:
index.android.bundle and its sourcemap. The SDK’s Metro configuration (Debug ID) is also wrapped with withDatadogMetroConfig; see React Native SDK integration.iOS: upload after the build
iOS has no build hook, so the upload runs by hand after the release build.react-native-xcode.sh emits a sourcemap only when SOURCEMAP_FILE is set. Export it in the Xcode build phase “Bundle React Native code and images”, before react-native-xcode.sh:
Symbol file management
On the Flashduty platform, symbol file management is done through the “Application Management” - “Source Code Management” menu:View source code in error tracking
RUM Error Tracking uses Websourcemap files, WeChat Mini Program SourceMaps, Android mapping files, and iOS dSYM files to restore error stacks. Error details then show the original source locations.
Capture Errors
console.error calls, and manually reported errors; native scenarios include crashes, exceptions, and stack information required for symbolication.Associate Symbol Files
sourcemap files, WeChat Mini Program SourceMaps, Android ProGuard mapping files, Android NDK symbol files, or iOS dSYM files. When they match, it maps minified, obfuscated, or compiled locations back to the original source.Minified file stack:View Error Details
- Error message: for example,
Something went wrong - Original stack: Mapped source code file path, line number, and column number
- Context code: Display source code snippet near the error location
…. If the sourcemap’s sourcesContent is itself a minified bundle, every line you see is such a window rather than the full code around the frame.If a Mini Program stack isn’t resolved, the notice in error details links to the Mini Program type on the Source Code Management page. From there you can open the upload panel for that version’s sourcemap.zip.Debug and Fix
Best practices
Standardize SourceMap Upload
Standardize SourceMap Upload
sourcemap files or WeChat Mini Program sourcemap.zip with each release.GitHub Actions Example:Version Management
Version Management
--release-version parameter to match the application version number for easy tracking of specific version sourcemaps.Clean Up Source Code
Clean Up Source Code
sourcemap files before uploading resources to CDN to avoid bringing source code information into production.Test Mapping Effect
Test Mapping Effect
sourcemap, proactively throw test errors to verify that the Error Tracking module correctly maps to source code.Frequently asked questions
Why isn't the error stack mapped to source code?
Why isn't the error stack mapped to source code?
- Confirm that
sourcemapwas successfully uploaded andminified-path-prefixmatches the actual deployment path - Check that
serviceandrelease-versionmatch the application version when the error occurred - For WeChat Mini Programs, confirm that the
sourcemap.zipfor the corresponding version has been uploaded
How to prevent SourceMap from leaking sensitive information?
How to prevent SourceMap from leaking sensitive information?
- Ensure
sourcemapfiles are only uploaded to the Flashduty server, not directly exposed on the public network - In production, remove direct access to
sourcemapfiles (for example, through Nginx configuration)
What if SourceMap upload fails?
What if SourceMap upload fails?
- Check if
API Keyis valid - Ensure network connection is normal and CLI version is the latest
Can Mini Program errors with empty stacks but a stack-like message still be source-mapped?
Can Mini Program errors with empty stacks but a stack-like message still be source-mapped?