

Configuration elements
An escalation rule contains six core elements. The system matches rules from top to bottom, stopping after the first successful match. You can enable or disable individual escalation rules. Flashduty skips disabled rules during matching, so they trigger no notifications. You can also copy an escalation rule to the current channel or another channel to quickly reuse existing configurations; see Copy an Escalation Rule. Edit, Copy, Enable/Disable, and Delete all live in the More actions (⋯) menu at the end of each row: an enabled rule offers Disable, and only after it is disabled does the menu offer Enable and Delete. Disable and Delete both ask you to confirm first. The list offers two views, table and card, switched at its top right and remembered per member. Cards are laid out in routing order; the number at a card’s top right turns into a drag handle on hover, and dropping it on another card reorders the rules. Each card keeps the More actions (⋯) menu. In the card view the View menu at the top right can hide the Last modified line at the bottom of each card. The Search name or description box at the top left of the list filters it by rule name and description, case-insensitively. It does not match the values inside trigger conditions or notification targets, and the list shows No matching results when nothing matches. While you search, the routing-order number shown on each row is still the rule’s position in the full list, and you cannot drag rows to reorder them; clear the search to reorder again.1. Trigger conditions
Determines which incidents trigger the current rule. Effective Time: Controls when the rule participates in matching.- Off (Default): Active 24/7
- On: Only participates in matching within specified time ranges; incidents outside this time will skip this rule. Two modes supported:
- Specific Time Period: for example, only active on weekdays (Monday-Friday 9:00-18:00)
- Service Calendar: Reference a predefined Service Calendar, for example, only active on “Trading Days”, automatically excluding holidays
- Trading Calendar: Skip the service calendar and pick a China A-share, Hong Kong or US trading calendar directly. The date type becomes Trading day / Closed day, and the hours are filled in with that exchange’s session (09:30-15:00 for A-shares, 09:30-16:00 for Hong Kong and US, exchange local time) read in the exchange’s time zone. Edit them if you need different hours; Flashduty only fills them while they are still empty. After a half trading day’s close the date counts as a closed day — see Service calendars
- Off (Default): All incidents may match this rule
- On: Only incidents matching the filter conditions hit this rule; unmatched incidents continue matching subsequent rules. You can add multiple condition groups — conditions within a group are ANDed, groups are ORed; each condition supports Match / Not Match operators, with available keys:
- Integration Source (First Alert): Match by the integration that produced the incident’s first alert; options are the integrations available to the current channel (both shared and dedicated)
- Severity: Multi-select Critical / Warning / Info
- Title, Description: Support exact, wildcard, regex, CIDR, and numeric comparison matching modes
- Labels: Match by alert label key-value pairs (for example,
service=payment); load keys from recent alert data or enter them manually
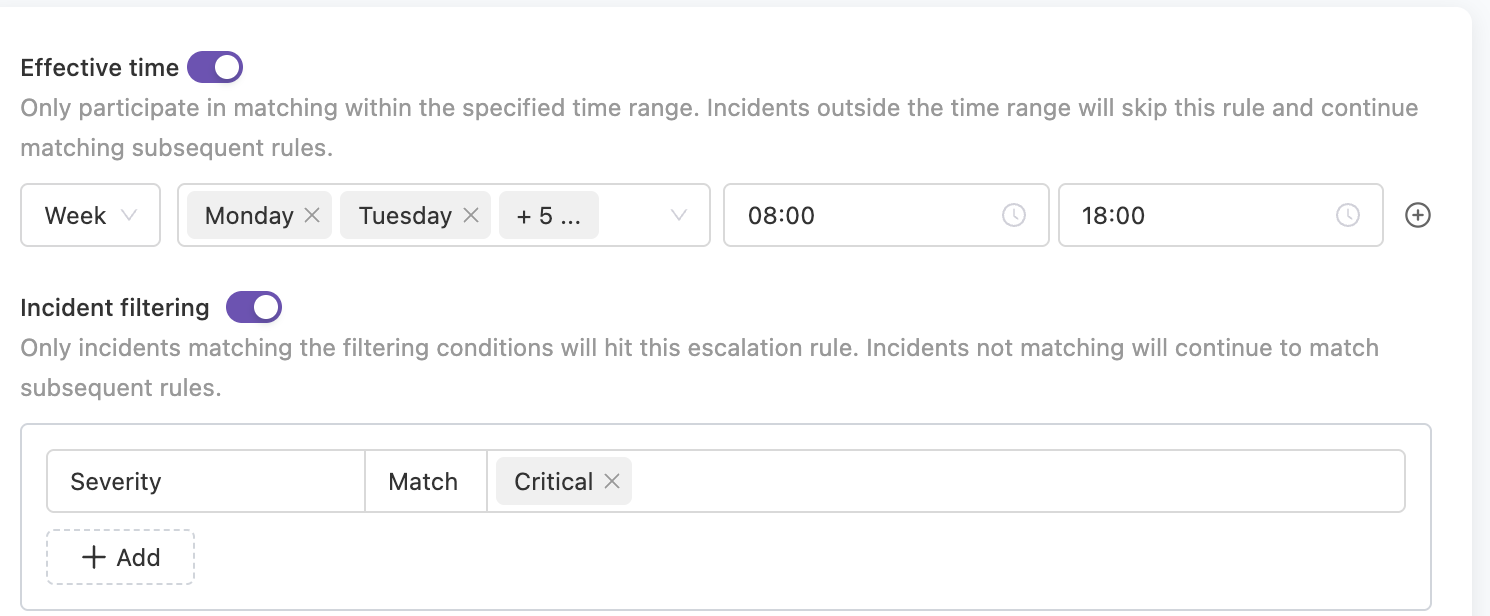
Escalation Rule Trigger Conditions Configuration
2. Notification recipients
Determines who receives notifications.3. Notification methods
Determines how Flashduty reaches users.- Direct Message (Reach Individuals)
- Group Chat (Reach Groups)
Point-to-point messaging to specific assignees, supports phone calls, SMS, email, app push, IM direct messages (Feishu/Lark, Dingtalk, WeCom, Slack, Microsoft Teams).
- Follow Personal Preferences (Recommended): Notification methods configured by members in Personal Settings
- Follow Unified Settings: Enforce notification methods (for example, must send SMS), overriding member personal preferences
4. Delay window
Wait before sending the first notification, to filter out incidents caused by transient flapping.- Range: 0 – 3600 seconds, default
0(disabled, notify immediately) - During the delay window, if the incident is auto-closed or manually closed, the system does not send a notification
5. Notification template
Every escalation rule must select a notification template, which determines the message format delivered to each channel.- Create and enable the template first under Notification Templates
- You can pick different templates for different escalation rules to format messages for specific scenarios
6. Escalation rules
When first-level responders don’t respond or complete handling, the system automatically escalates to the next level. Loop Notification: In each escalation level, you can enable the Loop Notification feature. If the incident is still unresolved at that level, Flashduty repeats the notification at the configured interval, up to the maximum count. The interval is at least 0.5 minutes, in 0.5-minute steps. Escalation Conditions:- Not closed: Incident not closed within N minutes after trigger
- Not closed and not acknowledged: Incident neither closed nor acknowledged within N minutes after trigger
Level management:
- Default first level: Flashduty creates the first level with each new rule. It escalates after a 30-minute timeout, sends no repeated notifications, and uses notification methods that follow personal preferences
- Add or remove levels: you can add or remove levels freely; a rule must keep at least 1 level
- Reorder: you can move a level up or down, or insert a new level between any two existing levels
Copy an escalation rule
In the escalation rule list, click the More actions (⋯) icon at the end of a row and select Copy to set the new rule’s name, target channel and description:
The copy keeps the source rule’s full configuration: trigger conditions, notification targets, notification methods, delay window, notification template, and escalation levels. It does not keep the rule’s position in the list, so move the new rule where you want it. After copying to another channel, click Go to view to open the new rule.
Best practices
Fallback Policy
Fallback Policy
Keep a default policy without filter conditions at the bottom of the list and assign it to the SRE team or administrators. It catches incidents that misconfigured filters would otherwise miss.
Avoid Over-notification
Avoid Over-notification
- For low-priority
Info/Warninglevel alerts, recommend using only IM messages, not phone calls or SMS - Use the Loop Notification feature cautiously to avoid alert bombardment
Reasonable Channel Splitting
Reasonable Channel Splitting
Don’t try to manage all company alerts in one channel. Splitting channels by functional module or team, with each channel maintaining independent and simple escalation rules, is key to reducing maintenance costs.
FAQ
Alerts are generated but no notifications received?
Alerts are generated but no notifications received?
Go to Incident Details → Timeline to check if notification status is normal for each channel. If there are failure messages, use them for troubleshooting. Contact technical support for more issues.
Notification method doesn't match personal preference settings?
Notification method doesn't match personal preference settings?
Flashduty On-call direct messaging supports two modes: “Follow Personal Preferences” and “Follow Unified Settings”. Only in “Follow Personal Preferences” mode will the system send notifications according to your personal settings.Go to Channel Details → Escalation Rules to check current settings.
What's the difference between webhook integrations and group bot webhooks?
What's the difference between webhook integrations and group bot webhooks?
These are two different features — do not confuse them:
- Webhook integrations (Alert Webhook, Incident Webhook): When alerts or incidents change, Flashduty pushes event data to your URL. External systems, such as ticketing or automation platforms, can then act on it
- Group bot webhooks (this page, “Notification Methods → Group Chat”): Set an IM group bot’s webhook URL in an escalation rule. Flashduty then posts incident notifications to that group chat
Related topics
Configure Schedules
Set rotation rules for automatic assignment
Configure Personal Preferences
Customize notification time periods and channels
Configure Notification Templates
Customize notification content format