Reduce alert noise through grouping, silencing, inhibition, and other strategies to improve processing efficiency
Plan requirement: which grouping methods you can pick depends on your subscription — No grouping is available on every plan, Rule-based grouping requires On-call Standard or higher, and Intelligent grouping requires On-call Pro (selectable by default on-premises). Alert storm warning and inhibit rules require an On-call Standard or higher subscription. Silence rules are available on all plans. Learn more
An alert storm can bring hundreds of similar notifications. Noise reduction groups these alerts into one incident, so you handle it once instead of wading through repeats.
Before understanding noise reduction, you need to understand the relationship between three core objects:
Monitoring System → Event → Alert → Incident
Object
Definition
Source
Event
Raw notification from monitoring system, each trigger or recovery is an event
Zabbix, Prometheus, and so on
Alert
Automatically triggered by events. Events sharing the same alert_key merge into one alert within the channel’s Event Aggregation window
Automatically created by Flashduty
Incident
Primary object processed by Flashduty, triggered by alerts or created manually
Auto-triggered or manually created
Key understanding:
One alert can contain multiple events (events with the same alert_key that arrive within the Event Aggregation window, plus the corresponding recovery events)
One incident can contain multiple alerts (similar alerts grouped together)
Noise reduction happens at two stages: Event Aggregation controls “Event → Alert”; Alert Grouping controls “Alert → Incident”
Noise reduction process
When a monitoring system pushes alerts to Flashduty On-call, the system automatically executes the following workflow:
1
Receive Event
Determine whether to merge into an existing alert, otherwise create a new alert.
2
Process New Alert
Determine whether to merge into an existing incident, otherwise create a new incident.
3
Trigger Notification
New incidents notify relevant personnel according to escalation rules.
4
Subsequent Alerts Merge
Subsequent alerts merge into existing incidents without repeated notifications.
Let AI configure noise reduction for you
The header of the Alert grouping and Flapping detection pages carries a Let AI tune noise reduction button on the right. It opens AI SRE in the side panel, takes this channel along as a context reference, and prefills a request for the page you are on:
Entry
Prefilled request (with channel “prod” as an example)
Alert grouping
/channel-noise Analyze the alert noise in Channel "prod", then recommend and configure alert grouping
Flapping detection
/channel-noise Analyze the alerts that keep re-firing in Channel "prod", then recommend and configure flapping detection
/channel-noise is the matching built-in Skill, reachable only from this entry, and it tunes one channel per session. You can send the prefilled request as it is, or rewrite it first, for example to narrow the look-back window or to name the grouping dimensions you must keep. After that you keep talking in plain language to refine what you asked for.
Prerequisite: AI SRE is enabled for the account and you have permission to use AI SRE conversations. The button is hidden when either is missing.
The agent reads the channel’s recent alerts (the look-back window is adjustable, up to 30 days) and recommends values; on the Alert grouping page it also gives an expected incident count from the page’s grouping preview. Nothing is written straight away: you can review the recommended values it fills into the form and click Save, or let it save directly, in which case a confirmation card lists each setting with its before and after value (for example, “Dimensions: labels.check → labels.check + labels.service”) and only your confirmation writes it. The change takes effect immediately./channel-noise changes Alert grouping and Flapping detection only. For Event aggregation, silence rules, inhibit rules and drop rules it recommends what to change and names the page to change it on, but never writes. For how a reference tag travels with a message and how sessions are managed, see Console chat.
Event aggregation
Go to Channel Details → Configuration → Noise Reduction → Event Aggregation to configure.Event Aggregation controls the “Event → Alert” merge. When the monitoring system keeps pushing events with the same alert_key, it decides whether they merge into the existing alert or each create a new one.An event merges into an existing alert only when all four conditions hold. If any one of them fails, Flashduty creates a new alert:
Same channel: the event and the target alert belong to the same channel
Same alert_key: the event describes the same alert lifecycle
Target alert still active: recovered or ended alerts no longer accept events
Still inside the aggregation window: after the window expires, a matching alert_key still creates a new alert
New channels have Event Aggregation enabled by default, with a window of 24 hours (1440 minutes).
Configuration
Configuration
Description
Default
Range
Enable Event Aggregation
When enabled, events with the same alert_key merge into the same alert within the aggregation window; when disabled, every event creates its own alert
Enabled
Enabled / Disabled
Aggregation Window
Starts counting from the alert’s creation time; events arriving after this duration create a new alert. Only configurable when Event Aggregation is enabled
1440 minutes (24 hours)
1–1440 minutes; capped at 24 hours by default, extendable up to 7 days on request (contact the Flashduty team)
alert_key is the identifier used for alert correlation and deduplication. It is either reported by the upstream integration or generated automatically by integration rules.
Versus alert grouping
Stage
Setting
Behavior it controls
Event → Alert
Event Aggregation
Whether events sharing the same alert_key merge into a single alert
Alert → Incident
Alert Grouping
Whether similar alerts merge into a single incident
Alert grouping
Go to Channel Details → Configuration → Noise Reduction → Alert Grouping to configure.Alert grouping merges multiple similar alerts into a single incident for unified assignment and notification. When an alert storm hits, you only need to handle one incident instead of hundreds of repeated notifications.
A new channel’s grouping method is derived from your subscription. The create wizard’s Alert Grouping step pre-selects it and marks that card with a Default badge, and saving the channel writes that configuration: free plans default to No grouping, Standard to Rule-based grouping (default grouping field labels.check), and Pro and on-premises deployments to Intelligent grouping (default fields for the similarity judgement: title, description, labels.service, labels.resource). With these defaults the aggregation window is until the incident closes, alert storm warning is off (default threshold 100 once enabled), and strict grouping is off. You can pick another available method in the wizard, or change it later under Noise Reduction → Alert Grouping. For the wizard step, see Create a channel.
Grouping modes
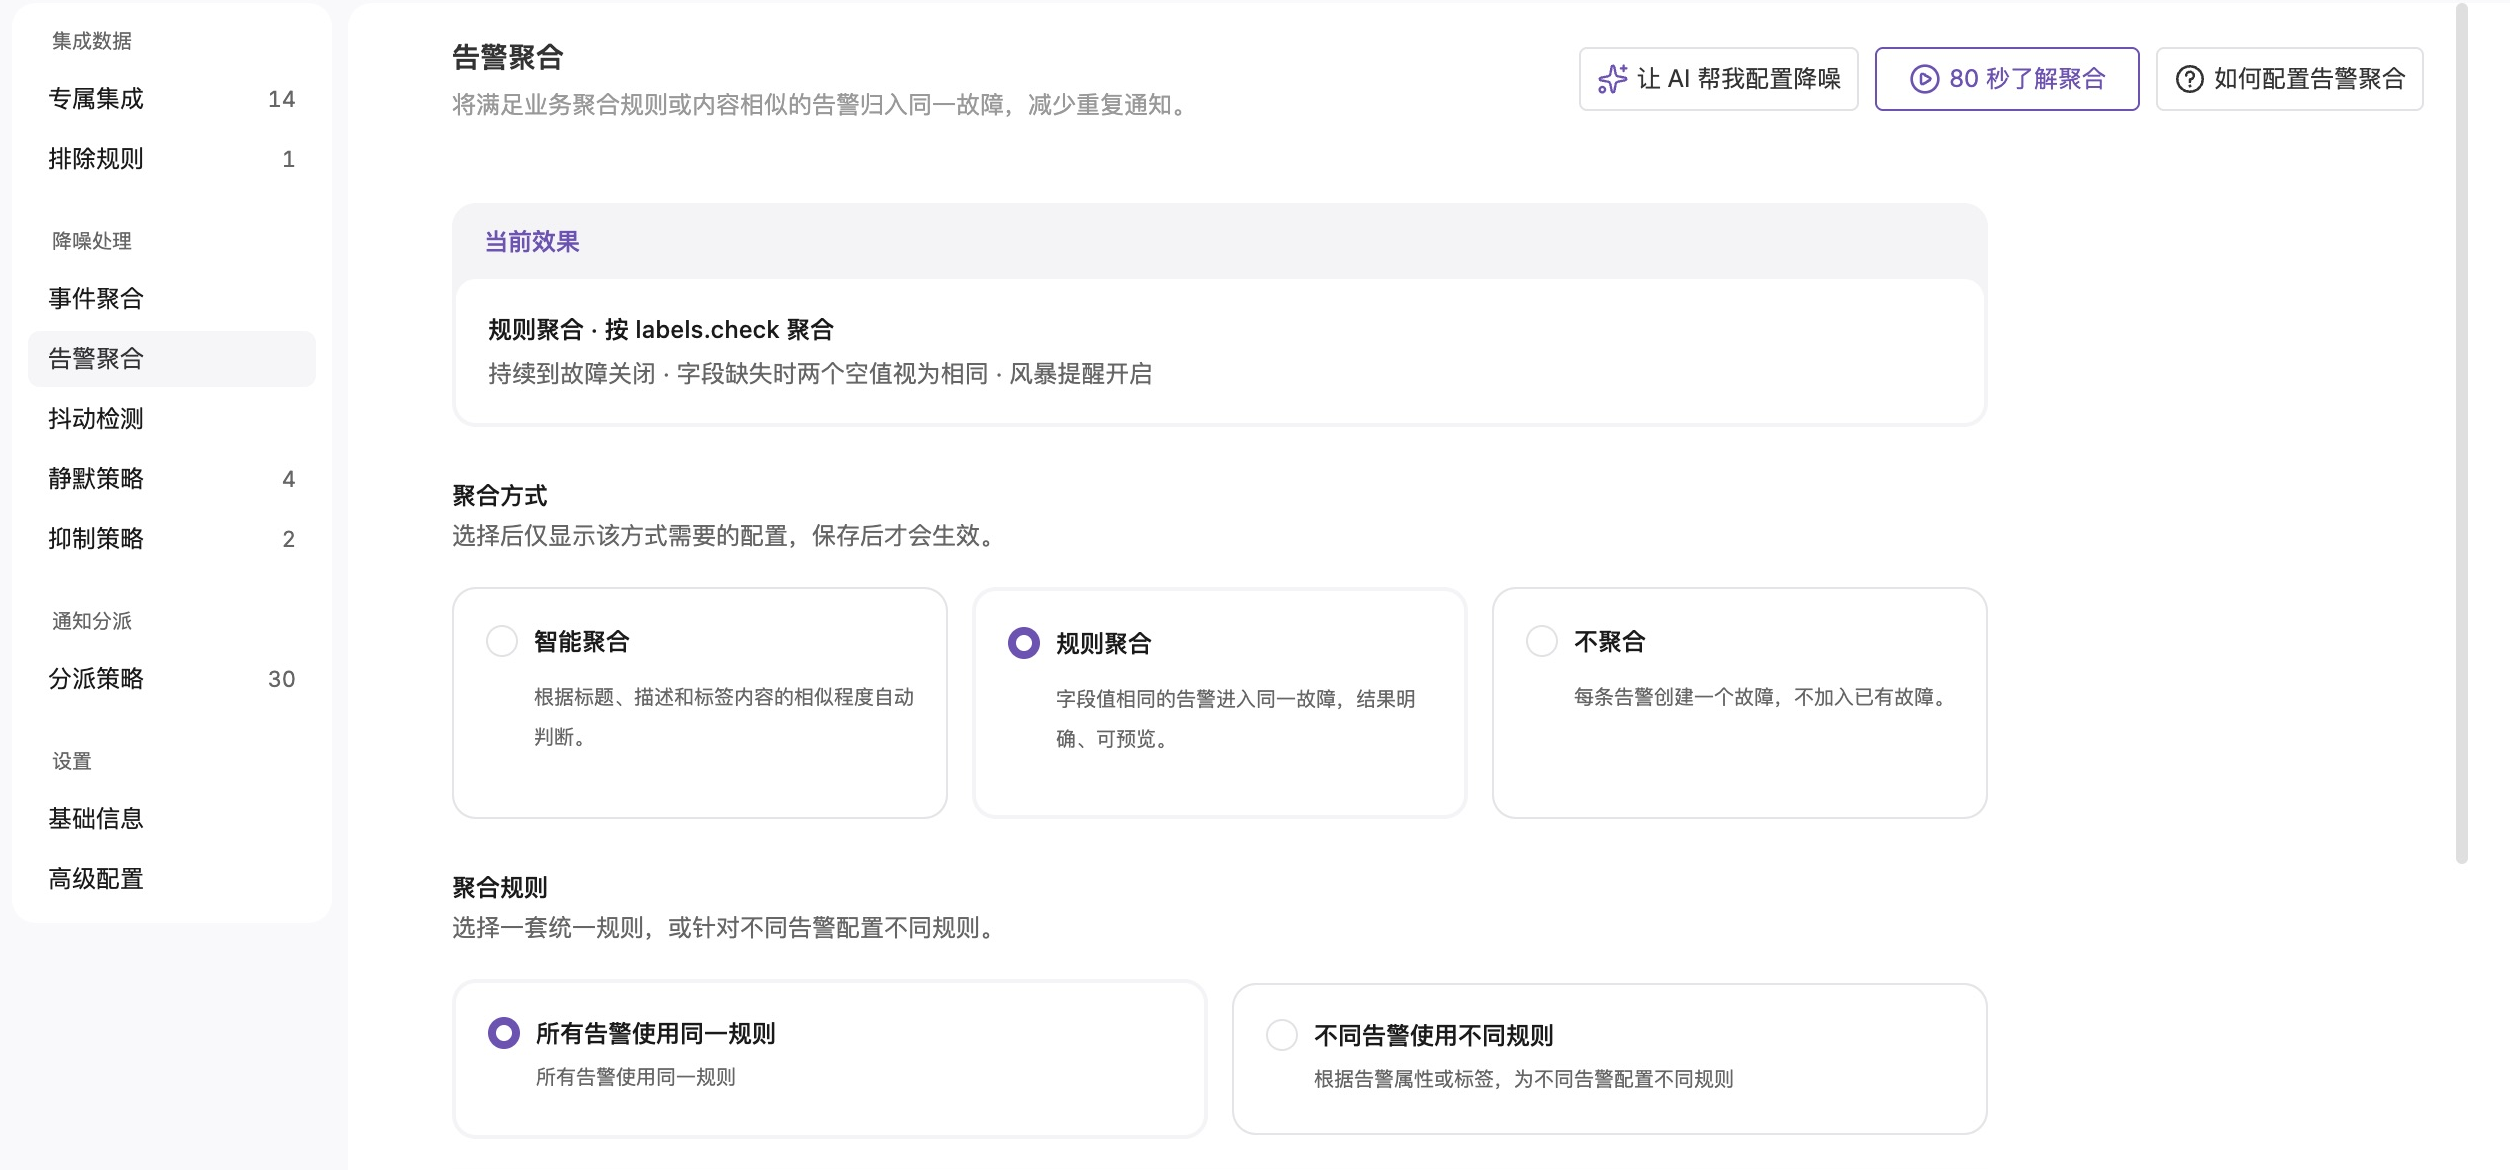
The Alert Grouping page offers three mutually exclusive methods. A choice takes effect only after you save it:
Method
Description
Plan availability
Intelligent grouping
Decided automatically from how similar the titles, descriptions and label content are; no manual rules
Pro or higher (selectable by default on-premises)
Rule-based grouping
Alerts with identical field values enter the same incident — predictable and previewable
Standard or higher
No grouping
Every alert creates its own incident and never joins an existing one
Every plan
In the create wizard, methods your subscription doesn’t include are greyed out, with the tooltip “Your current subscription does not support this grouping method”. The API field group_method carries the same choice: i (intelligent grouping), p (rule-based grouping), n (no grouping); see Incident webhook.Clicking another method card shows that method’s settings right below, with no confirmation dialog, and any draft you filled in before switching is kept. Nothing takes effect until you click Save.
Common configuration
Configuration
Description
Aggregation Window
Optional toggle. When disabled, new alerts continue merging into the incident until the incident is closed. When enabled, alerts within the window are merged; alerts arriving after the window expires are grouped into a new incident
Window Timing Start
Only configurable when the aggregation window is enabled. Incident trigger (default): Fixed timer starts from incident creation, stops grouping when the window duration is reached. Alert merges into incident: Timer resets each time a new alert merges in, the window recalculates from the last merge
Window Duration
Only configurable when the aggregation window is enabled. Set the duration of the aggregation window, minimum 1 minute. Rule-based grouping and intelligent grouping share the same cap: 24 hours by default, extendable to 30 days on request (contact the Flashduty team to enable)
Storm warning
Expand Advanced settings to configure. When merged alert count reaches a configured threshold, the system records an alert storm event in the incident timeline and triggers a warning notification, prompting urgent handling. You can configure up to 5 thresholds, each ranging from 2 to 10,000
Strict Grouping
Configure under Advanced settings in rule-based grouping. When enabled, a missing comparison field makes the alerts count as different, so they are not grouped; when disabled, a field that is empty on both sides counts as the same, but at least one comparison field must have a value, and alerts whose comparison fields are all empty are not grouped (not supported for intelligent grouping)
Intelligent Grouping
Rule-based Grouping
No Grouping
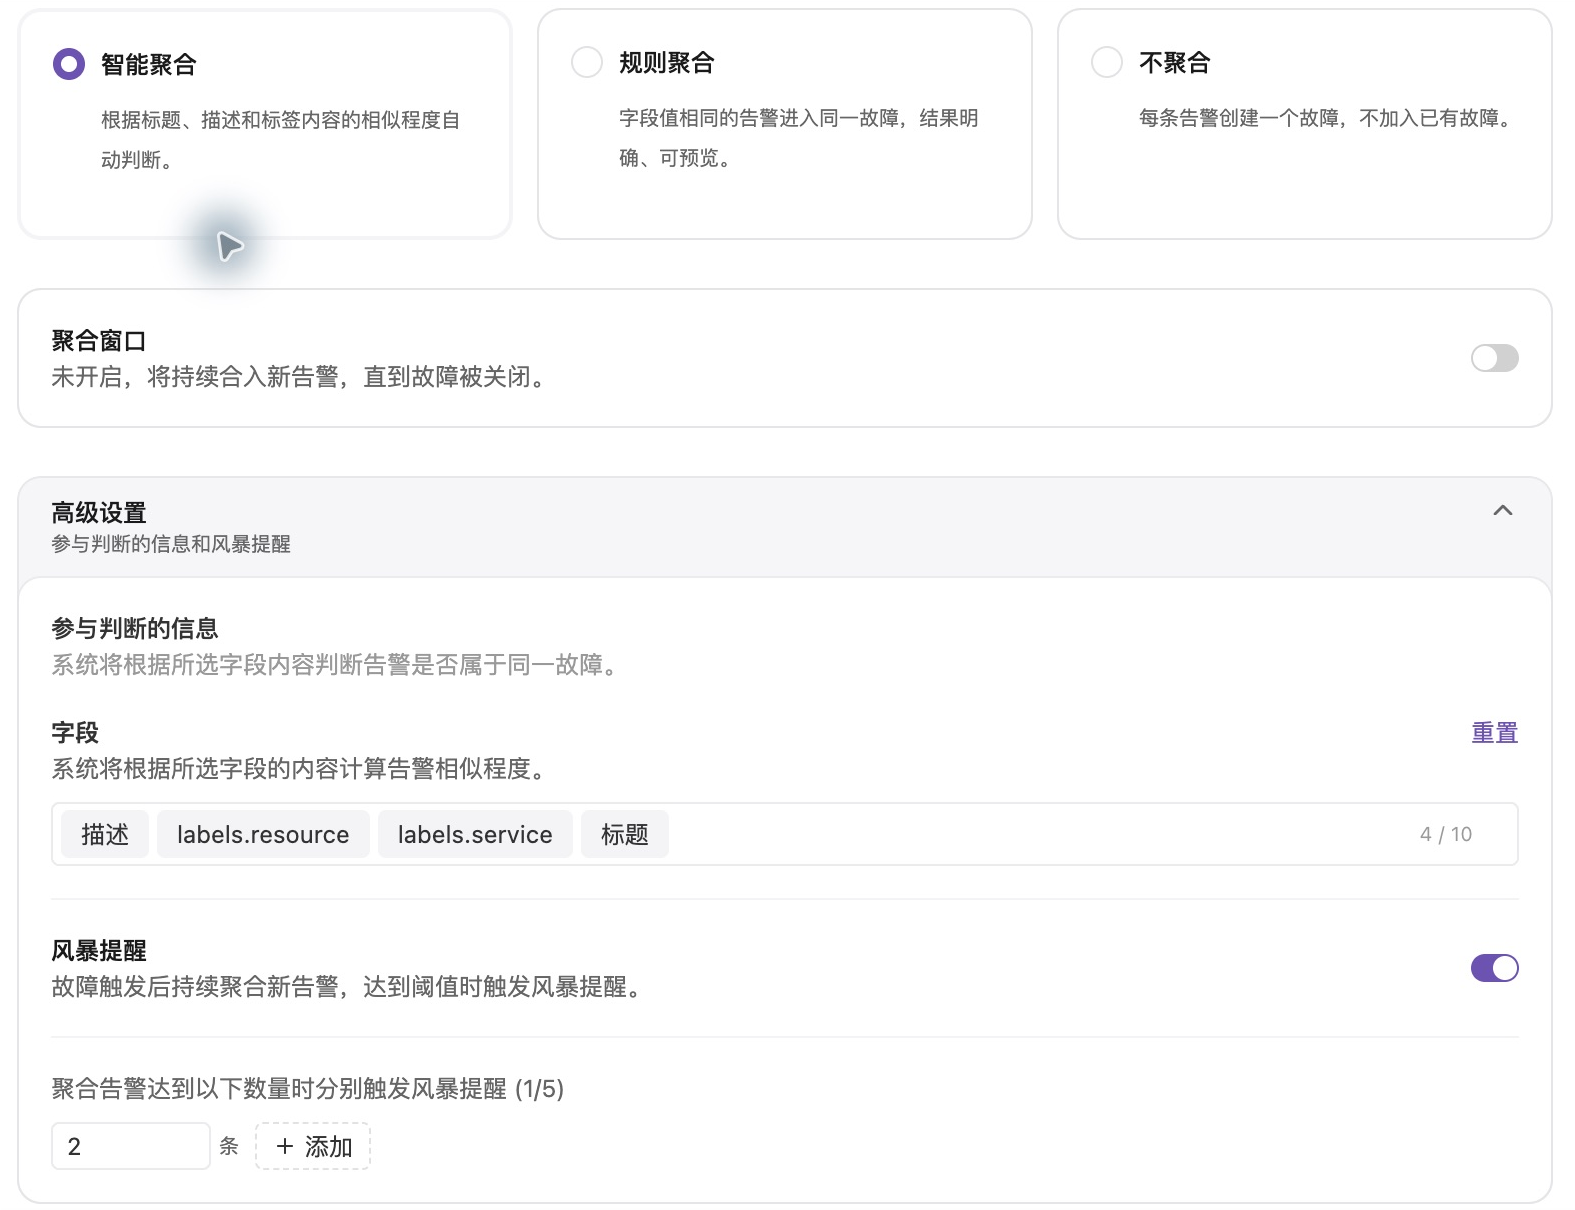
When new alerts are highly similar to active incidents, automatically merge into the incident. The system uses machine learning to calculate semantic similarity between alerts, requiring no manual rule definition.
1
Select Grouping Mode
Pick the Intelligent grouping card under Grouping method at the top of the page (greyed out on Standard, which needs Pro or higher)
2
Select information used for matching
Expand Advanced settings (described as “Similarity fields and storm alerts”), then select the fields under Information used for matching. Default fields include: title, description, labels.service, labels.resource. You can add or remove fields based on your needs, up to a maximum of 10 fields. Click Reset to restore default settings.
The system calculates alert similarity based on the selected fields’ content. When similarity reaches the threshold, new alerts automatically merge into existing incidents.
Intelligent Grouping Configuration
Exact matching by specified dimensions, only groups when all dimension values are identical. The Grouping rules section offers two mutually exclusive radio cards: one shared rule for every alert, or different rules for different alerts.All alerts use the same rule: every alert in the channel uses one set of grouping dimensions (subtitled “what has to match to enter the same incident”). Alerts enter the same incident only when all selected fields have identical values.
All Alerts Use the Same Rule Configuration
Different alerts use different rules: match rules per alert by attribute or label. You can add multiple condition branches, each containing match conditions and corresponding grouping dimensions:
The system matches conditions from top to bottom, using the grouping dimensions of the first matched branch
Supports reordering condition branch priority by moving them up or down
When no rule matches sets default fields as a fallback — “alerts are grouped by the default fields below; leave it empty and nothing is grouped”. Left empty, these alerts are not grouped and each creates its own incident
After you pick No grouping under Grouping method, the page shows only a Turn off alert grouping card: once saved, every new alert creates its own incident, and existing incidents and alerts are left untouched. The aggregation window, alert storm warning and strict grouping settings are hidden in this mode.No grouping is available on every plan, and it is the only method a free plan can use.
Preview rule grouping
After selecting Rule-based grouping and filling in the configuration, click Preview at the bottom to see how the current draft groups a sample of recent alerts. The result includes event, alert, and incident counts, plus the alerts in each incident. Previewing does not save the configuration. Click Save to apply the rule after reviewing the results.
Configuration limits
Grouping configuration has these limits:
Grouping mode
Limit
Cap
Description
Rule-based grouping
Grouping dimensions
Up to 5 per rule group
Number of dimensions per rule under “all alerts use the same rule” and “different alerts use different rules”
Rule-based grouping
Condition branches
Up to 100
Total condition branches you can configure under “different alerts use different rules”
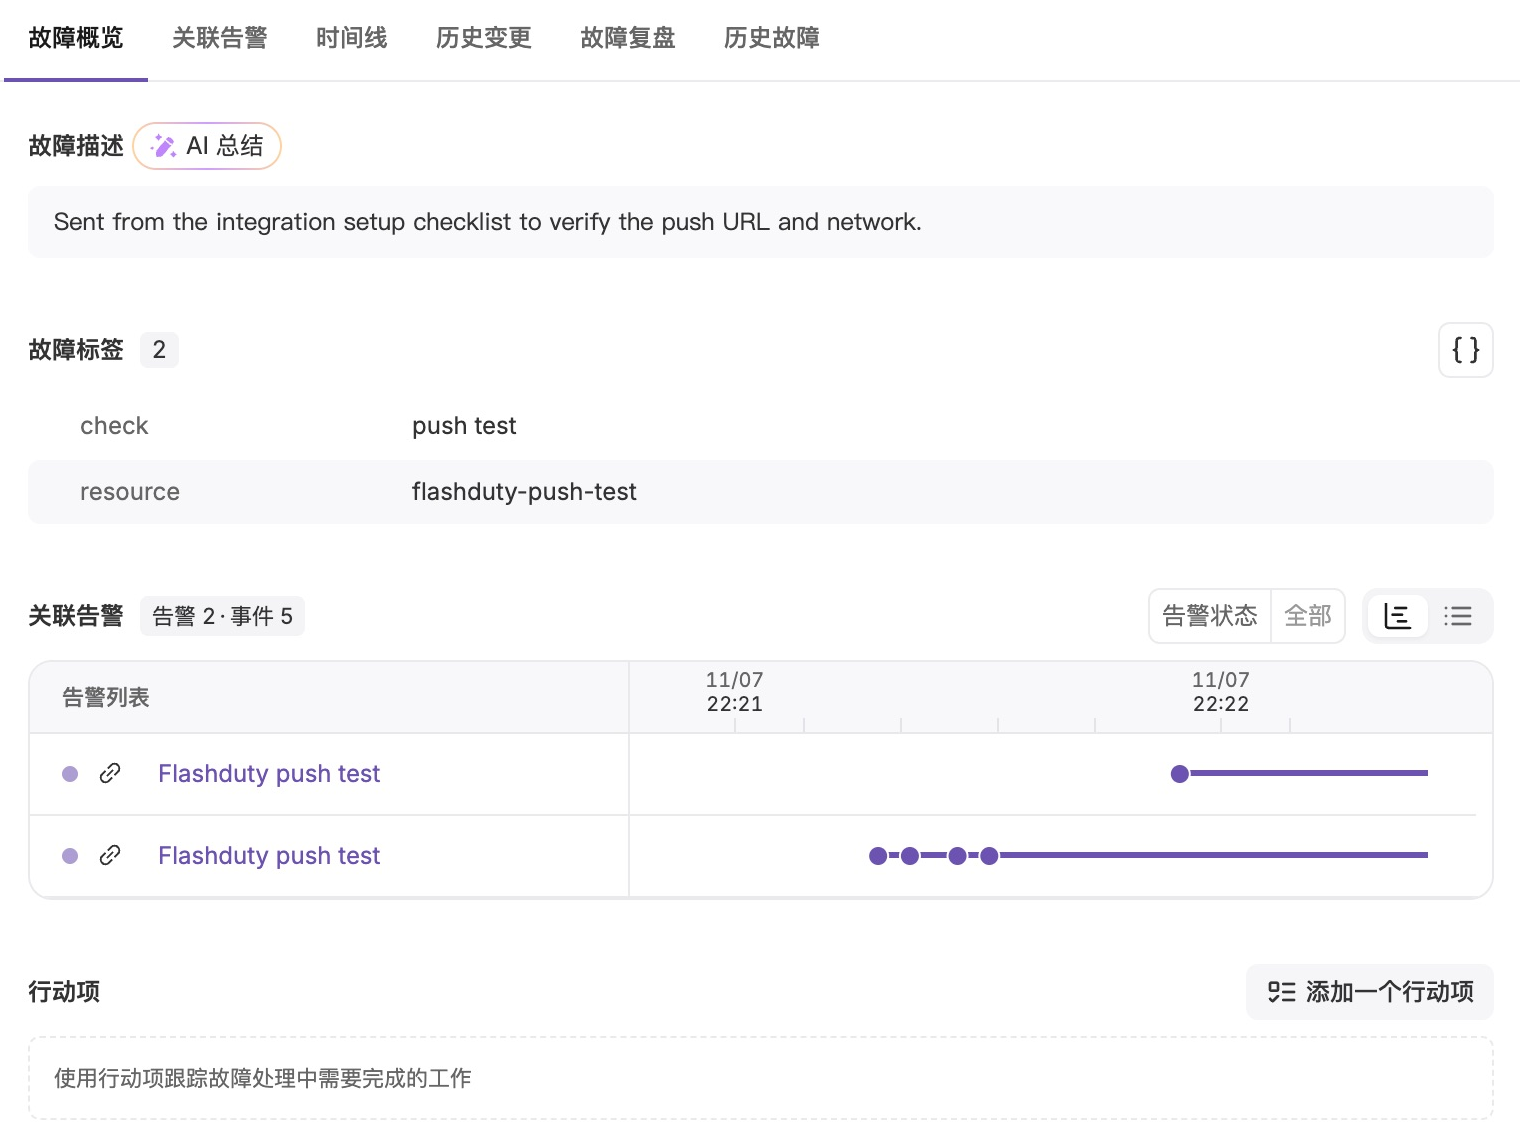
The screenshot below shows another incident example. In incident details, you can inspect grouping relationships:
Click alert title to view alert timeline and associated events
Click event point to view specific event content
Grouping Effect Display
Flapping detection
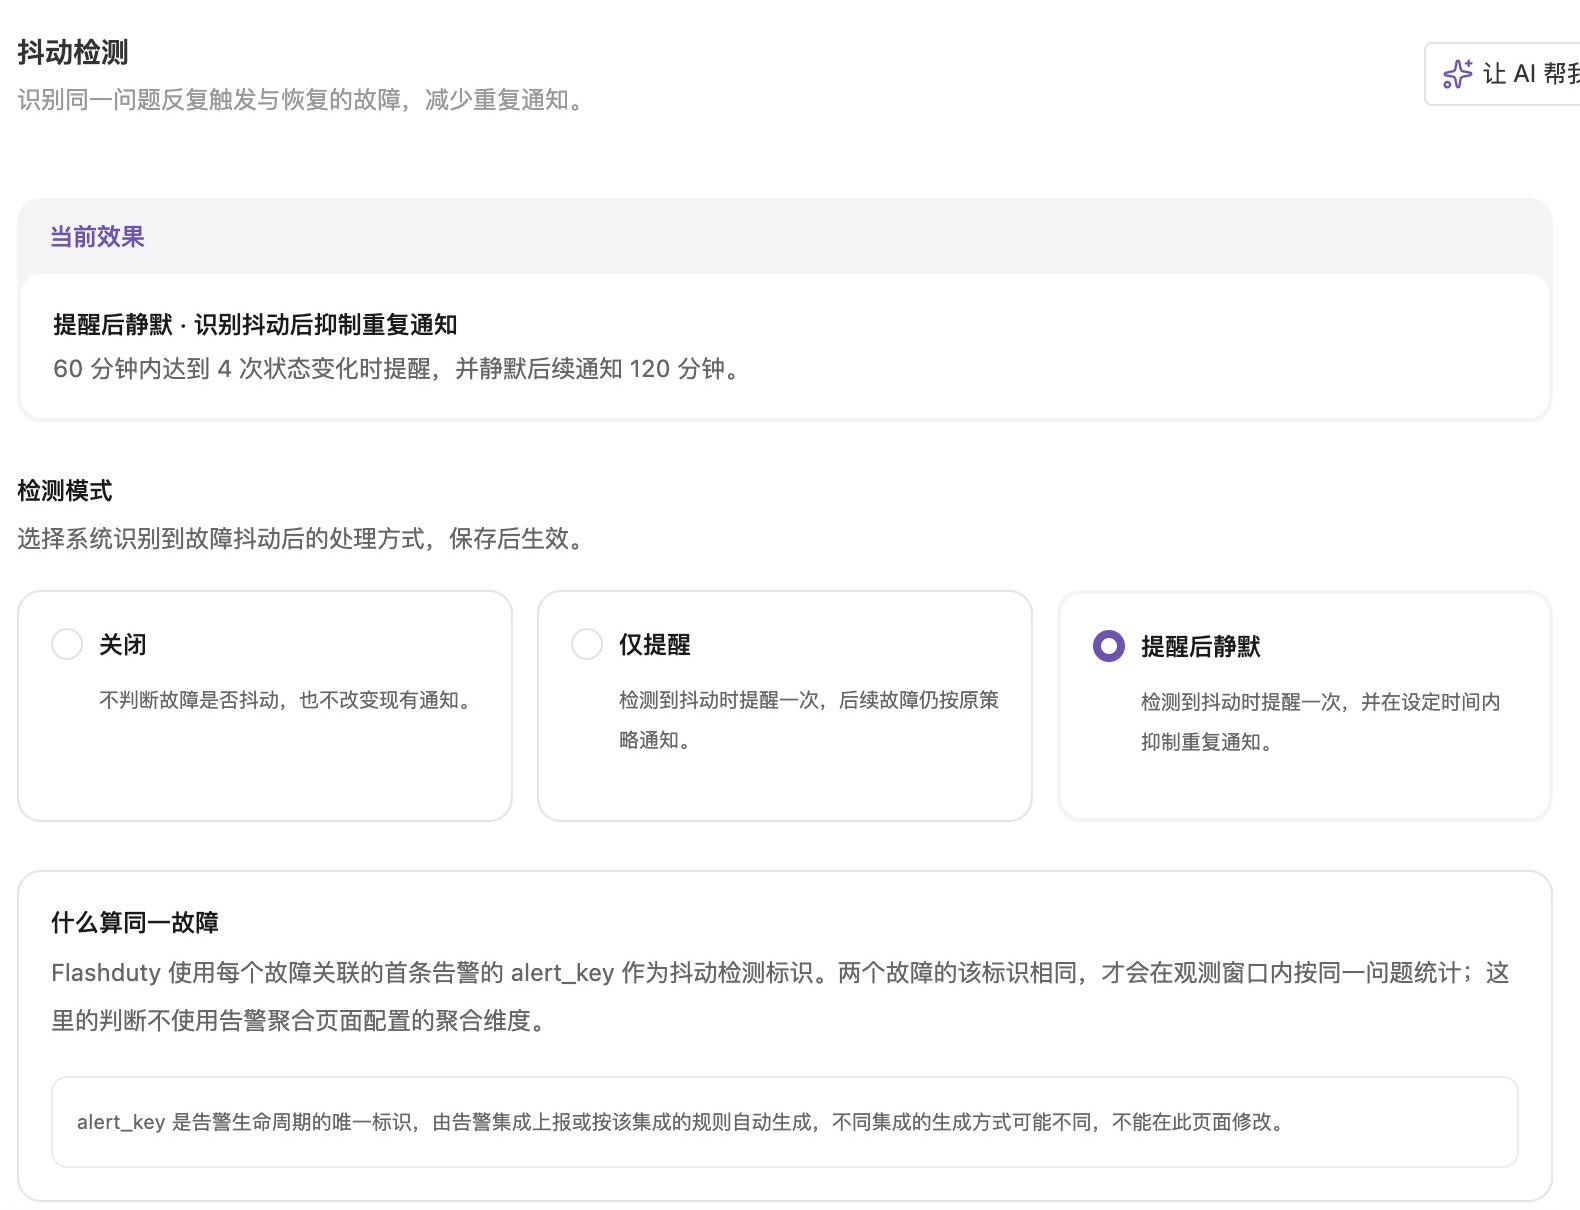
When the same incident triggers and recovers frequently, the system marks it as “flapping” status to avoid notification bombardment.Go to Channel Details → Configuration → Noise Reduction → Flapping Detection:
Option
Behavior
Off
Don’t detect flapping status
Alert Only
Mark flapping status, continue notifications per policy
Alert Then Silence
Mark flapping status, no more notifications after first alert
New channels enable flapping detection in Alert Only mode: Flashduty alerts once when it detects flapping, and later incidents still notify per their policy. The defaults are a 60-minute observation window and 4 state changes. Mute duration applies only in Alert Then Silence mode and defaults to 120 minutes; when you switch the mode to Alert Then Silence, Flashduty pre-fills the mute duration with 120 minutes.
Configurable parameters
Parameter
Description
Default
Range
State changes
Number of alert state changes within the observation window to trigger flapping detection
4
2–100
Observation window
Time window for counting state changes
60 minutes
1–1440 minutes
Mute duration
Duration to mute notifications after flapping is detected. Applies only in “Alert Then Silence” mode; in “Alert Only” mode the value is 0 and nothing is muted
120 minutes
30–1440 minutes
What counts as the same incident: Flashduty uses the alert_key of the first alert associated with each incident as the flapping identity. Two incidents are counted as the same problem inside the observation window only when that identity matches. This judgement does not use the grouping dimensions configured on the Alert Grouping page. The alert_key is reported by the alert integration or generated by that integration’s rules — integrations differ, and you cannot change it on this page.The Current effect card at the top of the page states the active mode in one line (for example, “Alert only · alerts once when flapping is detected”).
Silence rules
During maintenance windows or known issue periods, silence rules can suppress alert notifications for specific conditions.Go to Channel Details → Configuration → Noise Reduction → Silence Rules.The Search name or description box above the list filters it by rule name and description, case-insensitively. It does not match the values inside the conditions, and the list shows No matching results when nothing matches.
Silence time
Type
Description
One-time Silence
Active during specified time period, rule retained but inactive after expiration
Recurring Silence - Weekly Mode
Active at fixed weekly time periods, for example, every Saturday 00:00-06:00
Recurring Silence - Calendar Mode
Active per a service calendar or a trading calendar. The calendar can be one you created, or a China A-share, Hong Kong or US trading calendar; with a trading calendar the type becomes Trading day / Closed day and the hours are filled in with that exchange’s session. Clock times are read in the calendar’s time zone, and after a half trading day’s close the date counts as a rest day
Time input for One-time Silence: a duration input on the left (default 1d) plus an absolute time-range picker on the right. The two controls stay in sync:
Duration accepts shorthand such as 30m, 1h, 12h, 1d, 1w, 2w. Changing the duration recomputes the end time from the current moment.
You can also pick the start and end directly on the right; the duration input updates accordingly.
Start time must be earlier than end time, and neither field may be empty.
Auto-delete on expiration: one-time silence rules can opt into this switch. When it’s on, Flashduty deletes the rule 24 hours after its end time, as it does for Quick Silence. When it’s off (the default), the expired rule stays in the list, inactive, for you to reuse or delete.
Silence conditions
Define which alerts to silence. You can combine multiple conditions.
Alert appears in Raw Alerts List marked as “Silenced”, can be filtered and viewed
The next time you create a silence rule, Flashduty preselects the behavior you chose last.
Quick silence
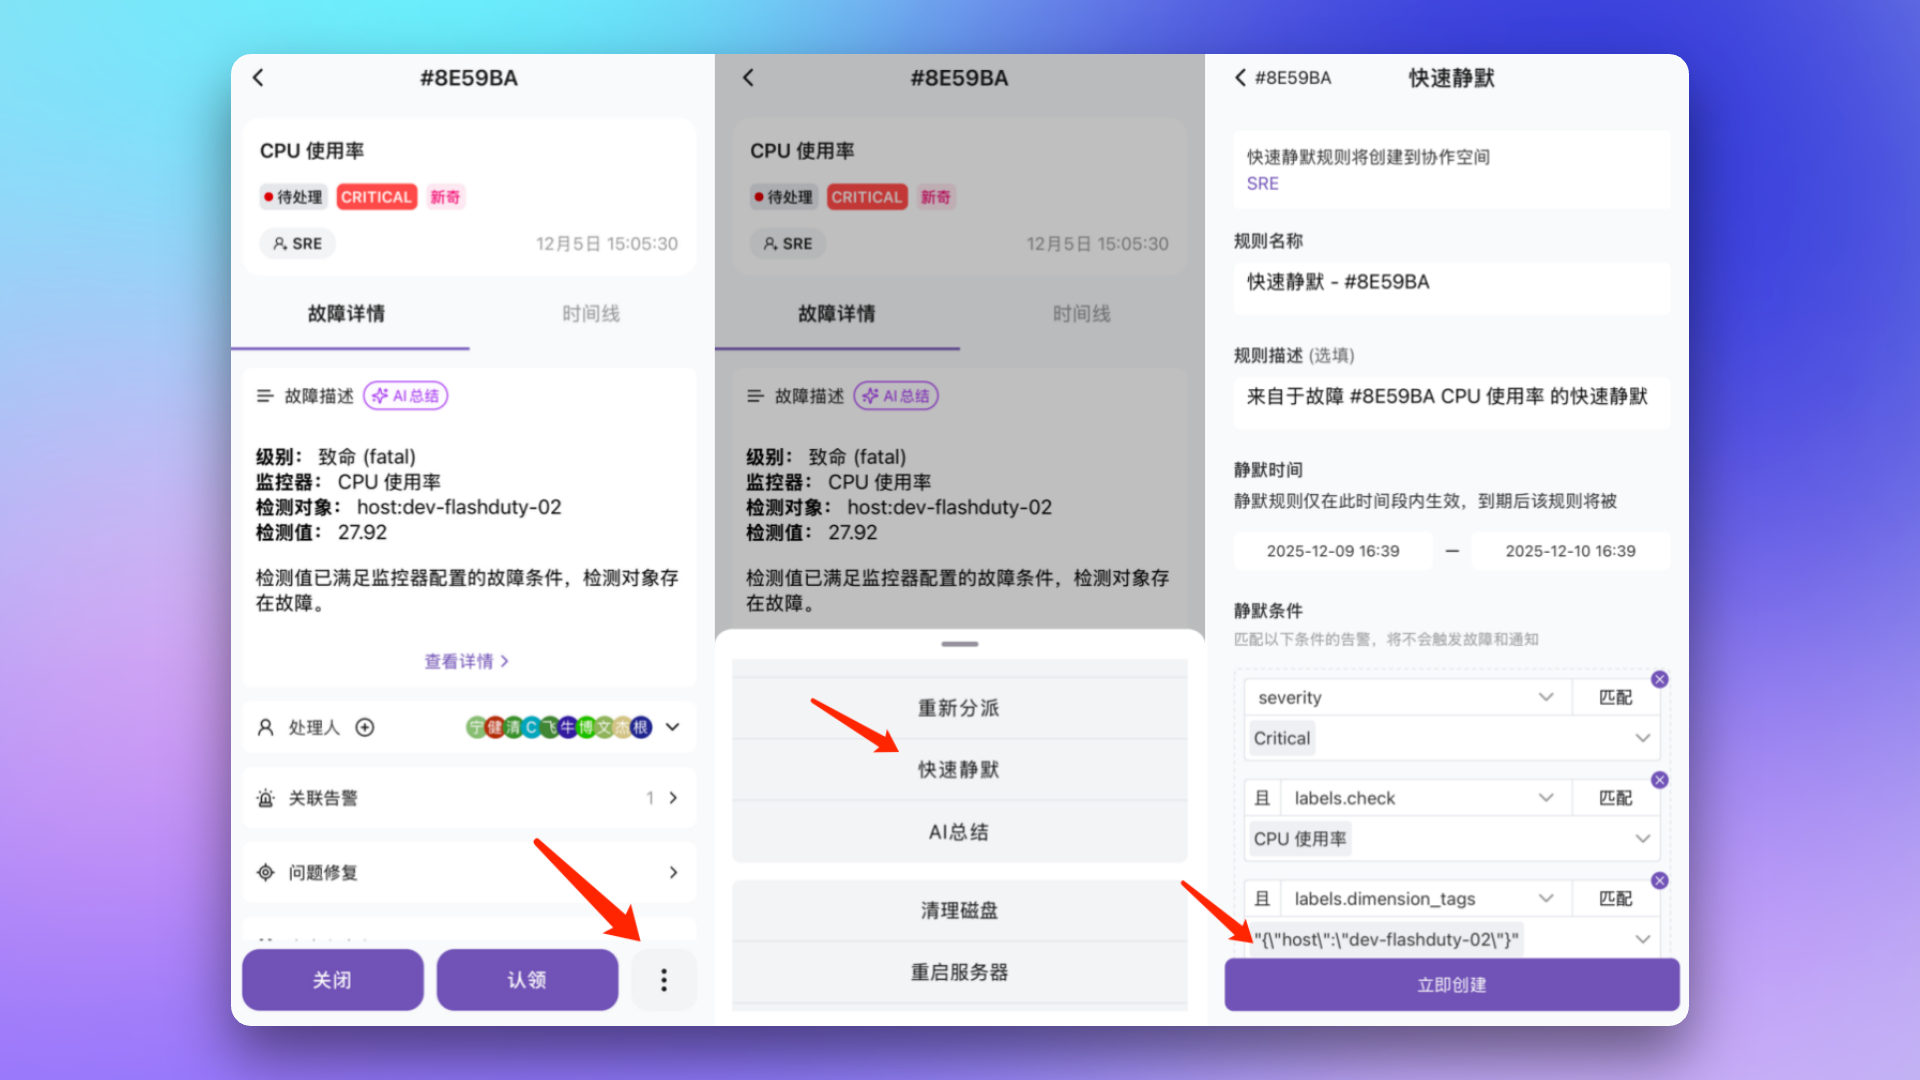
Quickly create temporary silence rules based on existing incidents.Operation Path: Incident Details → More Actions → Quick Silence
Rule name defaults to “Quick Silence - #short-ID”, with the incident title included in the description
Effective scope is the incident’s channel (cannot be changed)
One-time silence is the default and lasts 1 day. Type a custom duration on the left (such as 30m, 1h, 12h, 1d, 1w, or 2w), or pick an absolute time range on the right. Flashduty deletes a one-time rule after it expires
You can instead select recurring silence and configure the silenced time windows with the standard recurring schedule
Conditions default to severity plus filtered labels. Flashduty excludes two kinds of labels. System format rules exclude label values that are JSON, numeric, datetime-formatted, or overly long. Account exclusion rules exclude labels globally or per integration (see Quick-silence label exclusion rules)
Quick Silence Configuration
When you create a quick silence, the drawer lists the labels Flashduty excluded and why. Only the main account or account admins can change account exclusion rules. Flashduty builds the matching conditions from the source incident’s labels. Conditions that are too precise can let similar alerts through, so review them before you create the rule.
When repeatedly using quick silence on the same incident, it edits the original rule rather than creating a new one.
Copy a silence rule
Silence rules are listed in a table; click a row to expand it and see the rule’s details. In that list, open More actions (⋯) on the target rule and choose Copy (not offered for rules created by Quick Silence) to set the new rule’s name, description and target channel:
Configuration
Description
Rule name
Required; defaults to “Copy <original name>”, 39 characters max
Description
Defaults to the original description, 500 characters max
Channel
This channel or another channel (non-admins can choose only channels they manage)
The copy is a new, independent rule that keeps the source rule’s silence conditions, silence behavior, auto-delete setting and schedule, but is no longer linked to the source incident. After copying to another channel, click Go to view to open the new rule.
Inhibit rules
When a root cause alert exists, automatically inhibit related secondary alerts. For example: When a Critical level incident exists, inhibit Warning/Info level incidents for the same check item.
The Search name or description box above the inhibit rule list filters it by rule name and description, case-insensitively. It does not match the values inside the conditions, and the list shows No matching results when nothing matches.
Inhibit conditions
Flashduty inhibits a new alert when all of these hold:
The new alert meets the conditions.
A matching active alert exists from the last 10 minutes. Any active, unrecovered alert can be the source, acknowledged or not.
Both alerts share the equal items.
Configuration
Description
New Alert Conditions
Conditions the inhibited alert must meet, for example, severity is Warning/Info
Active Alert Conditions
Conditions the inhibiting source alert must meet, for example, severity is Critical
Equal Items
Attributes or labels that must be identical between both, for example, check item, hostname
Inhibit behavior
Behavior
Description
Drop Directly
Alert doesn’t appear in any list, no record
Retain and Mark
Alert appears in Alert List marked as “Inhibited”, can be filtered and viewed
Configuration example
Scenario: When Critical level alerts exist, inhibit Warning/Info level alerts for the same check item.
FAQ
Will the incident title change when new alerts merge in?
No. The incident takes its title from the first alert that triggered it. You can edit the title at any time, and new alerts don’t change it.
Will incident labels change when new alerts merge in?
Manually created incidents: No, labels list always remains empty
Auto-triggered incidents: Possibly, incident labels stay consistent with the first alert; if that alert’s labels change, incident labels update accordingly
Will alert labels change when new events merge in?
Yes. Alert labels always stay consistent with the latest merged event. However, if the new event is a recovery event, the alert keeps existing labels and only adds labels that didn’t exist before.
What's the maximum number of alerts a single incident can group?
Up to about 5000.
What's the maximum number of events a single alert can be associated with?
The channel’s Event Aggregation setting decides whether an event can merge into an existing alert. It governs the “Event → Alert” stage. It’s on by default with a 24-hour window, which you can set from 1 to 1440 minutes, extend to 7 days on request, or turn off:
Event Aggregation enabled: events with the same alert_key merge into the same alert within the window; events arriving after the window expires create a new alert
Event Aggregation disabled: every event creates an independent alert, with no merging
Note that Alert Grouping controls the merge window at the “Alert → Incident” stage (24 hours by default, extendable to 30 days). It is a separate concern from whether events merge into an alert — don’t conflate the two.
Related topics
Configure Escalation Rules
Define alert notification and escalation rules
Configure Filter Conditions
Learn about condition matching syntax
Was this page helpful?
{"docsConfig":{"theme":"mint","$schema":"https://mintlify.com/docs.json","name":"Flashduty Docs","description":"Flashduty 官方文档,涵盖 On-call 告警响应、Monitors 监控、RUM 与 AI SRE 的配置指南、集成方式和 API 参考。","colors":{"primary":"#8B5CF6","light":"#8B5CF6","dark":"#8B5CF6"},"logo":{"light":"https://mintcdn.com/flashduty-com/FpfuLufyi4FJe6mQ/logo/saas-logo.svg?fit=max\u0026auto=format\u0026n=FpfuLufyi4FJe6mQ\u0026q=85\u0026s=1656361bf7575f7275615ac9191db061","dark":"https://mintcdn.com/flashduty-com/FpfuLufyi4FJe6mQ/logo/saas-logo-white.svg?fit=max\u0026auto=format\u0026n=FpfuLufyi4FJe6mQ\u0026q=85\u0026s=744bbbd3bb703e9db8183af2ee98f185","href":"https://flashduty.com/"},"favicon":"https://mintcdn.com/flashduty-com/FpfuLufyi4FJe6mQ/logo/saas-favicon.png?fit=max\u0026auto=format\u0026n=FpfuLufyi4FJe6mQ\u0026q=85\u0026s=377e85b5ba71d5351ee7f84b5d70b1e1","navbar":{"links":[{"icon":"code","href":"/zh/openapi/introduction","label":"API Reference"}],"primary":{"type":"button","label":"Console","href":"https://console.flashcat.cloud"}},"seo":{"metatags":{"canonical":"https://docs.flashduty.com"},"organization":{"id":"https://flashduty.com/#organization","name":"Flashduty","legalName":"北京快猫星云科技有限公司","url":"https://flashduty.com/","logo":"https://docs.flashduty.com/logo/saas-logo.svg","sameAs":["https://github.com/flashcatcloud"]},"indexing":"all"},"styling":{"latex":true},"navigation":{"languages":[{"language":"zh","footer":{"socials":{"github":"https://github.com/flashcatcloud"},"links":[{"header":"Flashduty","items":[{"label":"官网","href":"https://www.flashduty.com/zh"},{"label":"定价","href":"https://www.flashduty.com/zh/pricing"},{"label":"集成目录","href":"https://www.flashduty.com/zh/integrations"},{"label":"博客","href":"https://www.flashduty.com/zh/now/blog"}]},{"header":"支持","items":[{"label":"联系我们","href":"https://www.flashduty.com/zh/contact"},{"label":"安全与合规","href":"https://www.flashduty.com/zh/legal/security"},{"label":"服务 SLA","href":"/zh/compliance/service-sla"}]},{"header":"法律","items":[{"label":"服务条款","href":"/zh/compliance/terms-of-service"},{"label":"用户协议","href":"/zh/compliance/user-agreement"},{"label":"隐私政策","href":"/zh/compliance/privacy-policy"},{"label":"退款政策","href":"/zh/compliance/refund-policy"}]}]},"navbar":{"links":[{"icon":"code","href":"/zh/openapi/introduction","label":"API 参考"}],"primary":{"type":"button","label":"控制台","href":"https://console.flashcat.cloud"}},"href":"zh/home"},{"language":"en","footer":{"socials":{"github":"https://github.com/flashcatcloud"},"links":[{"header":"Flashduty","items":[{"label":"Website","href":"https://www.flashduty.com/en"},{"label":"Pricing","href":"https://www.flashduty.com/en/pricing"},{"label":"Integrations","href":"https://www.flashduty.com/en/integrations"},{"label":"Blog","href":"https://www.flashduty.com/en/now/blog"}]},{"header":"Support","items":[{"label":"Contact us","href":"https://www.flashduty.com/en/contact"},{"label":"Security","href":"https://www.flashduty.com/en/legal/security"},{"label":"Service SLA","href":"/en/compliance/service-sla"}]},{"header":"Legal","items":[{"label":"Terms of Service","href":"/en/compliance/terms-of-service"},{"label":"User Agreement","href":"/en/compliance/user-agreement"},{"label":"Privacy Policy","href":"/en/compliance/privacy-policy"},{"label":"Refund Policy","href":"/en/compliance/refund-policy"}]}]},"navbar":{"links":[{"icon":"code","href":"/en/openapi/introduction","label":"API Reference"}],"primary":{"type":"button","label":"Console","href":"https://console.flashcat.cloud"}},"href":"en/home"}]}},"deployment":{"deploymentMetadataValue":{"subdomain":"flashduty-com","hasAudioNarration":false,"actualSubdomain":"flashduty-com","customDomains":["docs.flashduty.com"],"gitSource":{"type":"github","owner":"flashcatcloud","repo":"flashduty-docs","deployBranch":"main","contentDirectory":"","isPrivate":false,"mountPath":"","label":""},"feedback":{"thumbs":true},"entitlements":{},"buildId":"6affc7d52bab8c36268d629d","clientVersion":"0.0.4227","searchFilterCounts":[{"language":"en","tag":"On-call","count":621},{"language":"zh","tag":"On-call","count":621},{"language":"en","tag":"API Reference","count":396},{"language":"zh","tag":"API 参考","count":396},{"language":"en","tag":"Integrations","count":378},{"language":"zh","tag":"集成中心","count":378},{"language":"en","tag":"Alert Integration","count":297},{"language":"zh","tag":"告警集成","count":297},{"language":"en","tag":"RUM","count":125},{"language":"zh","tag":"RUM","count":125},{"language":"en","tag":"AI SRE","count":70},{"language":"en","tag":"Monitors","count":70},{"language":"zh","tag":"AI SRE","count":70},{"language":"zh","tag":"Monitors","count":70},{"language":"zh","tag":"故障管理","count":65},{"language":"en","tag":"Incidents","count":55},{"language":"en","tag":"Change Integration","count":40},{"language":"en","tag":"SDK Integration","count":40},{"language":"zh","tag":"变更集成","count":40},{"language":"zh","tag":"SDK 接入","count":40}]},"assistantConfig":{"enableAskAiButton":false,"enableStarterQuestions":false,"enableContextualStarterQuestions":false,"enableAskAiSearchBar":true},"basePath":"","hasChatPermissions":false,"hasWebMcpPermissions":false,"toggles":[{"name":"kill-isr","enabled":true,"variant":{"name":"disabled","enabled":false,"feature_enabled":true},"impressionData":false},{"name":"custom-rbac-roles","enabled":true,"variant":{"name":"disabled","enabled":false,"feature_enabled":true},"impressionData":false},{"name":"agent-mintlify-slack","enabled":true,"variant":{"name":"disabled","enabled":false,"feature_enabled":true},"impressionData":false},{"name":"agent-integrations-settings","enabled":true,"variant":{"name":"disabled","enabled":false,"feature_enabled":true},"impressionData":false},{"name":"rbac-expansion","enabled":true,"variant":{"name":"disabled","enabled":false,"feature_enabled":true},"impressionData":false},{"name":"automations-pr-grouping","enabled":true,"variant":{"name":"disabled","enabled":false,"feature_enabled":true},"impressionData":false},{"name":"custom-prefix","enabled":true,"variant":{"name":"disabled","enabled":false,"feature_enabled":true},"impressionData":false},{"name":"analytics-v7","enabled":true,"variant":{"name":"disabled","enabled":false,"feature_enabled":true},"impressionData":false},{"name":"user-flows-analytics","enabled":true,"variant":{"name":"disabled","enabled":false,"feature_enabled":true},"impressionData":false},{"name":"no-publish-flow","enabled":true,"variant":{"name":"disabled","enabled":false,"feature_enabled":true},"impressionData":false},{"name":"workos-onboarding","enabled":true,"variant":{"name":"disabled","enabled":false,"feature_enabled":true},"impressionData":false},{"name":"snapshot-serving-live","enabled":true,"variant":{"name":"disabled","enabled":false,"feature_enabled":true},"impressionData":false},{"name":"stripTemperatureMiddleware","enabled":true,"variant":{"name":"disabled","enabled":false,"feature_enabled":true},"impressionData":false},{"name":"support-platform-pylon-zendesk","enabled":true,"variant":{"name":"disabled","enabled":false,"feature_enabled":true},"impressionData":false},{"name":"snapshot-serving","enabled":true,"variant":{"name":"disabled","enabled":false,"feature_enabled":true},"impressionData":false},{"name":"instant-rollback","enabled":true,"variant":{"name":"disabled","enabled":false,"feature_enabled":true},"impressionData":false},{"name":"granular-notifications-server","enabled":true,"variant":{"name":"disabled","enabled":false,"feature_enabled":true},"impressionData":false},{"name":"granular-notifications","enabled":true,"variant":{"name":"disabled","enabled":false,"feature_enabled":true},"impressionData":false},{"name":"automations-fable","enabled":true,"variant":{"name":"disabled","enabled":false,"feature_enabled":true},"impressionData":false},{"name":"fixed-ai-action-pricing","enabled":true,"variant":{"name":"disabled","enabled":false,"feature_enabled":true},"impressionData":false},{"name":"site-roles","enabled":true,"variant":{"name":"disabled","enabled":false,"feature_enabled":true},"impressionData":false},{"name":"automation-resolve-merge-conflict","enabled":true,"variant":{"name":"disabled","enabled":false,"feature_enabled":true},"impressionData":false},{"name":"scoped-publishing","enabled":true,"variant":{"name":"disabled","enabled":false,"feature_enabled":true},"impressionData":false},{"name":"mintql","enabled":true,"variant":{"name":"disabled","enabled":false,"feature_enabled":true},"impressionData":false},{"name":"page-level-analytics","enabled":true,"variant":{"name":"disabled","enabled":false,"feature_enabled":true},"impressionData":false},{"name":"editor-version-history-v2","enabled":true,"variant":{"name":"disabled","enabled":false,"feature_enabled":true},"impressionData":false},{"name":"billing-page-v2","enabled":true,"variant":{"name":"disabled","enabled":false,"feature_enabled":true},"impressionData":false},{"name":"full-page-search","enabled":true,"variant":{"name":"disabled","enabled":false,"feature_enabled":true},"impressionData":false},{"name":"workspace-projects","enabled":true,"variant":{"name":"disabled","enabled":false,"feature_enabled":true},"impressionData":false},{"name":"assistant-v5","enabled":true,"variant":{"name":"disabled","enabled":false,"feature_enabled":true},"impressionData":false},{"name":"fork-pr-previews","enabled":true,"variant":{"name":"disabled","enabled":false,"feature_enabled":true},"impressionData":false},{"name":"revalidation-jwt","enabled":true,"variant":{"name":"disabled","enabled":false,"feature_enabled":true},"impressionData":false},{"name":"workos-sso-scim","enabled":true,"variant":{"name":"disabled","enabled":false,"feature_enabled":true},"impressionData":false},{"name":"hobby-abuse-scan","enabled":true,"variant":{"name":"disabled","enabled":false,"feature_enabled":true},"impressionData":false},{"name":"dashboard-inbox","enabled":true,"variant":{"name":"disabled","enabled":false,"feature_enabled":true},"impressionData":false},{"name":"workos-signup","enabled":true,"variant":{"name":"disabled","enabled":false,"feature_enabled":true},"impressionData":false},{"name":"turbopuffer-dual-write","enabled":true,"variant":{"name":"disabled","enabled":false,"feature_enabled":true},"impressionData":false},{"name":"workos-enabled","enabled":true,"variant":{"name":"disabled","enabled":false,"feature_enabled":true},"impressionData":false},{"name":"approve-review-flow","enabled":true,"variant":{"name":"disabled","enabled":false,"feature_enabled":true},"impressionData":false},{"name":"editor-metadata","enabled":true,"variant":{"name":"disabled","enabled":false,"feature_enabled":true},"impressionData":false},{"name":"sso-setup-deadline-banner","enabled":true,"variant":{"name":"disabled","enabled":false,"feature_enabled":true},"impressionData":false},{"name":"turbopuffer-serve","enabled":true,"variant":{"name":"disabled","enabled":false,"feature_enabled":true},"impressionData":false},{"name":"live-agents","enabled":true,"variant":{"name":"disabled","enabled":false,"feature_enabled":true},"impressionData":false},{"name":"starter-pricing","enabled":true,"variant":{"name":"control","enabled":true,"payload":{"type":"string","value":"control"},"feature_enabled":true},"impressionData":false},{"name":"llms-txt-v2","enabled":true,"variant":{"name":"disabled","enabled":false,"feature_enabled":true},"impressionData":false},{"name":"wildcard-email-auth","enabled":true,"variant":{"name":"disabled","enabled":false,"feature_enabled":true},"impressionData":false}],"googleFontsInlined":false},"customCss":[]}
{"page":{"pagePath":"en/on-call/channel/noise-reduction","slug":"/en/on-call/channel/noise-reduction","pageMetadata":{"title":"Noise reduction","description":"Reduce alert noise through grouping, silencing, inhibition, and other strategies to improve processing efficiency","href":"/en/on-call/channel/noise-reduction"},"description":{"compiledSource":"\"use strict\";\nconst {jsx: _jsx} = arguments[0];\nconst {useMDXComponents: _provideComponents} = arguments[0];\nfunction _createMdxContent(props) {\n const _components = {\n p: \"p\",\n ..._provideComponents(),\n ...props.components\n };\n return _jsx(_components.p, {\n children: \"Reduce alert noise through grouping, silencing, inhibition, and other strategies to improve processing efficiency\"\n });\n}\nfunction MDXContent(props = {}) {\n const {wrapper: MDXLayout} = {\n ..._provideComponents(),\n ...props.components\n };\n return MDXLayout ? _jsx(MDXLayout, {\n ...props,\n children: _jsx(_createMdxContent, {\n ...props\n })\n }) : _createMdxContent(props);\n}\nreturn {\n default: MDXContent\n};\n","frontmatter":{},"scope":{}},"pageType":"default","mdx":{"mdxSource":{"compiledSource":"\"use strict\";const{Fragment:_Fragment,jsx:_jsx,jsxs:_jsxs}=arguments[0];const{useMDXComponents:_provideComponents}=arguments[0];function _createMdxContent(props){const _components={a:`a`,code:`code`,img:`img`,li:`li`,p:`p`,pre:`pre`,span:`span`,strong:`strong`,tbody:`tbody`,td:`td`,th:`th`,thead:`thead`,tr:`tr`,ul:`ul`,..._provideComponents(),...props.components},{Accordion,AccordionGroup,Card,CardGroup,CodeBlock,Frame,Heading,Note,OptimizedImage,Step,Steps,Tab,Table,Tabs,Tip}=_components;if(!Accordion)_missingMdxReference(`Accordion`,true);if(!AccordionGroup)_missingMdxReference(`AccordionGroup`,true);if(!Card)_missingMdxReference(`Card`,true);if(!CardGroup)_missingMdxReference(`CardGroup`,true);if(!CodeBlock)_missingMdxReference(`CodeBlock`,true);if(!Frame)_missingMdxReference(`Frame`,true);if(!Heading)_missingMdxReference(`Heading`,true);if(!Note)_missingMdxReference(`Note`,true);if(!OptimizedImage)_missingMdxReference(`OptimizedImage`,true);if(!Step)_missingMdxReference(`Step`,true);if(!Steps)_missingMdxReference(`Steps`,true);if(!Tab)_missingMdxReference(`Tab`,true);if(!Table)_missingMdxReference(`Table`,true);if(!Tabs)_missingMdxReference(`Tabs`,true);if(!Tip)_missingMdxReference(`Tip`,true);return _jsxs(_Fragment,{children:[_jsxs(Tip,{children:[_jsx(_components.strong,{children:`Plan requirement`}),`: which grouping methods you can pick depends on your subscription — `,_jsx(_components.strong,{children:`No grouping`}),` is available on every plan, `,_jsx(_components.strong,{children:`Rule-based grouping`}),` requires On-call Standard or higher, and `,_jsx(_components.strong,{children:`Intelligent grouping`}),` requires On-call Pro (selectable by default on-premises). Alert storm warning and inhibit rules require an On-call Standard or higher subscription. Silence rules are available on all plans. `,_jsx(_components.a,{href:`https://flashcat.cloud/flashduty/price/`,children:`Learn more`})]}),`\n`,_jsx(_components.p,{children:`An alert storm can bring hundreds of similar notifications. Noise reduction groups these alerts into one incident, so you handle it once instead of wading through repeats.`}),`\n`,_jsx(Heading,{level:`2`,id:`why-noise-reduction`,children:`Why noise reduction`}),`\n`,_jsxs(Table,{children:[_jsx(_components.thead,{children:_jsxs(_components.tr,{children:[_jsx(_components.th,{style:{textAlign:`left`},children:`Scenario`}),_jsx(_components.th,{style:{textAlign:`left`},children:`Without Noise Reduction`}),_jsx(_components.th,{style:{textAlign:`left`},children:`With Noise Reduction`})]})}),_jsxs(_components.tbody,{children:[_jsxs(_components.tr,{children:[_jsx(_components.td,{style:{textAlign:`left`},children:`Server outage triggers 100 alerts`}),_jsx(_components.td,{style:{textAlign:`left`},children:`Receive 100 notifications, must handle each one`}),_jsx(_components.td,{style:{textAlign:`left`},children:`Receive 1 incident, handle uniformly`})]}),_jsxs(_components.tr,{children:[_jsx(_components.td,{style:{textAlign:`left`},children:`Network flapping causes repeated alert trigger/recovery`}),_jsx(_components.td,{style:{textAlign:`left`},children:`Notification bombardment, exhausting to respond`}),_jsx(_components.td,{style:{textAlign:`left`},children:`Marked as flapping, reduced interference`})]}),_jsxs(_components.tr,{children:[_jsx(_components.td,{style:{textAlign:`left`},children:`Batch alerts at midnight`}),_jsx(_components.td,{style:{textAlign:`left`},children:`Woken up multiple times by calls/SMS`}),_jsx(_components.td,{style:{textAlign:`left`},children:`Notified only once, sleep unaffected`})]})]})]}),`\n`,_jsx(Heading,{level:`2`,id:`core-concepts`,children:`Core concepts`}),`\n`,_jsx(_components.p,{children:`Before understanding noise reduction, you need to understand the relationship between three core objects:`}),`\n`,_jsx(CodeBlock,{numberOfLines:`2`,language:`text`,children:_jsx(_components.pre,{className:`shiki shiki-themes github-light-default dark-plus`,style:{backgroundColor:`#ffffff`,\"--shiki-dark-bg\":`#0B0C0E`,color:`#1f2328`,\"--shiki-dark\":`#D4D4D4`},language:`text`,children:_jsxs(_components.code,{language:`text`,numberOfLines:`2`,children:[_jsx(_components.span,{className:`line`,children:_jsx(_components.span,{children:`Monitoring System → Event → Alert → Incident`})}),`\n`,_jsx(_components.span,{className:`line`,children:_jsx(_components.span,{})})]})})}),`\n`,_jsxs(Table,{children:[_jsx(_components.thead,{children:_jsxs(_components.tr,{children:[_jsx(_components.th,{style:{textAlign:`left`},children:`Object`}),_jsx(_components.th,{style:{textAlign:`left`},children:`Definition`}),_jsx(_components.th,{style:{textAlign:`left`},children:`Source`})]})}),_jsxs(_components.tbody,{children:[_jsxs(_components.tr,{children:[_jsx(_components.td,{style:{textAlign:`left`},children:_jsx(_components.strong,{children:`Event`})}),_jsx(_components.td,{style:{textAlign:`left`},children:`Raw notification from monitoring system, each trigger or recovery is an event`}),_jsx(_components.td,{style:{textAlign:`left`},children:`Zabbix, Prometheus, and so on`})]}),_jsxs(_components.tr,{children:[_jsx(_components.td,{style:{textAlign:`left`},children:_jsx(_components.strong,{children:`Alert`})}),_jsxs(_components.td,{style:{textAlign:`left`},children:[`Automatically triggered by events. Events sharing the same `,_jsx(_components.code,{children:`alert_key`}),` merge into one alert within the channel’s `,_jsx(_components.strong,{children:`Event Aggregation`}),` window`]}),_jsx(_components.td,{style:{textAlign:`left`},children:`Automatically created by Flashduty`})]}),_jsxs(_components.tr,{children:[_jsx(_components.td,{style:{textAlign:`left`},children:_jsx(_components.strong,{children:`Incident`})}),_jsx(_components.td,{style:{textAlign:`left`},children:`Primary object processed by Flashduty, triggered by alerts or created manually`}),_jsx(_components.td,{style:{textAlign:`left`},children:`Auto-triggered or manually created`})]})]})]}),`\n`,_jsxs(Note,{children:[_jsxs(_components.p,{children:[_jsx(_components.strong,{children:`Key understanding`}),`:`]}),_jsxs(_components.ul,{children:[`\n`,_jsxs(_components.li,{children:[`One alert can contain multiple events (events with the same `,_jsx(_components.code,{children:`alert_key`}),` that arrive within the Event Aggregation window, plus the corresponding recovery events)`]}),`\n`,_jsx(_components.li,{children:`One incident can contain multiple alerts (similar alerts grouped together)`}),`\n`,_jsxs(_components.li,{children:[`Noise reduction happens at two stages: `,_jsx(_components.strong,{children:`Event Aggregation`}),` controls “Event → Alert”; `,_jsx(_components.strong,{children:`Alert Grouping`}),` controls “Alert → Incident”`]}),`\n`]})]}),`\n`,_jsx(Heading,{level:`2`,id:`noise-reduction-process`,children:`Noise reduction process`}),`\n`,_jsx(_components.p,{children:`When a monitoring system pushes alerts to Flashduty On-call, the system automatically executes the following workflow:`}),`\n`,_jsxs(Steps,{children:[_jsx(Step,{title:`Receive Event`,children:_jsx(_components.p,{children:`Determine whether to merge into an existing alert, otherwise create a new alert.`})}),_jsx(Step,{title:`Process New Alert`,children:_jsx(_components.p,{children:`Determine whether to merge into an existing incident, otherwise create a new incident.`})}),_jsx(Step,{title:`Trigger Notification`,children:_jsx(_components.p,{children:`New incidents notify relevant personnel according to escalation rules.`})}),_jsx(Step,{title:`Subsequent Alerts Merge`,children:_jsx(_components.p,{children:`Subsequent alerts merge into existing incidents without repeated notifications.`})})]}),`\n`,_jsx(Frame,{children:_jsx(_components.p,{children:_jsx(_components.img,{src:`https://docs-cdn.flashcat.cloud/images/png/6fec1c4fa6318119ab5c7f69f0c3cd55.png`,alt:`Alert Noise Reduction Flowchart`})})}),`\n`,_jsx(Heading,{level:`2`,id:`let-ai-configure-noise-reduction-for-you`,children:`Let AI configure noise reduction for you`}),`\n`,_jsxs(_components.p,{children:[`The header of the `,_jsx(_components.strong,{children:`Alert grouping`}),` and `,_jsx(_components.strong,{children:`Flapping detection`}),` pages carries a `,_jsx(_components.strong,{children:`Let AI tune noise reduction`}),` button on the right. It opens `,_jsx(_components.a,{href:`/en/ai-sre`,children:`AI SRE`}),` in the side panel, takes this channel along as a context reference, and prefills a request for the page you are on:`]}),`\n`,_jsxs(Table,{children:[_jsx(_components.thead,{children:_jsxs(_components.tr,{children:[_jsx(_components.th,{style:{textAlign:`left`},children:`Entry`}),_jsx(_components.th,{style:{textAlign:`left`},children:`Prefilled request (with channel “prod” as an example)`})]})}),_jsxs(_components.tbody,{children:[_jsxs(_components.tr,{children:[_jsx(_components.td,{style:{textAlign:`left`},children:_jsx(_components.strong,{children:`Alert grouping`})}),_jsx(_components.td,{style:{textAlign:`left`},children:_jsx(_components.code,{children:`/channel-noise Analyze the alert noise in Channel \"prod\", then recommend and configure alert grouping`})})]}),_jsxs(_components.tr,{children:[_jsx(_components.td,{style:{textAlign:`left`},children:_jsx(_components.strong,{children:`Flapping detection`})}),_jsx(_components.td,{style:{textAlign:`left`},children:_jsx(_components.code,{children:`/channel-noise Analyze the alerts that keep re-firing in Channel \"prod\", then recommend and configure flapping detection`})})]})]})]}),`\n`,_jsxs(_components.p,{children:[_jsx(_components.code,{children:`/channel-noise`}),` is the matching built-in `,_jsx(_components.a,{href:`/en/ai-sre/skills`,children:`Skill`}),`, reachable only from this entry, and it tunes one channel per session. You can send the prefilled request as it is, or rewrite it first, for example to narrow the look-back window or to name the grouping dimensions you must keep. After that you keep talking in plain language to refine what you asked for.`]}),`\n`,_jsx(Note,{children:_jsxs(_components.p,{children:[_jsx(_components.strong,{children:`Prerequisite`}),`: AI SRE is enabled for the account and you have permission to use AI SRE conversations. The button is hidden when either is missing.`]})}),`\n`,_jsxs(_components.p,{children:[`The agent reads the channel’s recent alerts (the look-back window is adjustable, up to 30 days) and recommends values; on the Alert grouping page it also gives an expected incident count from the page’s grouping preview. Nothing is written straight away: you can review the recommended values it fills into the form and click `,_jsx(_components.strong,{children:`Save`}),`, or let it save directly, in which case a confirmation card lists each setting with its before and after value (for example, “Dimensions: `,_jsx(_components.code,{children:`labels.check`}),` → `,_jsx(_components.code,{children:`labels.check`}),` + `,_jsx(_components.code,{children:`labels.service`}),`”) and only your confirmation writes it. The change takes effect immediately.`]}),`\n`,_jsxs(_components.p,{children:[_jsx(_components.code,{children:`/channel-noise`}),` changes `,_jsx(_components.strong,{children:`Alert grouping`}),` and `,_jsx(_components.strong,{children:`Flapping detection`}),` only. For `,_jsx(_components.strong,{children:`Event aggregation`}),`, silence rules, inhibit rules and drop rules it recommends what to change and names the page to change it on, but never writes. For how a reference tag travels with a message and how sessions are managed, see `,_jsx(_components.a,{href:`/en/ai-sre/sessions#attachments-and-context-references`,children:`Console chat`}),`.`]}),`\n`,_jsx(Heading,{level:`2`,id:`event-aggregation`,children:`Event aggregation`}),`\n`,_jsxs(_components.p,{children:[`Go to Channel Details → `,_jsx(_components.strong,{children:`Configuration`}),` → `,_jsx(_components.strong,{children:`Noise Reduction`}),` → `,_jsx(_components.strong,{children:`Event Aggregation`}),` to configure.`]}),`\n`,_jsxs(_components.p,{children:[`Event Aggregation controls the “Event → Alert” merge. When the monitoring system keeps pushing events with the same `,_jsx(_components.code,{children:`alert_key`}),`, it decides whether they merge into the existing alert or each create a new one.`]}),`\n`,_jsx(_components.p,{children:`An event merges into an existing alert only when all four conditions hold. If any one of them fails, Flashduty creates a new alert:`}),`\n`,_jsxs(_components.ul,{children:[`\n`,_jsxs(_components.li,{children:[_jsx(_components.strong,{children:`Same channel`}),`: the event and the target alert belong to the same channel`]}),`\n`,_jsxs(_components.li,{children:[_jsxs(_components.strong,{children:[`Same `,_jsx(_components.code,{children:`alert_key`})]}),`: the event describes the same alert lifecycle`]}),`\n`,_jsxs(_components.li,{children:[_jsx(_components.strong,{children:`Target alert still active`}),`: recovered or ended alerts no longer accept events`]}),`\n`,_jsxs(_components.li,{children:[_jsx(_components.strong,{children:`Still inside the aggregation window`}),`: after the window expires, a matching `,_jsx(_components.code,{children:`alert_key`}),` still creates a new alert`]}),`\n`]}),`\n`,_jsx(Note,{children:_jsxs(_components.p,{children:[`New channels have Event Aggregation enabled by default, with a window of `,_jsx(_components.strong,{children:`24 hours`}),` (1440 minutes).`]})}),`\n`,_jsx(Heading,{level:`3`,id:`configuration`,children:`Configuration`}),`\n`,_jsxs(Table,{children:[_jsx(_components.thead,{children:_jsxs(_components.tr,{children:[_jsx(_components.th,{style:{textAlign:`left`},children:`Configuration`}),_jsx(_components.th,{style:{textAlign:`left`},children:`Description`}),_jsx(_components.th,{style:{textAlign:`left`},children:`Default`}),_jsx(_components.th,{style:{textAlign:`left`},children:`Range`})]})}),_jsxs(_components.tbody,{children:[_jsxs(_components.tr,{children:[_jsx(_components.td,{style:{textAlign:`left`},children:_jsx(_components.strong,{children:`Enable Event Aggregation`})}),_jsxs(_components.td,{style:{textAlign:`left`},children:[`When enabled, events with the same `,_jsx(_components.code,{children:`alert_key`}),` merge into the same alert within the aggregation window; when disabled, every event creates its own alert`]}),_jsx(_components.td,{style:{textAlign:`left`},children:`Enabled`}),_jsx(_components.td,{style:{textAlign:`left`},children:`Enabled / Disabled`})]}),_jsxs(_components.tr,{children:[_jsx(_components.td,{style:{textAlign:`left`},children:_jsx(_components.strong,{children:`Aggregation Window`})}),_jsx(_components.td,{style:{textAlign:`left`},children:`Starts counting from the alert’s creation time; events arriving after this duration create a new alert. Only configurable when Event Aggregation is enabled`}),_jsx(_components.td,{style:{textAlign:`left`},children:`1440 minutes (24 hours)`}),_jsx(_components.td,{style:{textAlign:`left`},children:`1–1440 minutes; capped at 24 hours by default, extendable up to 7 days on request (contact the Flashduty team)`})]})]})]}),`\n`,_jsx(Tip,{children:_jsxs(_components.p,{children:[_jsx(_components.code,{children:`alert_key`}),` is the identifier used for alert correlation and deduplication. It is either reported by the upstream integration or generated automatically by integration rules.`]})}),`\n`,_jsx(Heading,{level:`3`,id:`versus-alert-grouping`,children:`Versus alert grouping`}),`\n`,_jsxs(Table,{children:[_jsx(_components.thead,{children:_jsxs(_components.tr,{children:[_jsx(_components.th,{style:{textAlign:`left`},children:`Stage`}),_jsx(_components.th,{style:{textAlign:`left`},children:`Setting`}),_jsx(_components.th,{style:{textAlign:`left`},children:`Behavior it controls`})]})}),_jsxs(_components.tbody,{children:[_jsxs(_components.tr,{children:[_jsx(_components.td,{style:{textAlign:`left`},children:_jsx(_components.strong,{children:`Event → Alert`})}),_jsx(_components.td,{style:{textAlign:`left`},children:`Event Aggregation`}),_jsxs(_components.td,{style:{textAlign:`left`},children:[`Whether events sharing the same `,_jsx(_components.code,{children:`alert_key`}),` merge into a single alert`]})]}),_jsxs(_components.tr,{children:[_jsx(_components.td,{style:{textAlign:`left`},children:_jsx(_components.strong,{children:`Alert → Incident`})}),_jsx(_components.td,{style:{textAlign:`left`},children:`Alert Grouping`}),_jsx(_components.td,{style:{textAlign:`left`},children:`Whether similar alerts merge into a single incident`})]})]})]}),`\n`,_jsx(Heading,{level:`2`,id:`alert-grouping`,children:`Alert grouping`}),`\n`,_jsxs(_components.p,{children:[`Go to Channel Details → `,_jsx(_components.strong,{children:`Configuration`}),` → `,_jsx(_components.strong,{children:`Noise Reduction`}),` → `,_jsx(_components.strong,{children:`Alert Grouping`}),` to configure.`]}),`\n`,_jsx(_components.p,{children:`Alert grouping merges multiple similar alerts into a single incident for unified assignment and notification. When an alert storm hits, you only need to handle one incident instead of hundreds of repeated notifications.`}),`\n`,_jsx(Note,{children:_jsxs(_components.p,{children:[`A new channel’s grouping method is derived from your subscription. The create wizard’s `,_jsx(_components.strong,{children:`Alert Grouping`}),` step pre-selects it and marks that card with a `,_jsx(_components.strong,{children:`Default`}),` badge, and saving the channel writes that configuration: free plans default to `,_jsx(_components.strong,{children:`No grouping`}),`, Standard to `,_jsx(_components.strong,{children:`Rule-based grouping`}),` (default grouping field `,_jsx(_components.code,{children:`labels.check`}),`), and Pro and on-premises deployments to `,_jsx(_components.strong,{children:`Intelligent grouping`}),` (default fields for the similarity judgement: `,_jsx(_components.code,{children:`title`}),`, `,_jsx(_components.code,{children:`description`}),`, `,_jsx(_components.code,{children:`labels.service`}),`, `,_jsx(_components.code,{children:`labels.resource`}),`). With these defaults the aggregation window is `,_jsx(_components.strong,{children:`until the incident closes`}),`, alert storm warning is `,_jsx(_components.strong,{children:`off`}),` (default threshold 100 once enabled), and strict grouping is `,_jsx(_components.strong,{children:`off`}),`. You can pick another available method in the wizard, or change it later under `,_jsx(_components.strong,{children:`Noise Reduction → Alert Grouping`}),`. For the wizard step, see `,_jsx(_components.a,{href:`/en/on-call/channel/create-edit#step-4-alert-grouping`,children:`Create a channel`}),`.`]})}),`\n`,_jsx(Heading,{level:`3`,id:`grouping-modes`,children:`Grouping modes`}),`\n`,_jsx(_components.p,{children:`The Alert Grouping page offers three mutually exclusive methods. A choice takes effect only after you save it:`}),`\n`,_jsxs(Table,{children:[_jsx(_components.thead,{children:_jsxs(_components.tr,{children:[_jsx(_components.th,{style:{textAlign:`left`},children:`Method`}),_jsx(_components.th,{style:{textAlign:`left`},children:`Description`}),_jsx(_components.th,{style:{textAlign:`left`},children:`Plan availability`})]})}),_jsxs(_components.tbody,{children:[_jsxs(_components.tr,{children:[_jsx(_components.td,{style:{textAlign:`left`},children:_jsx(_components.strong,{children:`Intelligent grouping`})}),_jsx(_components.td,{style:{textAlign:`left`},children:`Decided automatically from how similar the titles, descriptions and label content are; no manual rules`}),_jsx(_components.td,{style:{textAlign:`left`},children:`Pro or higher (selectable by default on-premises)`})]}),_jsxs(_components.tr,{children:[_jsx(_components.td,{style:{textAlign:`left`},children:_jsx(_components.strong,{children:`Rule-based grouping`})}),_jsx(_components.td,{style:{textAlign:`left`},children:`Alerts with identical field values enter the same incident — predictable and previewable`}),_jsx(_components.td,{style:{textAlign:`left`},children:`Standard or higher`})]}),_jsxs(_components.tr,{children:[_jsx(_components.td,{style:{textAlign:`left`},children:_jsx(_components.strong,{children:`No grouping`})}),_jsx(_components.td,{style:{textAlign:`left`},children:`Every alert creates its own incident and never joins an existing one`}),_jsx(_components.td,{style:{textAlign:`left`},children:`Every plan`})]})]})]}),`\n`,_jsxs(_components.p,{children:[`In the create wizard, methods your subscription doesn’t include are greyed out, with the tooltip “Your current subscription does not support this grouping method”. The API field `,_jsx(_components.code,{children:`group_method`}),` carries the same choice: `,_jsx(_components.code,{children:`i`}),` (intelligent grouping), `,_jsx(_components.code,{children:`p`}),` (rule-based grouping), `,_jsx(_components.code,{children:`n`}),` (no grouping); see `,_jsx(_components.a,{href:`/en/on-call/integration/webhooks/incident-webhook`,children:`Incident webhook`}),`.`]}),`\n`,_jsxs(_components.p,{children:[`Clicking another method card shows that method’s settings right below, with no confirmation dialog, and any draft you filled in before switching is kept. Nothing takes effect until you click `,_jsx(_components.strong,{children:`Save`}),`.`]}),`\n`,_jsx(Heading,{level:`3`,id:`common-configuration`,children:`Common configuration`}),`\n`,_jsxs(Table,{children:[_jsx(_components.thead,{children:_jsxs(_components.tr,{children:[_jsx(_components.th,{style:{textAlign:`left`},children:`Configuration`}),_jsx(_components.th,{style:{textAlign:`left`},children:`Description`})]})}),_jsxs(_components.tbody,{children:[_jsxs(_components.tr,{children:[_jsx(_components.td,{style:{textAlign:`left`},children:_jsx(_components.strong,{children:`Aggregation Window`})}),_jsx(_components.td,{style:{textAlign:`left`},children:`Optional toggle. When disabled, new alerts continue merging into the incident until the incident is closed. When enabled, alerts within the window are merged; alerts arriving after the window expires are grouped into a new incident`})]}),_jsxs(_components.tr,{children:[_jsx(_components.td,{style:{textAlign:`left`},children:_jsx(_components.strong,{children:`Window Timing Start`})}),_jsxs(_components.td,{style:{textAlign:`left`},children:[`Only configurable when the aggregation window is enabled. `,_jsx(_components.strong,{children:`Incident trigger`}),` (default): Fixed timer starts from incident creation, stops grouping when the window duration is reached. `,_jsx(_components.strong,{children:`Alert merges into incident`}),`: Timer resets each time a new alert merges in, the window recalculates from the last merge`]})]}),_jsxs(_components.tr,{children:[_jsx(_components.td,{style:{textAlign:`left`},children:_jsx(_components.strong,{children:`Window Duration`})}),_jsx(_components.td,{style:{textAlign:`left`},children:`Only configurable when the aggregation window is enabled. Set the duration of the aggregation window, minimum 1 minute. Rule-based grouping and intelligent grouping share the same cap: 24 hours by default, extendable to 30 days on request (contact the Flashduty team to enable)`})]}),_jsxs(_components.tr,{children:[_jsx(_components.td,{style:{textAlign:`left`},children:_jsx(_components.strong,{children:`Storm warning`})}),_jsxs(_components.td,{style:{textAlign:`left`},children:[`Expand `,_jsx(_components.strong,{children:`Advanced settings`}),` to configure. When merged alert count reaches a configured threshold, the system records an alert storm event in the incident timeline and triggers a warning notification, prompting urgent handling. You can configure up to 5 thresholds, each ranging from 2 to 10,000`]})]}),_jsxs(_components.tr,{children:[_jsx(_components.td,{style:{textAlign:`left`},children:_jsx(_components.strong,{children:`Strict Grouping`})}),_jsxs(_components.td,{style:{textAlign:`left`},children:[`Configure under `,_jsx(_components.strong,{children:`Advanced settings`}),` in rule-based grouping. When enabled, a missing comparison field makes the alerts count as different, so they are not grouped; when disabled, a field that is empty on both sides counts as the same, but at least one comparison field must have a value, and alerts whose comparison fields are all empty are not grouped (not supported for intelligent grouping)`]})]})]})]}),`\n`,_jsxs(Tabs,{children:[_jsxs(Tab,{title:`Intelligent Grouping`,id:`intelligent-grouping`,children:[_jsx(_components.p,{children:`When new alerts are highly similar to active incidents, automatically merge into the incident. The system uses machine learning to calculate semantic similarity between alerts, requiring no manual rule definition.`}),_jsxs(Steps,{children:[_jsx(Step,{title:`Select Grouping Mode`,children:_jsxs(_components.p,{children:[`Pick the `,_jsx(_components.strong,{children:`Intelligent grouping`}),` card under `,_jsx(_components.strong,{children:`Grouping method`}),` at the top of the page (greyed out on Standard, which needs Pro or higher)`]})}),_jsx(Step,{title:`Select information used for matching`,children:_jsxs(_components.p,{children:[`Expand `,_jsx(_components.strong,{children:`Advanced settings`}),` (described as “Similarity fields and storm alerts”), then select the fields under `,_jsx(_components.strong,{children:`Information used for matching`}),`. Default fields include: title, description, labels.service, labels.resource. You can add or remove fields based on your needs, up to a maximum of `,_jsx(_components.strong,{children:`10`}),` fields. Click `,_jsx(_components.strong,{children:`Reset`}),` to restore default settings.`]})})]}),_jsx(_components.p,{children:`The system calculates alert similarity based on the selected fields’ content. When similarity reaches the threshold, new alerts automatically merge into existing incidents.`}),_jsx(Frame,{caption:`Intelligent Grouping Configuration`,children:_jsx(_components.p,{children:_jsx(_components.img,{src:`https://docs-cdn.flashcat.cloud/images/png/670b3995e3ac6ac4cda2a1db55bf4452.png`,alt:`Intelligent Grouping Configuration`})})})]}),_jsxs(Tab,{title:`Rule-based Grouping`,id:`rule-based-grouping`,children:[_jsxs(_components.p,{children:[`Exact matching by specified dimensions, only groups when all dimension values are identical. The `,_jsx(_components.strong,{children:`Grouping rules`}),` section offers two mutually exclusive radio cards: one shared rule for every alert, or different rules for different alerts.`]}),_jsxs(_components.p,{children:[_jsx(_components.strong,{children:`All alerts use the same rule`}),`: every alert in the channel uses one set of `,_jsx(_components.strong,{children:`grouping dimensions`}),` (subtitled “what has to match to enter the same incident”). Alerts enter the same incident only when all selected fields have identical values.`]}),_jsx(Frame,{caption:`All Alerts Use the Same Rule Configuration`,children:_jsx(_components.p,{children:_jsx(_components.img,{src:`https://docs-cdn.flashcat.cloud/images/png/5c919eeba7fc932f21d107a02724d09b.png`,alt:`All Alerts Use the Same Rule Configuration`})})}),_jsxs(_components.p,{children:[_jsx(_components.strong,{children:`Different alerts use different rules`}),`: match rules per alert by attribute or label. You can add multiple condition branches, each containing match conditions and corresponding grouping dimensions:`]}),_jsxs(_components.ul,{children:[`\n`,_jsx(_components.li,{children:`The system matches conditions from top to bottom, using the grouping dimensions of the first matched branch`}),`\n`,_jsx(_components.li,{children:`Supports reordering condition branch priority by moving them up or down`}),`\n`,_jsxs(_components.li,{children:[_jsx(_components.strong,{children:`When no rule matches`}),` sets default fields as a fallback — “alerts are grouped by the default fields below; leave it empty and nothing is grouped”. `,_jsx(_components.strong,{children:`Left empty, these alerts are not grouped`}),` and each creates its own incident`]}),`\n`]})]}),_jsxs(Tab,{title:`No Grouping`,id:`no-grouping`,children:[_jsxs(_components.p,{children:[`After you pick `,_jsx(_components.strong,{children:`No grouping`}),` under `,_jsx(_components.strong,{children:`Grouping method`}),`, the page shows only a `,_jsx(_components.strong,{children:`Turn off alert grouping`}),` card: once saved, every new alert creates its own incident, and existing incidents and alerts are left untouched. The aggregation window, alert storm warning and strict grouping settings are hidden in this mode.`]}),_jsxs(_components.p,{children:[_jsx(_components.strong,{children:`No grouping`}),` is available on every plan, and it is the only method a free plan can use.`]})]})]}),`\n`,_jsx(Heading,{level:`3`,id:`preview-rule-grouping`,children:`Preview rule grouping`}),`\n`,_jsxs(_components.p,{children:[`After selecting `,_jsx(_components.strong,{children:`Rule-based grouping`}),` and filling in the configuration, click `,_jsx(_components.strong,{children:`Preview`}),` at the bottom to see how the current draft groups a sample of recent alerts. The result includes event, alert, and incident counts, plus the alerts in each incident. Previewing does not save the configuration. Click `,_jsx(_components.strong,{children:`Save`}),` to apply the rule after reviewing the results.`]}),`\n`,_jsx(Heading,{level:`3`,id:`configuration-limits`,children:`Configuration limits`}),`\n`,_jsx(_components.p,{children:`Grouping configuration has these limits:`}),`\n`,_jsxs(Table,{children:[_jsx(_components.thead,{children:_jsxs(_components.tr,{children:[_jsx(_components.th,{style:{textAlign:`left`},children:`Grouping mode`}),_jsx(_components.th,{style:{textAlign:`left`},children:`Limit`}),_jsx(_components.th,{style:{textAlign:`left`},children:`Cap`}),_jsx(_components.th,{style:{textAlign:`left`},children:`Description`})]})}),_jsxs(_components.tbody,{children:[_jsxs(_components.tr,{children:[_jsx(_components.td,{style:{textAlign:`left`},children:_jsx(_components.strong,{children:`Rule-based grouping`})}),_jsx(_components.td,{style:{textAlign:`left`},children:`Grouping dimensions`}),_jsx(_components.td,{style:{textAlign:`left`},children:`Up to 5 per rule group`}),_jsx(_components.td,{style:{textAlign:`left`},children:`Number of dimensions per rule under “all alerts use the same rule” and “different alerts use different rules”`})]}),_jsxs(_components.tr,{children:[_jsx(_components.td,{style:{textAlign:`left`},children:_jsx(_components.strong,{children:`Rule-based grouping`})}),_jsx(_components.td,{style:{textAlign:`left`},children:`Condition branches`}),_jsx(_components.td,{style:{textAlign:`left`},children:`Up to 100`}),_jsx(_components.td,{style:{textAlign:`left`},children:`Total condition branches you can configure under “different alerts use different rules”`})]}),_jsxs(_components.tr,{children:[_jsx(_components.td,{style:{textAlign:`left`},children:_jsx(_components.strong,{children:`Intelligent grouping`})}),_jsx(_components.td,{style:{textAlign:`left`},children:`Fields used for similarity calculation`}),_jsx(_components.td,{style:{textAlign:`left`},children:`Up to 10`}),_jsxs(_components.td,{style:{textAlign:`left`},children:[`Default 4: `,_jsx(_components.code,{children:`title`}),`, `,_jsx(_components.code,{children:`description`}),`, `,_jsx(_components.code,{children:`labels.service`}),`, `,_jsx(_components.code,{children:`labels.resource`})]})]})]})]}),`\n`,_jsx(Heading,{level:`3`,id:`grouping-effect`,children:`Grouping effect`}),`\n`,_jsxs(_components.p,{children:[`After setting grouping by `,_jsx(_components.strong,{children:`Alert Check Item`}),`, Flashduty groups 5 events into 3 alerts, and the 3 alerts into 1 incident:`]}),`\n`,_jsx(CodeBlock,{numberOfLines:`13`,language:`text`,children:_jsx(_components.pre,{className:`shiki shiki-themes github-light-default dark-plus`,style:{backgroundColor:`#ffffff`,\"--shiki-dark-bg\":`#0B0C0E`,color:`#1f2328`,\"--shiki-dark\":`#D4D4D4`},language:`text`,children:_jsxs(_components.code,{language:`text`,numberOfLines:`13`,children:[_jsx(_components.span,{className:`line`,children:_jsx(_components.span,{children:`Incident: cpu idle \u003c 20% / es.nj.03, Critical`})}),`\n`,_jsx(_components.span,{className:`line`,children:_jsx(_components.span,{})}),`\n`,_jsx(_components.span,{className:`line`,children:_jsx(_components.span,{children:` - Alert cpu idle \u003c 20% / es.nj.03:`})}),`\n`,_jsx(_components.span,{className:`line`,children:_jsx(_components.span,{children:` - Event1: es.nj.03, cpu.idle = 10%, Critical`})}),`\n`,_jsx(_components.span,{className:`line`,children:_jsx(_components.span,{children:` - Event2: es.nj.03, cpu.idle = 18%, Warning`})}),`\n`,_jsx(_components.span,{className:`line`,children:_jsx(_components.span,{children:` - Event4: es.nj.03, cpu.idle = 10%, Ok`})}),`\n`,_jsx(_components.span,{className:`line`,children:_jsx(_components.span,{})}),`\n`,_jsx(_components.span,{className:`line`,children:_jsx(_components.span,{children:` - Alert cpu idle \u003c 20% / es.nj.01:`})}),`\n`,_jsx(_components.span,{className:`line`,children:_jsx(_components.span,{children:` - Event3: es.nj.01, cpu.idle = 15%, Warning`})}),`\n`,_jsx(_components.span,{className:`line`,children:_jsx(_components.span,{children:` `})}),`\n`,_jsx(_components.span,{className:`line`,children:_jsx(_components.span,{children:` - Alert cpu idle \u003c 20% / es.nj.02:`})}),`\n`,_jsx(_components.span,{className:`line`,children:_jsx(_components.span,{children:` - Event5: es.nj.02, cpu.idle = 19%, Warning`})}),`\n`,_jsx(_components.span,{className:`line`,children:_jsx(_components.span,{})})]})})}),`\n`,_jsx(_components.p,{children:`The screenshot below shows another incident example. In incident details, you can inspect grouping relationships:`}),`\n`,_jsxs(_components.ul,{children:[`\n`,_jsx(_components.li,{children:`Click alert title to view alert timeline and associated events`}),`\n`,_jsx(_components.li,{children:`Click event point to view specific event content`}),`\n`]}),`\n`,_jsx(Frame,{caption:`Grouping Effect Display`,children:_jsx(_components.p,{children:_jsx(_components.img,{src:`https://docs-cdn.flashcat.cloud/images/png/745ea16da969f675ec1934d5392b1896.png`,alt:`Grouping Effect`})})}),`\n`,_jsx(Heading,{level:`2`,id:`flapping-detection`,children:`Flapping detection`}),`\n`,_jsx(_components.p,{children:`When the same incident triggers and recovers frequently, the system marks it as “flapping” status to avoid notification bombardment.`}),`\n`,_jsxs(_components.p,{children:[`Go to Channel Details → Configuration → Noise Reduction → `,_jsx(_components.strong,{children:`Flapping Detection`}),`:`]}),`\n`,_jsxs(Table,{children:[_jsx(_components.thead,{children:_jsxs(_components.tr,{children:[_jsx(_components.th,{style:{textAlign:`left`},children:`Option`}),_jsx(_components.th,{style:{textAlign:`left`},children:`Behavior`})]})}),_jsxs(_components.tbody,{children:[_jsxs(_components.tr,{children:[_jsx(_components.td,{style:{textAlign:`left`},children:_jsx(_components.strong,{children:`Off`})}),_jsx(_components.td,{style:{textAlign:`left`},children:`Don’t detect flapping status`})]}),_jsxs(_components.tr,{children:[_jsx(_components.td,{style:{textAlign:`left`},children:_jsx(_components.strong,{children:`Alert Only`})}),_jsx(_components.td,{style:{textAlign:`left`},children:`Mark flapping status, continue notifications per policy`})]}),_jsxs(_components.tr,{children:[_jsx(_components.td,{style:{textAlign:`left`},children:_jsx(_components.strong,{children:`Alert Then Silence`})}),_jsx(_components.td,{style:{textAlign:`left`},children:`Mark flapping status, no more notifications after first alert`})]})]})]}),`\n`,_jsx(Note,{children:_jsxs(_components.p,{children:[`New channels enable flapping detection in `,_jsx(_components.strong,{children:`Alert Only`}),` mode: Flashduty alerts once when it detects flapping, and later incidents still notify per their policy. The defaults are a 60-minute observation window and 4 state changes. `,_jsx(_components.strong,{children:`Mute duration`}),` applies only in `,_jsx(_components.strong,{children:`Alert Then Silence`}),` mode and defaults to 120 minutes; when you switch the mode to `,_jsx(_components.strong,{children:`Alert Then Silence`}),`, Flashduty pre-fills the mute duration with 120 minutes.`]})}),`\n`,_jsx(Frame,{children:_jsx(OptimizedImage,{src:`https://docs-cdn.flashcat.cloud/images/png/e145723e53deb95f5110ee22149f9e48.png`,alt:`Flapping detection modes`})}),`\n`,_jsx(Heading,{level:`3`,id:`configurable-parameters`,children:`Configurable parameters`}),`\n`,_jsxs(Table,{children:[_jsx(_components.thead,{children:_jsxs(_components.tr,{children:[_jsx(_components.th,{style:{textAlign:`left`},children:`Parameter`}),_jsx(_components.th,{style:{textAlign:`left`},children:`Description`}),_jsx(_components.th,{style:{textAlign:`left`},children:`Default`}),_jsx(_components.th,{style:{textAlign:`left`},children:`Range`})]})}),_jsxs(_components.tbody,{children:[_jsxs(_components.tr,{children:[_jsx(_components.td,{style:{textAlign:`left`},children:_jsx(_components.strong,{children:`State changes`})}),_jsx(_components.td,{style:{textAlign:`left`},children:`Number of alert state changes within the observation window to trigger flapping detection`}),_jsx(_components.td,{\"data-numeric\":`true`,style:{textAlign:`left`},children:`4`}),_jsx(_components.td,{\"data-numeric\":`true`,style:{textAlign:`left`},children:`2–100`})]}),_jsxs(_components.tr,{children:[_jsx(_components.td,{style:{textAlign:`left`},children:_jsx(_components.strong,{children:`Observation window`})}),_jsx(_components.td,{style:{textAlign:`left`},children:`Time window for counting state changes`}),_jsx(_components.td,{style:{textAlign:`left`},children:`60 minutes`}),_jsx(_components.td,{style:{textAlign:`left`},children:`1–1440 minutes`})]}),_jsxs(_components.tr,{children:[_jsx(_components.td,{style:{textAlign:`left`},children:_jsx(_components.strong,{children:`Mute duration`})}),_jsx(_components.td,{style:{textAlign:`left`},children:`Duration to mute notifications after flapping is detected. Applies only in “Alert Then Silence” mode; in “Alert Only” mode the value is 0 and nothing is muted`}),_jsx(_components.td,{style:{textAlign:`left`},children:`120 minutes`}),_jsx(_components.td,{style:{textAlign:`left`},children:`30–1440 minutes`})]})]})]}),`\n`,_jsxs(Tip,{children:[_jsxs(_components.p,{children:[_jsx(_components.strong,{children:`What counts as the same incident`}),`: Flashduty uses the `,_jsx(_components.code,{children:`alert_key`}),` of the `,_jsx(_components.strong,{children:`first alert`}),` associated with each incident as the flapping identity. Two incidents are counted as the same problem inside the observation window only when that identity matches. This judgement does `,_jsx(_components.strong,{children:`not`}),` use the grouping dimensions configured on the Alert Grouping page. The `,_jsx(_components.code,{children:`alert_key`}),` is reported by the alert integration or generated by that integration’s rules — integrations differ, and you cannot change it on this page.`]}),_jsxs(_components.p,{children:[`The `,_jsx(_components.strong,{children:`Current effect`}),` card at the top of the page states the active mode in one line (for example, “Alert only · alerts once when flapping is detected”).`]})]}),`\n`,_jsx(Heading,{level:`2`,id:`silence-rules`,children:`Silence rules`}),`\n`,_jsx(_components.p,{children:`During maintenance windows or known issue periods, silence rules can suppress alert notifications for specific conditions.`}),`\n`,_jsxs(_components.p,{children:[`Go to Channel Details → Configuration → Noise Reduction → `,_jsx(_components.strong,{children:`Silence Rules`}),`.`]}),`\n`,_jsxs(_components.p,{children:[`The `,_jsx(_components.strong,{children:`Search name or description`}),` box above the list filters it by rule name and description, case-insensitively. It does not match the values inside the conditions, and the list shows `,_jsx(_components.strong,{children:`No matching results`}),` when nothing matches.`]}),`\n`,_jsx(Heading,{level:`3`,id:`silence-time`,children:`Silence time`}),`\n`,_jsxs(Table,{children:[_jsx(_components.thead,{children:_jsxs(_components.tr,{children:[_jsx(_components.th,{style:{textAlign:`left`},children:`Type`}),_jsx(_components.th,{style:{textAlign:`left`},children:`Description`})]})}),_jsxs(_components.tbody,{children:[_jsxs(_components.tr,{children:[_jsx(_components.td,{style:{textAlign:`left`},children:_jsx(_components.strong,{children:`One-time Silence`})}),_jsx(_components.td,{style:{textAlign:`left`},children:`Active during specified time period, rule retained but inactive after expiration`})]}),_jsxs(_components.tr,{children:[_jsx(_components.td,{style:{textAlign:`left`},children:_jsx(_components.strong,{children:`Recurring Silence - Weekly Mode`})}),_jsx(_components.td,{style:{textAlign:`left`},children:`Active at fixed weekly time periods, for example, every Saturday 00:00-06:00`})]}),_jsxs(_components.tr,{children:[_jsx(_components.td,{style:{textAlign:`left`},children:_jsx(_components.strong,{children:`Recurring Silence - Calendar Mode`})}),_jsxs(_components.td,{style:{textAlign:`left`},children:[`Active per a `,_jsx(_components.a,{href:`/en/on-call/configuration/service-calendar`,children:`service calendar`}),` or a `,_jsx(_components.a,{href:`/en/on-call/configuration/service-calendar#link-a-trading-calendar`,children:`trading calendar`}),`. The calendar can be one you created, or a China A-share, Hong Kong or US trading calendar; with a trading calendar the type becomes `,_jsx(_components.strong,{children:`Trading day`}),` / `,_jsx(_components.strong,{children:`Closed day`}),` and the hours are filled in with that exchange’s session. Clock times are read in the calendar’s time zone, and after a half trading day’s close the date counts as a rest day`]})]})]})]}),`\n`,_jsxs(_components.p,{children:[_jsx(_components.strong,{children:`Time input for One-time Silence`}),`: a duration input on the left (default `,_jsx(_components.code,{children:`1d`}),`) plus an absolute time-range picker on the right. The two controls stay in sync:`]}),`\n`,_jsxs(_components.ul,{children:[`\n`,_jsxs(_components.li,{children:[`Duration accepts shorthand such as `,_jsx(_components.code,{children:`30m`}),`, `,_jsx(_components.code,{children:`1h`}),`, `,_jsx(_components.code,{children:`12h`}),`, `,_jsx(_components.code,{children:`1d`}),`, `,_jsx(_components.code,{children:`1w`}),`, `,_jsx(_components.code,{children:`2w`}),`. Changing the duration recomputes the end time from the current moment.`]}),`\n`,_jsx(_components.li,{children:`You can also pick the start and end directly on the right; the duration input updates accordingly.`}),`\n`,_jsx(_components.li,{children:`Start time must be earlier than end time, and neither field may be empty.`}),`\n`]}),`\n`,_jsxs(_components.p,{children:[_jsx(_components.strong,{children:`Auto-delete on expiration`}),`: one-time silence rules can opt into this switch. When it’s on, Flashduty deletes the rule 24 hours after its end time, as it does for `,_jsx(_components.a,{href:`#quick-silence`,children:`Quick Silence`}),`. When it’s off (the default), the expired rule stays in the list, inactive, for you to reuse or delete.`]}),`\n`,_jsx(Heading,{level:`3`,id:`silence-conditions`,children:`Silence conditions`}),`\n`,_jsx(_components.p,{children:`Define which alerts to silence. You can combine multiple conditions.`}),`\n`,_jsxs(Table,{children:[_jsx(_components.thead,{children:_jsxs(_components.tr,{children:[_jsx(_components.th,{style:{textAlign:`left`},children:`Match Item`}),_jsx(_components.th,{style:{textAlign:`left`},children:`Description`}),_jsx(_components.th,{style:{textAlign:`left`},children:`Example`})]})}),_jsxs(_components.tbody,{children:[_jsxs(_components.tr,{children:[_jsx(_components.td,{style:{textAlign:`left`},children:_jsx(_components.strong,{children:`Severity`})}),_jsx(_components.td,{style:{textAlign:`left`},children:`Match by alert level`}),_jsxs(_components.td,{style:{textAlign:`left`},children:[`Only silence `,_jsx(_components.code,{children:`Info`}),` level`]})]}),_jsxs(_components.tr,{children:[_jsx(_components.td,{style:{textAlign:`left`},children:_jsx(_components.strong,{children:`Title`})}),_jsx(_components.td,{style:{textAlign:`left`},children:`Match by alert title keywords`}),_jsx(_components.td,{style:{textAlign:`left`},children:`Title contains “Planned Maintenance”`})]}),_jsxs(_components.tr,{children:[_jsx(_components.td,{style:{textAlign:`left`},children:_jsx(_components.strong,{children:`Description`})}),_jsx(_components.td,{style:{textAlign:`left`},children:`Match by alert description content`}),_jsx(_components.td,{style:{textAlign:`left`},children:`Description contains “restart”`})]}),_jsxs(_components.tr,{children:[_jsx(_components.td,{style:{textAlign:`left`},children:_jsx(_components.strong,{children:`Integration`})}),_jsx(_components.td,{style:{textAlign:`left`},children:`Match by alert integration source`}),_jsx(_components.td,{style:{textAlign:`left`},children:`Only silence alerts from a specific integration`})]}),_jsxs(_components.tr,{children:[_jsx(_components.td,{style:{textAlign:`left`},children:_jsx(_components.strong,{children:`Labels`})}),_jsx(_components.td,{style:{textAlign:`left`},children:`Match by label key-value pairs`}),_jsx(_components.td,{style:{textAlign:`left`},children:_jsx(_components.code,{children:`host=db-master-01`})})]})]})]}),`\n`,_jsxs(_components.p,{children:[_jsx(_components.strong,{children:`Combination Logic`}),`:`]}),`\n`,_jsxs(_components.ul,{children:[`\n`,_jsxs(_components.li,{children:[_jsx(_components.strong,{children:`AND`}),`: All conditions must be met to silence`]}),`\n`,_jsxs(_components.li,{children:[_jsx(_components.strong,{children:`OR`}),`: Any condition met triggers silence`]}),`\n`]}),`\n`,_jsxs(_components.p,{children:[`See `,_jsx(_components.a,{href:`/en/on-call/configuration/filter-conditions`,children:`Configure Filter Conditions`}),` for details.`]}),`\n`,_jsx(Heading,{level:`3`,id:`silence-behavior`,children:`Silence behavior`}),`\n`,_jsxs(Table,{children:[_jsx(_components.thead,{children:_jsxs(_components.tr,{children:[_jsx(_components.th,{style:{textAlign:`left`},children:`Behavior`}),_jsx(_components.th,{style:{textAlign:`left`},children:`Description`})]})}),_jsxs(_components.tbody,{children:[_jsxs(_components.tr,{children:[_jsx(_components.td,{style:{textAlign:`left`},children:_jsx(_components.strong,{children:`Drop Directly`})}),_jsx(_components.td,{style:{textAlign:`left`},children:`Alert doesn’t appear in any list, no record`})]}),_jsxs(_components.tr,{children:[_jsx(_components.td,{style:{textAlign:`left`},children:_jsx(_components.strong,{children:`Retain and Mark`})}),_jsxs(_components.td,{style:{textAlign:`left`},children:[`Alert appears in `,_jsx(_components.strong,{children:`Raw Alerts List`}),` marked as “Silenced”, can be filtered and viewed`]})]})]})]}),`\n`,_jsx(Note,{children:_jsx(_components.p,{children:`The next time you create a silence rule, Flashduty preselects the behavior you chose last.`})}),`\n`,_jsx(Heading,{level:`3`,id:`quick-silence`,children:`Quick silence`}),`\n`,_jsx(_components.p,{children:`Quickly create temporary silence rules based on existing incidents.`}),`\n`,_jsxs(_components.p,{children:[_jsx(_components.strong,{children:`Operation Path`}),`: Incident Details → More Actions → `,_jsx(_components.strong,{children:`Quick Silence`})]}),`\n`,_jsxs(_components.ul,{children:[`\n`,_jsx(_components.li,{children:`Rule name defaults to “Quick Silence - #short-ID”, with the incident title included in the description`}),`\n`,_jsx(_components.li,{children:`Effective scope is the incident’s channel (cannot be changed)`}),`\n`,_jsxs(_components.li,{children:[_jsx(_components.strong,{children:`One-time silence`}),` is the default and lasts 1 day. Type a custom duration on the left (such as `,_jsx(_components.code,{children:`30m`}),`, `,_jsx(_components.code,{children:`1h`}),`, `,_jsx(_components.code,{children:`12h`}),`, `,_jsx(_components.code,{children:`1d`}),`, `,_jsx(_components.code,{children:`1w`}),`, or `,_jsx(_components.code,{children:`2w`}),`), or pick an absolute time range on the right. Flashduty deletes a one-time rule after it expires`]}),`\n`,_jsxs(_components.li,{children:[`You can instead select `,_jsx(_components.strong,{children:`recurring silence`}),` and configure the silenced time windows with the standard recurring schedule`]}),`\n`,_jsxs(_components.li,{children:[`Conditions default to severity plus filtered labels. Flashduty excludes two kinds of labels. `,_jsx(_components.strong,{children:`System format rules`}),` exclude label values that are JSON, numeric, datetime-formatted, or overly long. `,_jsx(_components.strong,{children:`Account exclusion rules`}),` exclude labels globally or per integration (see `,_jsx(_components.a,{href:`/en/platform/organization-info#quick-silence-label-exclusion-rules`,children:`Quick-silence label exclusion rules`}),`)`]}),`\n`]}),`\n`,_jsx(Frame,{caption:`Quick Silence Configuration`,children:_jsx(_components.p,{children:_jsx(_components.img,{src:`https://docs-cdn.flashcat.cloud/images/png/e80c2632d9065b28499edfa5a81a8505.png`,alt:`Quick Silence`})})}),`\n`,_jsx(_components.p,{children:`When you create a quick silence, the drawer lists the labels Flashduty excluded and why. Only the main account or account admins can change account exclusion rules. Flashduty builds the matching conditions from the source incident’s labels. Conditions that are too precise can let similar alerts through, so review them before you create the rule.`}),`\n`,_jsx(Note,{children:_jsx(_components.p,{children:`When repeatedly using quick silence on the same incident, it edits the original rule rather than creating a new one.`})}),`\n`,_jsx(Heading,{level:`3`,id:`copy-a-silence-rule`,children:`Copy a silence rule`}),`\n`,_jsxs(_components.p,{children:[`Silence rules are listed in a table; click a row to expand it and see the rule’s details. In that list, open `,_jsx(_components.strong,{children:`More actions`}),` (⋯) on the target rule and choose `,_jsx(_components.strong,{children:`Copy`}),` (not offered for rules created by `,_jsx(_components.strong,{children:`Quick Silence`}),`) to set the new rule’s name, description and target channel:`]}),`\n`,_jsxs(Table,{children:[_jsx(_components.thead,{children:_jsxs(_components.tr,{children:[_jsx(_components.th,{style:{textAlign:`left`},children:`Configuration`}),_jsx(_components.th,{style:{textAlign:`left`},children:`Description`})]})}),_jsxs(_components.tbody,{children:[_jsxs(_components.tr,{children:[_jsx(_components.td,{style:{textAlign:`left`},children:_jsx(_components.strong,{children:`Rule name`})}),_jsxs(_components.td,{style:{textAlign:`left`},children:[`Required; defaults to “Copy \u003coriginal name>”, `,_jsx(_components.strong,{children:`39 characters max`})]})]}),_jsxs(_components.tr,{children:[_jsx(_components.td,{style:{textAlign:`left`},children:_jsx(_components.strong,{children:`Description`})}),_jsxs(_components.td,{style:{textAlign:`left`},children:[`Defaults to the original description, `,_jsx(_components.strong,{children:`500 characters max`})]})]}),_jsxs(_components.tr,{children:[_jsx(_components.td,{style:{textAlign:`left`},children:_jsx(_components.strong,{children:`Channel`})}),_jsx(_components.td,{style:{textAlign:`left`},children:`This channel or another channel (non-admins can choose only channels they manage)`})]})]})]}),`\n`,_jsxs(_components.p,{children:[`The copy is `,_jsx(_components.strong,{children:`a new, independent rule`}),` that keeps the source rule’s silence conditions, silence behavior, auto-delete setting and schedule, but is no longer linked to the source incident. After copying to another channel, click `,_jsx(_components.strong,{children:`Go to view`}),` to open the new rule.`]}),`\n`,_jsx(Heading,{level:`2`,id:`inhibit-rules`,children:`Inhibit rules`}),`\n`,_jsx(_components.p,{children:`When a root cause alert exists, automatically inhibit related secondary alerts. For example: When a Critical level incident exists, inhibit Warning/Info level incidents for the same check item.`}),`\n`,_jsx(Heading,{level:`3`,id:`configuration-path`,children:`Configuration path`}),`\n`,_jsxs(Table,{children:[_jsx(_components.thead,{children:_jsxs(_components.tr,{children:[_jsx(_components.th,{style:{textAlign:`left`},children:`Location`}),_jsx(_components.th,{style:{textAlign:`left`},children:`Path`}),_jsx(_components.th,{style:{textAlign:`left`},children:`Characteristics`})]})}),_jsxs(_components.tbody,{children:[_jsxs(_components.tr,{children:[_jsx(_components.td,{style:{textAlign:`left`},children:_jsx(_components.strong,{children:`Channel`})}),_jsxs(_components.td,{style:{textAlign:`left`},children:[`Channel Details → Configuration → Noise Reduction → `,_jsx(_components.strong,{children:`Inhibit Rules`})]}),_jsx(_components.td,{style:{textAlign:`left`},children:`Only effective for alerts in current channel`})]}),_jsxs(_components.tr,{children:[_jsx(_components.td,{style:{textAlign:`left`},children:_jsx(_components.strong,{children:`Alert Integration`})}),_jsxs(_components.td,{style:{textAlign:`left`},children:[`Alert Integration Details → Alert Processing → `,_jsx(_components.strong,{children:`Alert Inhibition`})]}),_jsx(_components.td,{style:{textAlign:`left`},children:`Effective for alerts from this integration`})]})]})]}),`\n`,_jsxs(_components.p,{children:[`The `,_jsx(_components.strong,{children:`Search name or description`}),` box above the inhibit rule list filters it by rule name and description, case-insensitively. It does not match the values inside the conditions, and the list shows `,_jsx(_components.strong,{children:`No matching results`}),` when nothing matches.`]}),`\n`,_jsx(Heading,{level:`3`,id:`inhibit-conditions`,children:`Inhibit conditions`}),`\n`,_jsx(_components.p,{children:`Flashduty inhibits a new alert when all of these hold:`}),`\n`,_jsxs(_components.ul,{children:[`\n`,_jsx(_components.li,{children:`The new alert meets the conditions.`}),`\n`,_jsxs(_components.li,{children:[`A matching `,_jsx(_components.strong,{children:`active alert`}),` exists from the last 10 minutes. Any active, unrecovered alert can be the source, acknowledged or not.`]}),`\n`,_jsx(_components.li,{children:`Both alerts share the equal items.`}),`\n`]}),`\n`,_jsxs(Table,{children:[_jsx(_components.thead,{children:_jsxs(_components.tr,{children:[_jsx(_components.th,{style:{textAlign:`left`},children:`Configuration`}),_jsx(_components.th,{style:{textAlign:`left`},children:`Description`})]})}),_jsxs(_components.tbody,{children:[_jsxs(_components.tr,{children:[_jsx(_components.td,{style:{textAlign:`left`},children:_jsx(_components.strong,{children:`New Alert Conditions`})}),_jsx(_components.td,{style:{textAlign:`left`},children:`Conditions the inhibited alert must meet, for example, severity is Warning/Info`})]}),_jsxs(_components.tr,{children:[_jsx(_components.td,{style:{textAlign:`left`},children:_jsx(_components.strong,{children:`Active Alert Conditions`})}),_jsx(_components.td,{style:{textAlign:`left`},children:`Conditions the inhibiting source alert must meet, for example, severity is Critical`})]}),_jsxs(_components.tr,{children:[_jsx(_components.td,{style:{textAlign:`left`},children:_jsx(_components.strong,{children:`Equal Items`})}),_jsx(_components.td,{style:{textAlign:`left`},children:`Attributes or labels that must be identical between both, for example, check item, hostname`})]})]})]}),`\n`,_jsx(Heading,{level:`3`,id:`inhibit-behavior`,children:`Inhibit behavior`}),`\n`,_jsxs(Table,{children:[_jsx(_components.thead,{children:_jsxs(_components.tr,{children:[_jsx(_components.th,{style:{textAlign:`left`},children:`Behavior`}),_jsx(_components.th,{style:{textAlign:`left`},children:`Description`})]})}),_jsxs(_components.tbody,{children:[_jsxs(_components.tr,{children:[_jsx(_components.td,{style:{textAlign:`left`},children:_jsx(_components.strong,{children:`Drop Directly`})}),_jsx(_components.td,{style:{textAlign:`left`},children:`Alert doesn’t appear in any list, no record`})]}),_jsxs(_components.tr,{children:[_jsx(_components.td,{style:{textAlign:`left`},children:_jsx(_components.strong,{children:`Retain and Mark`})}),_jsxs(_components.td,{style:{textAlign:`left`},children:[`Alert appears in `,_jsx(_components.strong,{children:`Alert List`}),` marked as “Inhibited”, can be filtered and viewed`]})]})]})]}),`\n`,_jsx(Heading,{level:`3`,id:`configuration-example`,children:`Configuration example`}),`\n`,_jsxs(_components.p,{children:[_jsx(_components.strong,{children:`Scenario`}),`: When Critical level alerts exist, inhibit Warning/Info level alerts for the same check item.`]}),`\n`,_jsx(Heading,{level:`2`,id:`faq`,children:`FAQ`}),`\n`,_jsxs(AccordionGroup,{children:[_jsx(Accordion,{title:`Will the incident title change when new alerts merge in?`,icon:`circle-question`,id:`will-the-incident-title-change-when-new-alerts-merge-in`,children:_jsx(_components.p,{children:`No. The incident takes its title from the first alert that triggered it. You can edit the title at any time, and new alerts don’t change it.`})}),_jsx(Accordion,{title:`Will incident labels change when new alerts merge in?`,icon:`circle-question`,id:`will-incident-labels-change-when-new-alerts-merge-in`,children:_jsxs(_components.ul,{children:[`\n`,_jsxs(_components.li,{children:[_jsx(_components.strong,{children:`Manually created incidents`}),`: No, labels list always remains empty`]}),`\n`,_jsxs(_components.li,{children:[_jsx(_components.strong,{children:`Auto-triggered incidents`}),`: Possibly, incident labels stay consistent with the first alert; if that alert’s labels change, incident labels update accordingly`]}),`\n`]})}),_jsx(Accordion,{title:`Will alert labels change when new events merge in?`,icon:`circle-question`,id:`will-alert-labels-change-when-new-events-merge-in`,children:_jsx(_components.p,{children:`Yes. Alert labels always stay consistent with the latest merged event. However, if the new event is a recovery event, the alert keeps existing labels and only adds labels that didn’t exist before.`})}),_jsx(Accordion,{title:`What's the maximum number of alerts a single incident can group?`,icon:`circle-question`,id:`whats-the-maximum-number-of-alerts-a-single-incident-can-group`,children:_jsx(_components.p,{children:`Up to about 5000.`})}),_jsxs(Accordion,{title:`What's the maximum number of events a single alert can be associated with?`,icon:`circle-question`,id:`whats-the-maximum-number-of-events-a-single-alert-can-be-associated-with`,children:[_jsxs(_components.p,{children:[`The channel’s `,_jsx(_components.strong,{children:`Event Aggregation`}),` setting decides whether an event can merge into an existing alert. It governs the “Event → Alert” stage. It’s on by default with a 24-hour window, which you can set from 1 to 1440 minutes, extend to 7 days on request, or turn off:`]}),_jsxs(_components.ul,{children:[`\n`,_jsxs(_components.li,{children:[_jsx(_components.strong,{children:`Event Aggregation enabled`}),`: events with the same `,_jsx(_components.code,{children:`alert_key`}),` merge into the same alert within the window; events arriving after the window expires create a new alert`]}),`\n`,_jsxs(_components.li,{children:[_jsx(_components.strong,{children:`Event Aggregation disabled`}),`: every event creates an independent alert, with no merging`]}),`\n`]}),_jsxs(_components.p,{children:[`Note that `,_jsx(_components.strong,{children:`Alert Grouping`}),` controls the merge window at the “Alert → Incident” stage (24 hours by default, extendable to 30 days). It is a separate concern from whether events merge into an alert — don’t conflate the two.`]})]})]}),`\n`,_jsx(Heading,{level:`2`,id:`related-topics`,children:`Related topics`}),`\n`,_jsxs(CardGroup,{cols:2,children:[_jsx(Card,{title:`Configure Escalation Rules`,icon:`sitemap`,href:`/en/on-call/channel/escalation-rule`,children:_jsx(_components.p,{children:`Define alert notification and escalation rules`})}),_jsx(Card,{title:`Configure Filter Conditions`,icon:`filter`,href:`/en/on-call/configuration/filter-conditions`,children:_jsx(_components.p,{children:`Learn about condition matching syntax`})})]})]})}function MDXContent(props={}){const{wrapper:MDXLayout}={..._provideComponents(),...props.components};return MDXLayout?_jsx(MDXLayout,{...props,children:_jsx(_createMdxContent,{...props})}):_createMdxContent(props)}return{default:MDXContent};function _missingMdxReference(id,component){throw new Error(`Expected `+(component?`component`:`object`)+\" `\"+id+\"` to be defined: you likely forgot to import, pass, or provide it.\")}","frontmatter":{},"scope":{"config":{},"pageMetadata":{"title":"Noise reduction","description":"Reduce alert noise through grouping, silencing, inhibition, and other strategies to improve processing efficiency","href":"/en/on-call/channel/noise-reduction"}}},"mdxSourceWithNoJs":null},"mdxExtracts":{"tableOfContents":[{"title":"Why noise reduction","slug":"why-noise-reduction","depth":2,"children":[]},{"title":"Core concepts","slug":"core-concepts","depth":2,"children":[]},{"title":"Noise reduction process","slug":"noise-reduction-process","depth":2,"children":[]},{"title":"Let AI configure noise reduction for you","slug":"let-ai-configure-noise-reduction-for-you","depth":2,"children":[]},{"title":"Event aggregation","slug":"event-aggregation","depth":2,"children":[{"title":"Configuration","slug":"configuration","depth":3,"children":[]},{"title":"Versus alert grouping","slug":"versus-alert-grouping","depth":3,"children":[]}]},{"title":"Alert grouping","slug":"alert-grouping","depth":2,"children":[{"title":"Grouping modes","slug":"grouping-modes","depth":3,"children":[]},{"title":"Common configuration","slug":"common-configuration","depth":3,"children":[]},{"title":"Preview rule grouping","slug":"preview-rule-grouping","depth":3,"children":[]},{"title":"Configuration limits","slug":"configuration-limits","depth":3,"children":[]},{"title":"Grouping effect","slug":"grouping-effect","depth":3,"children":[]}]},{"title":"Flapping detection","slug":"flapping-detection","depth":2,"children":[{"title":"Configurable parameters","slug":"configurable-parameters","depth":3,"children":[]}]},{"title":"Silence rules","slug":"silence-rules","depth":2,"children":[{"title":"Silence time","slug":"silence-time","depth":3,"children":[]},{"title":"Silence conditions","slug":"silence-conditions","depth":3,"children":[]},{"title":"Silence behavior","slug":"silence-behavior","depth":3,"children":[]},{"title":"Quick silence","slug":"quick-silence","depth":3,"children":[]},{"title":"Copy a silence rule","slug":"copy-a-silence-rule","depth":3,"children":[]}]},{"title":"Inhibit rules","slug":"inhibit-rules","depth":2,"children":[{"title":"Configuration path","slug":"configuration-path","depth":3,"children":[]},{"title":"Inhibit conditions","slug":"inhibit-conditions","depth":3,"children":[]},{"title":"Inhibit behavior","slug":"inhibit-behavior","depth":3,"children":[]},{"title":"Configuration example","slug":"configuration-example","depth":3,"children":[]}]},{"title":"FAQ","slug":"faq","depth":2,"children":[]},{"title":"Related topics","slug":"related-topics","depth":2,"children":[]}],"codeExamples":{}},"jsLinks":[],"subdomain":"flashduty-com","siteName":"Flashduty Docs","title":"Noise reduction - Flashduty Docs","navMaps":{"firstHrefInVersion":{},"firstHrefInLanguage":{"zh":{"href":"/zh/on-call/channel/noise-reduction","matchLevel":1},"en":{"href":"/en/on-call/channel/noise-reduction","matchLevel":0}}},"lastModified":"2026-11-12T08:48:49.251Z","originalFileLocation":"en/on-call/channel/noise-reduction.mdx","locale":"en"},"headHtml":"\u003cscript data-mint-head>(function(){var d=document.documentElement,p=null;if(!p){try{p=localStorage.getItem(\"isDarkMode\")}catch(e){}if(p==='true')p='dark';else if(p==='false')p='light';if(p!=='light'\u0026\u0026p!=='dark'\u0026\u0026p!=='system')p=\"system\"}var r=p==='system'?(matchMedia(\"(prefers-color-scheme: dark)\").matches?'dark':'light'):p;d.classList.remove(r==='dark'?'light':'dark');d.classList.add(r);d.setAttribute(\"data-theme-preference\",p)})();\u003c/script>\u003cmeta data-mint-head name=\"description\" content=\"Reduce alert noise through grouping, silencing, inhibition, and other strategies to improve processing efficiency\">\u003cmeta data-mint-head name=\"application-name\" content=\"Flashduty Docs\">\u003cmeta data-mint-head name=\"generator\" content=\"Mintlify\">\u003clink data-mint-head rel=\"icon\" type=\"image/png\" sizes=\"192x192\" href=\"/mintlify-assets/_mintlify/favicons/flashduty-com/ZomM9gFDgYEBUD0S/_generated/favicon/android-chrome-192x192.png\" media=\"(prefers-color-scheme: light)\">\u003clink data-mint-head rel=\"apple-touch-icon\" type=\"image/png\" sizes=\"180x180\" href=\"/mintlify-assets/_mintlify/favicons/flashduty-com/ZomM9gFDgYEBUD0S/_generated/favicon/apple-touch-icon.png\">\u003clink data-mint-head rel=\"icon\" type=\"image/png\" sizes=\"16x16\" href=\"/mintlify-assets/_mintlify/favicons/flashduty-com/ZomM9gFDgYEBUD0S/_generated/favicon/favicon-16x16.png\" media=\"(prefers-color-scheme: light)\">\u003clink data-mint-head rel=\"icon\" type=\"image/png\" sizes=\"32x32\" href=\"/mintlify-assets/_mintlify/favicons/flashduty-com/ZomM9gFDgYEBUD0S/_generated/favicon/favicon-32x32.png\" media=\"(prefers-color-scheme: light)\">\u003clink data-mint-head rel=\"shortcut icon\" type=\"image/x-icon\" href=\"/mintlify-assets/_mintlify/favicons/flashduty-com/ZomM9gFDgYEBUD0S/_generated/favicon/favicon.ico\" media=\"(prefers-color-scheme: light)\">\u003clink data-mint-head rel=\"icon\" type=\"image/png\" sizes=\"192x192\" href=\"/mintlify-assets/_mintlify/favicons/flashduty-com/ZomM9gFDgYEBUD0S/_generated/favicon-dark/android-chrome-192x192.png\" media=\"(prefers-color-scheme: dark)\">\u003clink data-mint-head rel=\"icon\" type=\"image/png\" sizes=\"16x16\" href=\"/mintlify-assets/_mintlify/favicons/flashduty-com/ZomM9gFDgYEBUD0S/_generated/favicon-dark/favicon-16x16.png\" media=\"(prefers-color-scheme: dark)\">\u003clink data-mint-head rel=\"icon\" type=\"image/png\" sizes=\"32x32\" href=\"/mintlify-assets/_mintlify/favicons/flashduty-com/ZomM9gFDgYEBUD0S/_generated/favicon-dark/favicon-32x32.png\" media=\"(prefers-color-scheme: dark)\">\u003clink data-mint-head rel=\"shortcut icon\" type=\"image/x-icon\" href=\"/mintlify-assets/_mintlify/favicons/flashduty-com/ZomM9gFDgYEBUD0S/_generated/favicon-dark/favicon.ico\" media=\"(prefers-color-scheme: dark)\">\u003cmeta data-mint-head property=\"og:title\" content=\"Noise reduction - Flashduty Docs\">\u003cmeta data-mint-head property=\"og:description\" content=\"Reduce alert noise through grouping, silencing, inhibition, and other strategies to improve processing efficiency\">\u003cmeta data-mint-head property=\"og:site_name\" content=\"Flashduty Docs\">\u003cmeta data-mint-head property=\"og:url\" content=\"https://docs.flashduty.com/en/on-call/channel/noise-reduction\">\u003cmeta data-mint-head property=\"og:type\" content=\"website\">\u003cmeta data-mint-head property=\"og:image\" content=\"https://flashduty-com.mintlify.site/_mintlify/api/og/v2?division=Channels\u0026amp;title=Noise+reduction\u0026amp;description=Reduce+alert+noise+through+grouping%2C+silencing%2C+inhibition%2C+and+other+strategies+to+improve+processing+efficiency\u0026amp;theme=e69468df7fc0f2b1601c6217\u0026amp;signature=3156d8122f916f5149ebcb58b2734c9378157586daf4d7b38d0b5b97fe80eb1e\">\u003cmeta data-mint-head property=\"og:image:width\" content=\"1200\">\u003cmeta data-mint-head property=\"og:image:height\" content=\"630\">\u003cmeta data-mint-head name=\"twitter:card\" content=\"summary_large_image\">\u003cmeta data-mint-head name=\"twitter:title\" content=\"Noise reduction - Flashduty Docs\">\u003cmeta data-mint-head name=\"twitter:description\" content=\"Reduce alert noise through grouping, silencing, inhibition, and other strategies to improve processing efficiency\">\u003cmeta data-mint-head name=\"twitter:image\" content=\"https://flashduty-com.mintlify.site/_mintlify/api/og/v2?division=Channels\u0026amp;title=Noise+reduction\u0026amp;description=Reduce+alert+noise+through+grouping%2C+silencing%2C+inhibition%2C+and+other+strategies+to+improve+processing+efficiency\u0026amp;theme=e69468df7fc0f2b1601c6217\u0026amp;signature=3156d8122f916f5149ebcb58b2734c9378157586daf4d7b38d0b5b97fe80eb1e\">\u003cmeta data-mint-head name=\"twitter:image:width\" content=\"1200\">\u003cmeta data-mint-head name=\"twitter:image:height\" content=\"630\">\u003cmeta data-mint-head name=\"msapplication-config\" content=\"/mintlify-assets/_mintlify/favicons/flashduty-com/ZomM9gFDgYEBUD0S/_generated/favicon/browserconfig.xml\">\u003cmeta data-mint-head name=\"apple-mobile-web-app-title\" content=\"Flashduty Docs\">\u003cmeta data-mint-head name=\"msapplication-TileColor\" content=\"#8B5CF6\">\u003clink data-mint-head rel=\"canonical\" href=\"https://docs.flashduty.com/en/on-call/channel/noise-reduction\">\u003clink data-mint-head rel=\"alternate\" type=\"application/xml\" href=\"/sitemap.xml\">\u003clink data-mint-head rel=\"alternate\" type=\"text/markdown\" href=\"/en/on-call/channel/noise-reduction.md\">\u003clink data-mint-head rel=\"alternate\" hreflang=\"en\" href=\"https://docs.flashduty.com/en/on-call/channel/noise-reduction\">\u003clink data-mint-head rel=\"alternate\" hreflang=\"zh\" href=\"https://docs.flashduty.com/zh/on-call/channel/noise-reduction\">\u003clink data-mint-head rel=\"alternate\" hreflang=\"x-default\" href=\"https://docs.flashduty.com/zh/on-call/channel/noise-reduction\">\u003cscript data-mint-head type=\"application/ld+json\">{\"@context\":\"https://schema.org\",\"@graph\":[{\"@type\":\"Organization\",\"@id\":\"https://flashduty.com/#organization\",\"name\":\"Flashduty\",\"legalName\":\"北京快猫星云科技有限公司\",\"url\":\"https://flashduty.com/\",\"logo\":{\"@type\":\"ImageObject\",\"url\":\"https://docs.flashduty.com/logo/saas-logo.svg\"},\"sameAs\":[\"https://github.com/flashcatcloud\"]},{\"@type\":\"WebSite\",\"@id\":\"https://docs.flashduty.com#website\",\"name\":\"Flashduty Docs\",\"url\":\"https://docs.flashduty.com\",\"publisher\":{\"@id\":\"https://flashduty.com/#organization\"}},{\"@type\":\"WebPage\",\"@id\":\"https://docs.flashduty.com/en/on-call/channel/noise-reduction#webpage\",\"url\":\"https://docs.flashduty.com/en/on-call/channel/noise-reduction\",\"name\":\"Noise reduction\",\"description\":\"Reduce alert noise through grouping, silencing, inhibition, and other strategies to improve processing efficiency\",\"dateModified\":\"2026-11-12T08:48:49.251Z\",\"isPartOf\":{\"@id\":\"https://docs.flashduty.com#website\"},\"breadcrumb\":{\"@id\":\"https://docs.flashduty.com/en/on-call/channel/noise-reduction#breadcrumb\"}},{\"@type\":\"BreadcrumbList\",\"@id\":\"https://docs.flashduty.com/en/on-call/channel/noise-reduction#breadcrumb\",\"itemListElement\":[{\"@type\":\"ListItem\",\"position\":1,\"name\":\"Channels\",\"item\":\"https://docs.flashduty.com/en/on-call/channel/create-edit\"},{\"@type\":\"ListItem\",\"position\":2,\"name\":\"Noise reduction\",\"item\":\"https://docs.flashduty.com/en/on-call/channel/noise-reduction\"}]},{\"@type\":[\"Article\",\"TechArticle\"],\"@id\":\"https://docs.flashduty.com/en/on-call/channel/noise-reduction#article\",\"headline\":\"Noise reduction\",\"name\":\"Noise reduction\",\"description\":\"Reduce alert noise through grouping, silencing, inhibition, and other strategies to improve processing efficiency\",\"url\":\"https://docs.flashduty.com/en/on-call/channel/noise-reduction\",\"mainEntityOfPage\":{\"@id\":\"https://docs.flashduty.com/en/on-call/channel/noise-reduction#webpage\"},\"dateModified\":\"2026-11-12T08:48:49.251Z\",\"publisher\":{\"@id\":\"https://flashduty.com/#organization\"},\"isPartOf\":{\"@id\":\"https://docs.flashduty.com#website\"}}]}\u003c/script>\u003cscript data-mint-head type=\"application/ld+json\">{\"@context\":\"https://schema.org\",\"@type\":\"WebSite\",\"name\":\"Flashduty Docs\",\"publisher\":{\"@type\":\"Organization\",\"name\":\"Flashduty\"},\"provider\":{\"@type\":\"Organization\",\"name\":\"Mintlify\",\"url\":\"https://mintlify.com\"}}\u003c/script>","agentPointerHref":"/en/on-call/channel/noise-reduction.md","siteName":"Flashduty Docs","nav":{"global":null,"languages":[{"language":"zh","footer":{"socials":{"github":"https://github.com/flashcatcloud"},"links":[{"header":"Flashduty","items":[{"label":"官网","href":"https://www.flashduty.com/zh"},{"label":"定价","href":"https://www.flashduty.com/zh/pricing"},{"label":"集成目录","href":"https://www.flashduty.com/zh/integrations"},{"label":"博客","href":"https://www.flashduty.com/zh/now/blog"}]},{"header":"支持","items":[{"label":"联系我们","href":"https://www.flashduty.com/zh/contact"},{"label":"安全与合规","href":"https://www.flashduty.com/zh/legal/security"},{"label":"服务 SLA","href":"/zh/compliance/service-sla"}]},{"header":"法律","items":[{"label":"服务条款","href":"/zh/compliance/terms-of-service"},{"label":"用户协议","href":"/zh/compliance/user-agreement"},{"label":"隐私政策","href":"/zh/compliance/privacy-policy"},{"label":"退款政策","href":"/zh/compliance/refund-policy"}]}]},"navbar":{"links":[{"icon":"code","href":"/zh/openapi/introduction","label":"API 参考"}],"primary":{"type":"button","label":"控制台","href":"https://console.flashcat.cloud"}},"pages":[{"title":"zh","href":"/zh/on-call/channel/noise-reduction"}]},{"language":"en","footer":{"socials":{"github":"https://github.com/flashcatcloud"},"links":[{"header":"Flashduty","items":[{"label":"Website","href":"https://www.flashduty.com/en"},{"label":"Pricing","href":"https://www.flashduty.com/en/pricing"},{"label":"Integrations","href":"https://www.flashduty.com/en/integrations"},{"label":"Blog","href":"https://www.flashduty.com/en/now/blog"}]},{"header":"Support","items":[{"label":"Contact us","href":"https://www.flashduty.com/en/contact"},{"label":"Security","href":"https://www.flashduty.com/en/legal/security"},{"label":"Service SLA","href":"/en/compliance/service-sla"}]},{"header":"Legal","items":[{"label":"Terms of Service","href":"/en/compliance/terms-of-service"},{"label":"User Agreement","href":"/en/compliance/user-agreement"},{"label":"Privacy Policy","href":"/en/compliance/privacy-policy"},{"label":"Refund Policy","href":"/en/compliance/refund-policy"}]}]},"navbar":{"links":[{"icon":"code","href":"/en/openapi/introduction","label":"API Reference"}],"primary":{"type":"button","label":"Console","href":"https://console.flashcat.cloud"}},"tabs":[{"tab":"Home","icon":"house","pages":[{"title":"Home","href":"/en/home"}]},{"tab":"AI SRE","icon":"sparkles","pages":[{"title":"AI SRE","href":"/en/ai-sre/quickstart"}]},{"tab":"On-call","icon":"light-emergency-on","groups":[{"group":"Quick Start","icon":"rocket","pages":[{"title":"Flashduty On-call getting started","sidebarTitle":"Getting started","href":"/en/on-call/quickstart/quickstart"},{"title":"Flashduty app (mobile)","sidebarTitle":"Mobile app","href":"/en/on-call/quickstart/mobile-app"},{"title":"Flashduty On-call FAQ","sidebarTitle":"FAQ","href":"/en/on-call/quickstart/faq"}]},{"group":"Product Comparison","icon":"scale-balanced","pages":[{"title":"Flashduty vs PagerDuty","href":"/en/on-call/comparison/vs-pagerduty"},{"title":"Flashduty vs Opsgenie","href":"/en/on-call/comparison/vs-opsgenie"}]},{"group":"Channels","icon":"comments","pages":[{"title":"Create and manage","href":"/en/on-call/channel/create-edit"},{"title":"Integrate data","href":"/en/on-call/channel/integrate-data"},{"title":"Escalation rules","description":"Configure alert escalation rules to ensure incidents are promptly notified to the right responders","href":"/en/on-call/channel/escalation-rule"},{"title":"Noise reduction","href":"/en/on-call/channel/noise-reduction"}]},{"group":"Incident Management","icon":"triangle-exclamation","pages":[{"title":"What is an incident","description":"An incident in Flashduty On-call represents an ongoing problem or an issue that needs to be addressed. Incidents are typically triggered by alerts and often associated with a series of similar alerts.","href":"/en/on-call/incident/what-is-incident"},{"title":"Search and view incidents","href":"/en/on-call/incident/search-view-incident"},{"title":"Handle and update incidents","href":"/en/on-call/incident/handle-update-incident"},{"title":"Action items and follow-ups","href":"/en/on-call/incident/work-items"},{"title":"Escalate and reassign","href":"/en/on-call/incident/escalate-dispatch-incident"},{"title":"Alert management","href":"/en/on-call/incident/alert-management"},{"title":"Custom actions","sidebarTitle":"Incident custom actions","href":"/en/on-call/incident/custom-actions"},{"title":"Past incidents","href":"/en/on-call/incident/past-incidents"},{"title":"Outlier incidents","href":"/en/on-call/incident/outlier-incidents"},{"title":"External incident submission","href":"/en/on-call/incident/external-submission"}]},{"group":"Post-Mortem","icon":"clipboard-check","pages":[{"title":"What is a post-mortem","href":"/en/on-call/post-mortem/what-is-post-mortem"},{"title":"Create and edit post-mortem reports","href":"/en/on-call/post-mortem/create-edit-post-mortem"},{"title":"AI-assisted post-mortem generation","href":"/en/on-call/post-mortem/ai-generate-post-mortem"},{"title":"Manage post-mortem templates","href":"/en/on-call/post-mortem/manage-templates"}]},{"group":"Status Page","icon":"signal","pages":[{"title":"What is a status page","href":"/en/on-call/statuspage/statuspage"},{"title":"Get started with Flashduty status page","href":"/en/on-call/statuspage/get-started"},{"title":"Configure status page basics","href":"/en/on-call/statuspage/create-manage-page"},{"title":"Components and sections","href":"/en/on-call/statuspage/components-sections"},{"title":"Publish and manage events","href":"/en/on-call/statuspage/publish-events"},{"title":"Event templates","href":"/en/on-call/statuspage/templates"},{"title":"Subscription management","href":"/en/on-call/statuspage/subscriptions"},{"title":"Widgets","href":"/en/on-call/statuspage/widgets"},{"title":"Status page comparison","href":"/en/on-call/statuspage/comparison"}]},{"group":"Analytics","icon":"chart-pie","pages":[{"title":"Insights","href":"/en/on-call/analytics/insights"}]},{"group":"Integration Settings","icon":"sliders","pages":[{"title":"Label enhancement","href":"/en/on-call/integration/alert-integration/label-enhancement"},{"title":"Alert pipeline","href":"/en/on-call/integration/alert-integration/alert-pipelines"},{"title":"Routing rules","href":"/en/on-call/integration/alert-integration/routing-rules"}]},{"group":"Configuration","icon":"gear","pages":[{"title":"Schedule","href":"/en/on-call/configuration/schedule"},{"title":"Service Calendar","href":"/en/on-call/configuration/service-calendar"},{"title":"Templates","href":"/en/on-call/configuration/templates"},{"title":"Filter Conditions","href":"/en/on-call/configuration/filter-conditions"},{"title":"Notification","href":"/en/on-call/configuration/notifications"},{"title":"Personal Settings","href":"/en/on-call/configuration/personal-settings"},{"title":"Custom fields","href":"/en/on-call/configuration/custom-fields"},{"title":"Custom forms","href":"/en/on-call/configuration/custom-forms"}]},{"group":"Advanced","icon":"wand-magic-sparkles","pages":[{"title":"Reference Variables","href":"/en/on-call/advanced/reference-variables"},{"title":"Dynamic assignment","href":"/en/on-call/advanced/dynamic-notifications"},{"title":"War room","href":"/en/on-call/advanced/war-room"}]},{"group":"Integrations","icon":"puzzle-piece","pages":[{"group":"Alert Integration","expanded":false,"pages":[{"title":"Alert integrations overview","sidebarTitle":"Overview","href":"/en/on-call/integration/alert-integration/overview"},{"title":"Standard alert event integration guide","sidebarTitle":"Standard alert event","href":"/en/on-call/integration/alert-integration/alert-sources/standard-alert"},{"title":"Email integration","sidebarTitle":"Email","href":"/en/on-call/integration/alert-integration/alert-sources/email"},{"title":"HTTP Pull alert integration","sidebarTitle":"HTTP Pull","href":"/en/on-call/integration/alert-integration/alert-sources/http-pull"},{"title":"Database Pull Alert Integration (DB Pull)","sidebarTitle":"Database Pull (DB Pull)","href":"/en/on-call/integration/alert-integration/alert-sources/db-pull"},{"title":"Aikido Security alert integration","sidebarTitle":"Aikido Security","href":"/en/on-call/integration/alert-integration/alert-sources/aikido"},{"title":"Airbrake alert integration","sidebarTitle":"Airbrake","href":"/en/on-call/integration/alert-integration/alert-sources/airbrake"},{"title":"SmartBear AlertSite alert integration","sidebarTitle":"SmartBear AlertSite","href":"/en/on-call/integration/alert-integration/alert-sources/alertsite"},{"title":"Alibaba Cloud ARMS integration","sidebarTitle":"Alibaba Cloud ARMS","href":"/en/on-call/integration/alert-integration/alert-sources/aliyun-arms"},{"title":"Alibaba Cloud Monitor CM event integration","sidebarTitle":"Alibaba Cloud Monitor CM event","href":"/en/on-call/integration/alert-integration/alert-sources/aliyun-cm-event"},{"title":"Alibaba Cloud Monitor CM metrics integration","sidebarTitle":"Alibaba Cloud Monitor CM metrics","href":"/en/on-call/integration/alert-integration/alert-sources/aliyun-cm-metrics"},{"title":"Alibaba CloudMonitor 2.0 Notification Policy Edition integration","sidebarTitle":"Alibaba CloudMonitor 2.0 Notification Policy Edition","href":"/en/on-call/integration/alert-integration/alert-sources/aliyun-cms-v2"},{"title":"Alibaba Cloud DataWorks integration","sidebarTitle":"Alibaba Cloud DataWorks","href":"/en/on-call/integration/alert-integration/alert-sources/aliyun-dataworks-op"},{"title":"Alibaba Cloud Prometheus integration","sidebarTitle":"Alibaba Cloud Prometheus","href":"/en/on-call/integration/alert-integration/alert-sources/aliyun-prometheus"},{"title":"Alibaba Cloud SLS integration","sidebarTitle":"Alibaba Cloud SLS","href":"/en/on-call/integration/alert-integration/alert-sources/aliyun-sls"},{"title":"Amazon Inspector alert integration","sidebarTitle":"Amazon Inspector","href":"/en/on-call/integration/alert-integration/alert-sources/amazon-inspector"},{"title":"apcupsd alert integration","sidebarTitle":"apcupsd","href":"/en/on-call/integration/alert-integration/alert-sources/apcupsd"},{"title":"APIContext (APImetrics) alert integration","sidebarTitle":"APIContext (APImetrics)","href":"/en/on-call/integration/alert-integration/alert-sources/apimetrics"},{"title":"AppDynamics alert integration","sidebarTitle":"AppDynamics","href":"/en/on-call/integration/alert-integration/alert-sources/appdynamics"},{"title":"AppSignal alert integration","sidebarTitle":"AppSignal","href":"/en/on-call/integration/alert-integration/alert-sources/appsignal"},{"title":"Argo CD alert integration","sidebarTitle":"Argo CD","href":"/en/on-call/integration/alert-integration/alert-sources/argocd"},{"title":"Atatus alert integration","sidebarTitle":"Atatus","href":"/en/on-call/integration/alert-integration/alert-sources/atatus"},{"title":"Auth0 alert integration","sidebarTitle":"Auth0","href":"/en/on-call/integration/alert-integration/alert-sources/auth0"},{"title":"Auvik alert integration","sidebarTitle":"Auvik","href":"/en/on-call/integration/alert-integration/alert-sources/auvik"},{"title":"AWS CloudWatch integration","sidebarTitle":"AWS CloudWatch","href":"/en/on-call/integration/alert-integration/alert-sources/aws-cloudwatch"},{"title":"AWS EventBridge alert events","sidebarTitle":"AWS EventBridge","href":"/en/on-call/integration/alert-integration/alert-sources/aws-eventbridge"},{"title":"AWS Health alert integration","sidebarTitle":"AWS Health","href":"/en/on-call/integration/alert-integration/alert-sources/aws-health"},{"title":"AWS Security Hub alert integration","sidebarTitle":"AWS Security Hub","href":"/en/on-call/integration/alert-integration/alert-sources/aws-security-hub"},{"title":"Axiom alert integration","sidebarTitle":"Axiom","href":"/en/on-call/integration/alert-integration/alert-sources/axiom"},{"title":"Azure Monitor integration","sidebarTitle":"Azure Monitor","href":"/en/on-call/integration/alert-integration/alert-sources/azure-monitor"},{"title":"Azure Service Health alert integration","sidebarTitle":"Azure Service Health","href":"/en/on-call/integration/alert-integration/alert-sources/azure-service-health"},{"title":"Baidu Cloud BCM integration","sidebarTitle":"Baidu Cloud BCM","href":"/en/on-call/integration/alert-integration/alert-sources/baidu-bcm"},{"title":"BGPalerter alert integration","sidebarTitle":"BGPalerter","href":"/en/on-call/integration/alert-integration/alert-sources/bgpalerter"},{"title":"BigPanda alert integration","sidebarTitle":"BigPanda","href":"/en/on-call/integration/alert-integration/alert-sources/bigpanda"},{"title":"Bitdefender GravityZone alert integration","sidebarTitle":"Bitdefender GravityZone","href":"/en/on-call/integration/alert-integration/alert-sources/bitdefender"},{"title":"Bleemeo alert integration","sidebarTitle":"Bleemeo","href":"/en/on-call/integration/alert-integration/alert-sources/bleemeo"},{"title":"Tencent BlueKing integration","sidebarTitle":"Tencent BlueKing","href":"/en/on-call/integration/alert-integration/alert-sources/blueking"},{"title":"Blumira alert integration","sidebarTitle":"Blumira","href":"/en/on-call/integration/alert-integration/alert-sources/blumira"},{"title":"BugSnag alert integration","sidebarTitle":"BugSnag","href":"/en/on-call/integration/alert-integration/alert-sources/bugsnag"},{"title":"Calibre alert integration","sidebarTitle":"Calibre","href":"/en/on-call/integration/alert-integration/alert-sources/calibre"},{"title":"Canarytokens alert integration","sidebarTitle":"Canarytokens","href":"/en/on-call/integration/alert-integration/alert-sources/canarytokens"},{"title":"Catchpoint alert integration","sidebarTitle":"Catchpoint","href":"/en/on-call/integration/alert-integration/alert-sources/catchpoint"},{"title":"Cato Networks alert integration","sidebarTitle":"Cato Networks","href":"/en/on-call/integration/alert-integration/alert-sources/cato"},{"title":"Censys alert integration","sidebarTitle":"Censys","href":"/en/on-call/integration/alert-integration/alert-sources/censys"},{"title":"Centreon alert integration","sidebarTitle":"Centreon","href":"/en/on-call/integration/alert-integration/alert-sources/centreon"},{"title":"Cert Spotter alert integration","sidebarTitle":"Cert Spotter","href":"/en/on-call/integration/alert-integration/alert-sources/cert-spotter"},{"title":"CFEngine alert integration","sidebarTitle":"CFEngine","href":"/en/on-call/integration/alert-integration/alert-sources/cfengine"},{"title":"Check Point SmartEvent alert integration","sidebarTitle":"Check Point SmartEvent","href":"/en/on-call/integration/alert-integration/alert-sources/check-point-smartevent"},{"title":"Checkly alert integration","sidebarTitle":"Checkly","href":"/en/on-call/integration/alert-integration/alert-sources/checkly"},{"title":"Checkmk alert integration","sidebarTitle":"Checkmk","href":"/en/on-call/integration/alert-integration/alert-sources/checkmk"},{"title":"Chronosphere alert integration","sidebarTitle":"Chronosphere","href":"/en/on-call/integration/alert-integration/alert-sources/chronosphere"},{"title":"Circonus alert integration","sidebarTitle":"Circonus","href":"/en/on-call/integration/alert-integration/alert-sources/circonus"},{"title":"CloudAMQP alert integration","sidebarTitle":"CloudAMQP","href":"/en/on-call/integration/alert-integration/alert-sources/cloudamqp"},{"title":"Cloudflare alert events","sidebarTitle":"Cloudflare","href":"/en/on-call/integration/alert-integration/alert-sources/cloudflare"},{"title":"ClusterControl alert integration","sidebarTitle":"ClusterControl","href":"/en/on-call/integration/alert-integration/alert-sources/clustercontrol"},{"title":"HashiCorp Consul alert integration","sidebarTitle":"HashiCorp Consul","href":"/en/on-call/integration/alert-integration/alert-sources/consul"},{"title":"Contrast Security alert integration","sidebarTitle":"Contrast Security","href":"/en/on-call/integration/alert-integration/alert-sources/contrast"},{"title":"Coralogix alert integration","sidebarTitle":"Coralogix","href":"/en/on-call/integration/alert-integration/alert-sources/coralogix"},{"title":"Coroot alert integration","sidebarTitle":"Coroot","href":"/en/on-call/integration/alert-integration/alert-sources/coroot"},{"title":"Cronicle alert integration","sidebarTitle":"Cronicle","href":"/en/on-call/integration/alert-integration/alert-sources/cronicle"},{"title":"Cronitor alert integration","sidebarTitle":"Cronitor","href":"/en/on-call/integration/alert-integration/alert-sources/cronitor"},{"title":"CrowdSec alert integration","sidebarTitle":"CrowdSec","href":"/en/on-call/integration/alert-integration/alert-sources/crowdsec"},{"title":"CrowdStrike Falcon alert integration","sidebarTitle":"CrowdStrike Falcon","href":"/en/on-call/integration/alert-integration/alert-sources/crowdstrike"},{"title":"CrowdStrike Falcon LogScale alert integration","sidebarTitle":"CrowdStrike Falcon LogScale","href":"/en/on-call/integration/alert-integration/alert-sources/crowdstrike-logscale"},{"title":"StateCloud alert events","sidebarTitle":"StateCloud","href":"/en/on-call/integration/alert-integration/alert-sources/ctyun"},{"title":"CubeAPM alert integration","sidebarTitle":"CubeAPM","href":"/en/on-call/integration/alert-integration/alert-sources/cubeapm"},{"title":"Dash0 alert integration","sidebarTitle":"Dash0","href":"/en/on-call/integration/alert-integration/alert-sources/dash0"},{"title":"Datadog alert integration","sidebarTitle":"Datadog","href":"/en/on-call/integration/alert-integration/alert-sources/datadog"},{"title":"Datto RMM alert integration","sidebarTitle":"Datto RMM","href":"/en/on-call/integration/alert-integration/alert-sources/datto-rmm"},{"title":"DBmarlin alert integration","sidebarTitle":"DBmarlin","href":"/en/on-call/integration/alert-integration/alert-sources/dbmarlin"},{"title":"Dead Man's Snitch alert integration","sidebarTitle":"Dead Man's Snitch","href":"/en/on-call/integration/alert-integration/alert-sources/dead-mans-snitch"},{"title":"Dependency-Track alert integration","sidebarTitle":"Dependency-Track","href":"/en/on-call/integration/alert-integration/alert-sources/dependency-track"},{"title":"DingTalk Bot Compatible integration","sidebarTitle":"DingTalk Bot Compatible","href":"/en/on-call/integration/alert-integration/alert-sources/dingtalk-alert"},{"title":"Dkron alert integration","sidebarTitle":"Dkron","href":"/en/on-call/integration/alert-integration/alert-sources/dkron"},{"title":"Apache DolphinScheduler alert integration","sidebarTitle":"Apache DolphinScheduler","href":"/en/on-call/integration/alert-integration/alert-sources/dolphinscheduler"},{"title":"Domotz alert integration","sidebarTitle":"Domotz","href":"/en/on-call/integration/alert-integration/alert-sources/domotz"},{"title":"Dotcom-Monitor alert integration","sidebarTitle":"Dotcom-Monitor","href":"/en/on-call/integration/alert-integration/alert-sources/dotcom-monitor"},{"title":"Duplicati alert integration","sidebarTitle":"Duplicati","href":"/en/on-call/integration/alert-integration/alert-sources/duplicati"},{"title":"Dynatrace alert events","sidebarTitle":"Dynatrace","href":"/en/on-call/integration/alert-integration/alert-sources/dynatrace"},{"title":"China Mobile Cloud (ecloud) Cloud Monitor integration","sidebarTitle":"China Mobile Cloud (ecloud) Cloud Monitor","href":"/en/on-call/integration/alert-integration/alert-sources/ecloud-cm"},{"title":"Edge Delta alert integration","sidebarTitle":"Edge Delta","href":"/en/on-call/integration/alert-integration/alert-sources/edge-delta"},{"title":"ElastAlert2 alert integration guide","sidebarTitle":"ElastAlert2","href":"/en/on-call/integration/alert-integration/alert-sources/elastalert2"},{"title":"Elastic alert integration","sidebarTitle":"Elastic","href":"/en/on-call/integration/alert-integration/alert-sources/elastic"},{"title":"EMQX alert integration","sidebarTitle":"EMQX","href":"/en/on-call/integration/alert-integration/alert-sources/emqx"},{"title":"ExtraHop alert integration","sidebarTitle":"ExtraHop","href":"/en/on-call/integration/alert-integration/alert-sources/extrahop"},{"title":"Fail2ban alert integration","sidebarTitle":"Fail2ban","href":"/en/on-call/integration/alert-integration/alert-sources/fail2ban"},{"title":"Falco alert integration","sidebarTitle":"Falco","href":"/en/on-call/integration/alert-integration/alert-sources/falco"},{"title":"FastNetMon alert integration","sidebarTitle":"FastNetMon","href":"/en/on-call/integration/alert-integration/alert-sources/fastnetmon"},{"title":"Firebase Crashlytics alert integration","sidebarTitle":"Firebase Crashlytics","href":"/en/on-call/integration/alert-integration/alert-sources/firebase-crashlytics"},{"title":"Firefly alert integration","sidebarTitle":"Firefly","href":"/en/on-call/integration/alert-integration/alert-sources/firefly"},{"title":"Fivetran alert integration","sidebarTitle":"Fivetran","href":"/en/on-call/integration/alert-integration/alert-sources/fivetran"},{"title":"Nightingale/Flashcat integration","sidebarTitle":"Nightingale/Flashcat","href":"/en/on-call/integration/alert-integration/alert-sources/flashcat"},{"title":"Fleet alert integration","sidebarTitle":"Fleet","href":"/en/on-call/integration/alert-integration/alert-sources/fleet"},{"title":"Flowmon ADS alert integration","sidebarTitle":"Flowmon ADS","href":"/en/on-call/integration/alert-integration/alert-sources/flowmon-ads"},{"title":"Flowtriq alert integration","sidebarTitle":"Flowtriq","href":"/en/on-call/integration/alert-integration/alert-sources/flowtriq"},{"title":"Flux CD alert integration","sidebarTitle":"Flux CD","href":"/en/on-call/integration/alert-integration/alert-sources/fluxcd"},{"title":"Formant alert integration","sidebarTitle":"Formant","href":"/en/on-call/integration/alert-integration/alert-sources/formant"},{"title":"FortiMonitor alert integration","sidebarTitle":"FortiMonitor","href":"/en/on-call/integration/alert-integration/alert-sources/fortimonitor"},{"title":"FortiSIEM alert integration","sidebarTitle":"FortiSIEM","href":"/en/on-call/integration/alert-integration/alert-sources/fortisiem"},{"title":"Gatus alert integration","sidebarTitle":"Gatus","href":"/en/on-call/integration/alert-integration/alert-sources/gatus"},{"title":"Google Cloud Personalized Service Health alert integration","sidebarTitle":"Google Cloud Personalized Service Health","href":"/en/on-call/integration/alert-integration/alert-sources/gcp-personalized-service-health"},{"title":"Ghost Inspector alert integration","sidebarTitle":"Ghost Inspector","href":"/en/on-call/integration/alert-integration/alert-sources/ghost-inspector"},{"title":"GitGuardian alert integration","sidebarTitle":"GitGuardian","href":"/en/on-call/integration/alert-integration/alert-sources/gitguardian"},{"title":"GitHub alert integration","sidebarTitle":"GitHub","href":"/en/on-call/integration/alert-integration/alert-sources/github"},{"title":"GitLab alert integration","sidebarTitle":"GitLab","href":"/en/on-call/integration/alert-integration/alert-sources/gitlab"},{"title":"Google Cloud monitoring alert events","sidebarTitle":"Google Cloud monitoring","href":"/en/on-call/integration/alert-integration/alert-sources/google-cloud-monitoring"},{"title":"Google Security Command Center alert integration","sidebarTitle":"Google Security Command Center","href":"/en/on-call/integration/alert-integration/alert-sources/google-scc"},{"title":"Grafana integration","sidebarTitle":"Grafana","href":"/en/on-call/integration/alert-integration/alert-sources/grafana"},{"title":"Graylog alert events","sidebarTitle":"Graylog","href":"/en/on-call/integration/alert-integration/alert-sources/graylog"},{"title":"Guance alert events","sidebarTitle":"Guance","href":"/en/on-call/integration/alert-integration/alert-sources/guance"},{"title":"HackerOne alert integration","sidebarTitle":"HackerOne","href":"/en/on-call/integration/alert-integration/alert-sources/hackerone"},{"title":"Harbor alert integration","sidebarTitle":"Harbor","href":"/en/on-call/integration/alert-integration/alert-sources/harbor"},{"title":"Harness alert integration","sidebarTitle":"Harness","href":"/en/on-call/integration/alert-integration/alert-sources/harness"},{"title":"Healthchecks.io alert integration","sidebarTitle":"Healthchecks.io","href":"/en/on-call/integration/alert-integration/alert-sources/healthchecks-io"},{"title":"Apache HertzBeat alert integration","sidebarTitle":"Apache HertzBeat","href":"/en/on-call/integration/alert-integration/alert-sources/hertzbeat"},{"title":"HetrixTools alert integration","sidebarTitle":"HetrixTools","href":"/en/on-call/integration/alert-integration/alert-sources/hetrixtools"},{"title":"Honeybadger alert integration","sidebarTitle":"Honeybadger","href":"/en/on-call/integration/alert-integration/alert-sources/honeybadger"},{"title":"Honeycomb alert integration","sidebarTitle":"Honeycomb","href":"/en/on-call/integration/alert-integration/alert-sources/honeycomb"},{"title":"Hookdeck alert integration","sidebarTitle":"Hookdeck","href":"/en/on-call/integration/alert-integration/alert-sources/hookdeck"},{"title":"n8n alert integration","sidebarTitle":"n8n","href":"/en/on-call/integration/alert-integration/alert-sources/n8n"},{"title":"Hosted Graphite alert integration","sidebarTitle":"Hosted Graphite","href":"/en/on-call/integration/alert-integration/alert-sources/hosted-graphite"},{"title":"Huawei Cloud AOM alert integration","sidebarTitle":"Huawei Cloud AOM","href":"/en/on-call/integration/alert-integration/alert-sources/huawei-aom"},{"title":"Huawei Cloud APM alerts","sidebarTitle":"Huawei Cloud APM","href":"/en/on-call/integration/alert-integration/alert-sources/huawei-apm"},{"title":"Huawei Cloud CES integration","sidebarTitle":"Huawei Cloud CES","href":"/en/on-call/integration/alert-integration/alert-sources/huawei-ces"},{"title":"Huawei Cloud LTS alert events","sidebarTitle":"Huawei Cloud LTS","href":"/en/on-call/integration/alert-integration/alert-sources/huawei-lts"},{"title":"Hund alert integration","sidebarTitle":"Hund","href":"/en/on-call/integration/alert-integration/alert-sources/hund"},{"title":"HyperDX alert integration","sidebarTitle":"HyperDX","href":"/en/on-call/integration/alert-integration/alert-sources/hyperdx"},{"title":"Hyperping alert integration","sidebarTitle":"Hyperping","href":"/en/on-call/integration/alert-integration/alert-sources/hyperping"},{"title":"IBM QRadar alert integration","sidebarTitle":"IBM QRadar","href":"/en/on-call/integration/alert-integration/alert-sources/ibm-qradar"},{"title":"Icinga 2 alert integration","sidebarTitle":"Icinga 2","href":"/en/on-call/integration/alert-integration/alert-sources/icinga"},{"title":"Imperva alert integration","sidebarTitle":"Imperva","href":"/en/on-call/integration/alert-integration/alert-sources/imperva"},{"title":"Infisical alert integration","sidebarTitle":"Infisical","href":"/en/on-call/integration/alert-integration/alert-sources/infisical"},{"title":"InfluxData alert integration","sidebarTitle":"InfluxData","href":"/en/on-call/integration/alert-integration/alert-sources/influxdata"},{"title":"Rapid7 InsightIDR alert integration","sidebarTitle":"Rapid7 InsightIDR","href":"/en/on-call/integration/alert-integration/alert-sources/insightidr"},{"title":"IBM Instana alert integration","sidebarTitle":"IBM Instana","href":"/en/on-call/integration/alert-integration/alert-sources/instana"},{"title":"Instatus alert integration","sidebarTitle":"Instatus","href":"/en/on-call/integration/alert-integration/alert-sources/instatus"},{"title":"Cisco Intersight alert integration","sidebarTitle":"Cisco Intersight","href":"/en/on-call/integration/alert-integration/alert-sources/intersight"},{"title":"JD Cloud monitoring integration","sidebarTitle":"JD Cloud monitoring","href":"/en/on-call/integration/alert-integration/alert-sources/jdcloud"},{"title":"JFrog Xray alert integration","sidebarTitle":"JFrog Xray","href":"/en/on-call/integration/alert-integration/alert-sources/jfrog-xray"},{"title":"Jiankongbao alert events","sidebarTitle":"Jiankongbao","href":"/en/on-call/integration/alert-integration/alert-sources/jiankongbao"},{"title":"JumpCloud alert integration","sidebarTitle":"JumpCloud","href":"/en/on-call/integration/alert-integration/alert-sources/jumpcloud"},{"title":"Juniper Mist alert integration","sidebarTitle":"Juniper Mist","href":"/en/on-call/integration/alert-integration/alert-sources/juniper-mist"},{"title":"Kapacitor alert integration","sidebarTitle":"Kapacitor","href":"/en/on-call/integration/alert-integration/alert-sources/kapacitor"},{"title":"Keep alert integration guide","sidebarTitle":"Keep","href":"/en/on-call/integration/alert-integration/alert-sources/keep"},{"title":"Kener alert integration","sidebarTitle":"Kener","href":"/en/on-call/integration/alert-integration/alert-sources/kener"},{"title":"Kentik alert integration","sidebarTitle":"Kentik","href":"/en/on-call/integration/alert-integration/alert-sources/kentik"},{"title":"Komodor alert integration","sidebarTitle":"Komodor","href":"/en/on-call/integration/alert-integration/alert-sources/komodor"},{"title":"Kingsoft Cloud monitoring integration","sidebarTitle":"Kingsoft Cloud monitoring","href":"/en/on-call/integration/alert-integration/alert-sources/kscloud-monitor"},{"title":"Kuvasz alert integration","sidebarTitle":"Kuvasz","href":"/en/on-call/integration/alert-integration/alert-sources/kuvasz"},{"title":"Lacework FortiCNAPP alert integration","sidebarTitle":"Lacework FortiCNAPP","href":"/en/on-call/integration/alert-integration/alert-sources/lacework"},{"title":"LangSmith alert integration","sidebarTitle":"LangSmith","href":"/en/on-call/integration/alert-integration/alert-sources/langsmith"},{"title":"Lark Bot Compatible integration","sidebarTitle":"Lark Bot Compatible","href":"/en/on-call/integration/alert-integration/alert-sources/lark-alert"},{"title":"Last9 alert integration","sidebarTitle":"Last9","href":"/en/on-call/integration/alert-integration/alert-sources/last9"},{"title":"Level alert integration","sidebarTitle":"Level","href":"/en/on-call/integration/alert-integration/alert-sources/level"},{"title":"LibreNMS alert integration","sidebarTitle":"LibreNMS","href":"/en/on-call/integration/alert-integration/alert-sources/librenms"},{"title":"LimaCharlie alert integration","sidebarTitle":"LimaCharlie","href":"/en/on-call/integration/alert-integration/alert-sources/limacharlie"},{"title":"Loadster alert integration","sidebarTitle":"Loadster","href":"/en/on-call/integration/alert-integration/alert-sources/loadster"},{"title":"Loggly alert integration","sidebarTitle":"Loggly","href":"/en/on-call/integration/alert-integration/alert-sources/loggly"},{"title":"LogicMonitor alert integration","sidebarTitle":"LogicMonitor","href":"/en/on-call/integration/alert-integration/alert-sources/logicmonitor"},{"title":"Logpoint alert integration","sidebarTitle":"Logpoint","href":"/en/on-call/integration/alert-integration/alert-sources/logpoint"},{"title":"LogRocket alert integration","sidebarTitle":"LogRocket","href":"/en/on-call/integration/alert-integration/alert-sources/logrocket"},{"title":"Logz.io alert integration","sidebarTitle":"Logz.io","href":"/en/on-call/integration/alert-integration/alert-sources/logz-io"},{"title":"Mackerel alert integration","sidebarTitle":"Mackerel","href":"/en/on-call/integration/alert-integration/alert-sources/mackerel"},{"title":"Meraki alert events","sidebarTitle":"Meraki","href":"/en/on-call/integration/alert-integration/alert-sources/meraki"},{"title":"Metoro alert integration","sidebarTitle":"Metoro","href":"/en/on-call/integration/alert-integration/alert-sources/metoro"},{"title":"Mezmo alert integration","sidebarTitle":"Mezmo","href":"/en/on-call/integration/alert-integration/alert-sources/mezmo"},{"title":"Microsoft Defender for Cloud alert integration","sidebarTitle":"Microsoft Defender for Cloud","href":"/en/on-call/integration/alert-integration/alert-sources/microsoft-defender-for-cloud"},{"title":"Microsoft Sentinel alert integration","sidebarTitle":"Microsoft Sentinel","href":"/en/on-call/integration/alert-integration/alert-sources/microsoft-sentinel"},{"title":"Moesif alert integration","sidebarTitle":"Moesif","href":"/en/on-call/integration/alert-integration/alert-sources/moesif"},{"title":"MongoDB Atlas alert integration","sidebarTitle":"MongoDB Atlas","href":"/en/on-call/integration/alert-integration/alert-sources/mongodb-atlas"},{"title":"Monit alert integration","sidebarTitle":"Monit","href":"/en/on-call/integration/alert-integration/alert-sources/monit"},{"title":"Monitive alert integration","sidebarTitle":"Monitive","href":"/en/on-call/integration/alert-integration/alert-sources/monitive"},{"title":"Monte Carlo alert integration","sidebarTitle":"Monte Carlo","href":"/en/on-call/integration/alert-integration/alert-sources/monte-carlo"},{"title":"Nagios alert events","sidebarTitle":"Nagios","href":"/en/on-call/integration/alert-integration/alert-sources/nagios"},{"title":"NetBeez alert integration","sidebarTitle":"NetBeez","href":"/en/on-call/integration/alert-integration/alert-sources/netbeez"},{"title":"Netdata alert integration","sidebarTitle":"Netdata","href":"/en/on-call/integration/alert-integration/alert-sources/netdata"},{"title":"New Relic alert integration","sidebarTitle":"New Relic","href":"/en/on-call/integration/alert-integration/alert-sources/new-relic"},{"title":"Nobl9 alert integration","sidebarTitle":"Nobl9","href":"/en/on-call/integration/alert-integration/alert-sources/nobl9"},{"title":"NodePing alert integration","sidebarTitle":"NodePing","href":"/en/on-call/integration/alert-integration/alert-sources/nodeping"},{"title":"NS1 Connect alert integration","sidebarTitle":"NS1 Connect","href":"/en/on-call/integration/alert-integration/alert-sources/ns1"},{"title":"ntopng alert integration","sidebarTitle":"ntopng","href":"/en/on-call/integration/alert-integration/alert-sources/ntopng"},{"title":"NUT (Network UPS Tools) alert integration","sidebarTitle":"NUT (Network UPS Tools)","href":"/en/on-call/integration/alert-integration/alert-sources/nut"},{"title":"Obkio alert integration","sidebarTitle":"Obkio","href":"/en/on-call/integration/alert-integration/alert-sources/obkio"},{"title":"Observium alert integration","sidebarTitle":"Observium","href":"/en/on-call/integration/alert-integration/alert-sources/observium"},{"title":"OceanBase alert events","sidebarTitle":"OceanBase","href":"/en/on-call/integration/alert-integration/alert-sources/oceanbase"},{"title":"OCI Monitoring alert integration","sidebarTitle":"OCI monitoring","href":"/en/on-call/integration/alert-integration/alert-sources/oci-monitoring"},{"title":"Odown alert integration","sidebarTitle":"Odown","href":"/en/on-call/integration/alert-integration/alert-sources/odown"},{"title":"Ofelia alert integration","sidebarTitle":"Ofelia","href":"/en/on-call/integration/alert-integration/alert-sources/ofelia"},{"title":"Oh Dear alert integration","sidebarTitle":"Oh Dear","href":"/en/on-call/integration/alert-integration/alert-sources/ohdear"},{"title":"Okta alert integration","sidebarTitle":"Okta","href":"/en/on-call/integration/alert-integration/alert-sources/okta"},{"title":"Open Falcon integration","sidebarTitle":"Open Falcon","href":"/en/on-call/integration/alert-integration/alert-sources/open-falcon"},{"title":"OpenNMS alert integration","sidebarTitle":"OpenNMS","href":"/en/on-call/integration/alert-integration/alert-sources/opennms"},{"title":"OpenObserve alert integration","sidebarTitle":"OpenObserve","href":"/en/on-call/integration/alert-integration/alert-sources/openobserve"},{"title":"OpenSearch alert integration","sidebarTitle":"OpenSearch","href":"/en/on-call/integration/alert-integration/alert-sources/opensearch"},{"title":"OpenStatus alert integration","sidebarTitle":"OpenStatus","href":"/en/on-call/integration/alert-integration/alert-sources/openstatus"},{"title":"OpManager alert events","sidebarTitle":"OpManager","href":"/en/on-call/integration/alert-integration/alert-sources/opmanager"},{"title":"OPNsense alert integration","sidebarTitle":"OPNsense","href":"/en/on-call/integration/alert-integration/alert-sources/opnsense"},{"title":"Opsgenie Compatible alert integration","sidebarTitle":"Opsgenie Compatible","href":"/en/on-call/integration/alert-integration/alert-sources/opsgenie"},{"title":"Opsview alert integration","sidebarTitle":"Opsview","href":"/en/on-call/integration/alert-integration/alert-sources/opsview"},{"title":"OSSEC alert integration","sidebarTitle":"OSSEC","href":"/en/on-call/integration/alert-integration/alert-sources/ossec"},{"title":"PagerDuty Compatible integration","sidebarTitle":"PagerDuty Compatible","href":"/en/on-call/integration/alert-integration/alert-sources/pagerduty"},{"title":"Pandora FMS alert integration","sidebarTitle":"Pandora FMS","href":"/en/on-call/integration/alert-integration/alert-sources/pandora-fms"},{"title":"Panther alert integration","sidebarTitle":"Panther","href":"/en/on-call/integration/alert-integration/alert-sources/panther"},{"title":"Papertrail alert integration","sidebarTitle":"Papertrail","href":"/en/on-call/integration/alert-integration/alert-sources/papertrail"},{"title":"Peekaping alert integration","sidebarTitle":"Peekaping","href":"/en/on-call/integration/alert-integration/alert-sources/peekaping"},{"title":"pgDash alert integration","sidebarTitle":"pgDash","href":"/en/on-call/integration/alert-integration/alert-sources/pgdash"},{"title":"Phare Uptime alert integration","sidebarTitle":"Phare Uptime","href":"/en/on-call/integration/alert-integration/alert-sources/phare"},{"title":"Pingdom alert integration","sidebarTitle":"Pingdom","href":"/en/on-call/integration/alert-integration/alert-sources/pingdom"},{"title":"Postman alert integration","sidebarTitle":"Postman","href":"/en/on-call/integration/alert-integration/alert-sources/postman"},{"title":"PowerJob alert integration","sidebarTitle":"PowerJob","href":"/en/on-call/integration/alert-integration/alert-sources/powerjob"},{"title":"ProjectDiscovery Cloud alert integration","sidebarTitle":"ProjectDiscovery Cloud","href":"/en/on-call/integration/alert-integration/alert-sources/projectdiscovery"},{"title":"Prometheus integration guide","sidebarTitle":"Prometheus","href":"/en/on-call/integration/alert-integration/alert-sources/prometheus"},{"title":"PRTG alert integration","sidebarTitle":"PRTG","href":"/en/on-call/integration/alert-integration/alert-sources/prtg"},{"title":"Pulsetic alert integration","sidebarTitle":"Pulsetic","href":"/en/on-call/integration/alert-integration/alert-sources/pulsetic"},{"title":"Pulseway alert integration","sidebarTitle":"Pulseway","href":"/en/on-call/integration/alert-integration/alert-sources/pulseway"},{"title":"Raritan PX PDU alert integration","sidebarTitle":"Raritan PX PDU","href":"/en/on-call/integration/alert-integration/alert-sources/raritan-px"},{"title":"Raygun alert integration","sidebarTitle":"Raygun","href":"/en/on-call/integration/alert-integration/alert-sources/raygun"},{"title":"RBLTracker alert integration","sidebarTitle":"RBLTracker","href":"/en/on-call/integration/alert-integration/alert-sources/rbltracker"},{"title":"Red Hat OpenShift alert integration","sidebarTitle":"Red Hat OpenShift","href":"/en/on-call/integration/alert-integration/alert-sources/red-hat-openshift"},{"title":"Redash alert integration","sidebarTitle":"Redash","href":"/en/on-call/integration/alert-integration/alert-sources/redash"},{"title":"Redgate SQL Monitor alert integration","sidebarTitle":"Redgate SQL Monitor","href":"/en/on-call/integration/alert-integration/alert-sources/redgate-sql-monitor"},{"title":"Logease alert integration","sidebarTitle":"Logease","href":"/en/on-call/integration/alert-integration/alert-sources/rizhiyi"},{"title":"Robotalp alert integration","sidebarTitle":"Robotalp","href":"/en/on-call/integration/alert-integration/alert-sources/robotalp"},{"title":"Robusta alert integration","sidebarTitle":"Robusta","href":"/en/on-call/integration/alert-integration/alert-sources/robusta"},{"title":"Rollbar alert integration","sidebarTitle":"Rollbar","href":"/en/on-call/integration/alert-integration/alert-sources/rollbar"},{"title":"RUM alert integration","sidebarTitle":"RUM","href":"/en/on-call/integration/alert-integration/alert-sources/rum-alert"},{"title":"SearchStax alert integration","sidebarTitle":"SearchStax","href":"/en/on-call/integration/alert-integration/alert-sources/searchstax"},{"title":"SecurityScorecard alert integration","sidebarTitle":"SecurityScorecard","href":"/en/on-call/integration/alert-integration/alert-sources/securityscorecard"},{"title":"Sematext alert integration","sidebarTitle":"Sematext","href":"/en/on-call/integration/alert-integration/alert-sources/sematext"},{"title":"Semgrep alert integration","sidebarTitle":"Semgrep","href":"/en/on-call/integration/alert-integration/alert-sources/semgrep"},{"title":"Sensu Go alert integration","sidebarTitle":"Sensu Go","href":"/en/on-call/integration/alert-integration/alert-sources/sensu"},{"title":"Sentry alert events","sidebarTitle":"Sentry","href":"/en/on-call/integration/alert-integration/alert-sources/sentry"},{"title":"IBM SevOne NPM alert integration","sidebarTitle":"IBM SevOne NPM","href":"/en/on-call/integration/alert-integration/alert-sources/sevone"},{"title":"SigNoz alert integration","sidebarTitle":"SigNoz","href":"/en/on-call/integration/alert-integration/alert-sources/signoz"},{"title":"Simple Observability alert integration","sidebarTitle":"Simple Observability","href":"/en/on-call/integration/alert-integration/alert-sources/simple-observability"},{"title":"Site24x7 alert integration","sidebarTitle":"Site24x7","href":"/en/on-call/integration/alert-integration/alert-sources/site24x7"},{"title":"Skywalking alert events","sidebarTitle":"Skywalking","href":"/en/on-call/integration/alert-integration/alert-sources/skywalking"},{"title":"Snyk alert integration","sidebarTitle":"Snyk","href":"/en/on-call/integration/alert-integration/alert-sources/snyk"},{"title":"SolarWinds alert events","sidebarTitle":"SolarWinds","href":"/en/on-call/integration/alert-integration/alert-sources/solarwinds"},{"title":"SolarWinds Platform (Orion) alert integration","sidebarTitle":"SolarWinds Platform (Orion)","href":"/en/on-call/integration/alert-integration/alert-sources/solarwinds-orion"},{"title":"SonarQube alert integration","sidebarTitle":"SonarQube","href":"/en/on-call/integration/alert-integration/alert-sources/sonarqube"},{"title":"Split alert integration","sidebarTitle":"Split","href":"/en/on-call/integration/alert-integration/alert-sources/split-io"},{"title":"Splunk alert events","sidebarTitle":"Splunk","href":"/en/on-call/integration/alert-integration/alert-sources/splunk"},{"title":"Splunk Observability Cloud alert integration","sidebarTitle":"Splunk Observability Cloud","href":"/en/on-call/integration/alert-integration/alert-sources/splunk-observability"},{"title":"StackRox alert integration","sidebarTitle":"StackRox","href":"/en/on-call/integration/alert-integration/alert-sources/stackrox"},{"title":"StatusCake alert integration","sidebarTitle":"StatusCake","href":"/en/on-call/integration/alert-integration/alert-sources/statuscake"},{"title":"StatusGator alert integration","sidebarTitle":"StatusGator","href":"/en/on-call/integration/alert-integration/alert-sources/statusgator"},{"title":"Atlassian Statuspage alert integration","sidebarTitle":"Atlassian Statuspage","href":"/en/on-call/integration/alert-integration/alert-sources/statuspage"},{"title":"Statuspal alert integration","sidebarTitle":"Statuspal","href":"/en/on-call/integration/alert-integration/alert-sources/statuspal"},{"title":"Stripe alert integration","sidebarTitle":"Stripe","href":"/en/on-call/integration/alert-integration/alert-sources/stripe"},{"title":"Sublime Security alert integration","sidebarTitle":"Sublime Security","href":"/en/on-call/integration/alert-integration/alert-sources/sublime"},{"title":"Sumo Logic alert integration","sidebarTitle":"Sumo Logic","href":"/en/on-call/integration/alert-integration/alert-sources/sumo-logic"},{"title":"Suricata alert integration","sidebarTitle":"Suricata","href":"/en/on-call/integration/alert-integration/alert-sources/suricata"},{"title":"Sysdig alert integration","sidebarTitle":"Sysdig","href":"/en/on-call/integration/alert-integration/alert-sources/sysdig"},{"title":"Tactical RMM alert integration","sidebarTitle":"Tactical RMM","href":"/en/on-call/integration/alert-integration/alert-sources/tactical-rmm"},{"title":"Tailscale alert integration","sidebarTitle":"Tailscale","href":"/en/on-call/integration/alert-integration/alert-sources/tailscale"},{"title":"Tencent Cloud CLS integration","sidebarTitle":"Tencent Cloud CLS","href":"/en/on-call/integration/alert-integration/alert-sources/tencent-cls"},{"title":"Tencent Cloud Monitor CM integration","sidebarTitle":"Tencent Cloud Monitor CM","href":"/en/on-call/integration/alert-integration/alert-sources/tencent-cm"},{"title":"Tencent Cloud Live alert integration","sidebarTitle":"Tencent Cloud Live","href":"/en/on-call/integration/alert-integration/alert-sources/tencent-css"},{"title":"Tencent Cloud EventBridge","sidebarTitle":"Tencent Cloud EventBridge","href":"/en/on-call/integration/alert-integration/alert-sources/tencent-eventbridge"},{"title":"Thinkst Canary alert integration","sidebarTitle":"Thinkst Canary","href":"/en/on-call/integration/alert-integration/alert-sources/thinkst-canary"},{"title":"ThousandEyes alert integration","sidebarTitle":"ThousandEyes","href":"/en/on-call/integration/alert-integration/alert-sources/thousandeyes"},{"title":"Tideways alert integration","sidebarTitle":"Tideways","href":"/en/on-call/integration/alert-integration/alert-sources/tideways"},{"title":"Aqua Tracee alert integration","sidebarTitle":"Aqua Tracee","href":"/en/on-call/integration/alert-integration/alert-sources/tracee"},{"title":"Trigger.dev alert integration","sidebarTitle":"Trigger.dev","href":"/en/on-call/integration/alert-integration/alert-sources/trigger-dev"},{"title":"Trivy Operator alert integration","sidebarTitle":"Trivy Operator","href":"/en/on-call/integration/alert-integration/alert-sources/trivy-operator"},{"title":"Twilio alert integration","sidebarTitle":"Twilio","href":"/en/on-call/integration/alert-integration/alert-sources/twilio"},{"title":"Twingate alert integration","sidebarTitle":"Twingate","href":"/en/on-call/integration/alert-integration/alert-sources/twingate"},{"title":"UCloud CloudWatch alert integration","sidebarTitle":"UCloud CloudWatch","href":"/en/on-call/integration/alert-integration/alert-sources/ucloud-cloudwatch"},{"title":"updown.io alert integration","sidebarTitle":"updown.io","href":"/en/on-call/integration/alert-integration/alert-sources/updown"},{"title":"UpGuard alert integration","sidebarTitle":"UpGuard","href":"/en/on-call/integration/alert-integration/alert-sources/upguard"},{"title":"Uptime.com alert integration","sidebarTitle":"Uptime.com","href":"/en/on-call/integration/alert-integration/alert-sources/uptime-com"},{"title":"Uptime Kuma integration","sidebarTitle":"Uptime Kuma","href":"/en/on-call/integration/alert-integration/alert-sources/uptime-kuma"},{"title":"UptimeObserver alert integration","sidebarTitle":"UptimeObserver","href":"/en/on-call/integration/alert-integration/alert-sources/uptimeobserver"},{"title":"UptimeRobot alert integration","sidebarTitle":"UptimeRobot","href":"/en/on-call/integration/alert-integration/alert-sources/uptimerobot"},{"title":"Uptimia alert integration","sidebarTitle":"Uptimia","href":"/en/on-call/integration/alert-integration/alert-sources/uptimia"},{"title":"Uptrends alert integration","sidebarTitle":"Uptrends","href":"/en/on-call/integration/alert-integration/alert-sources/uptrends"},{"title":"Veeam ONE alert integration","sidebarTitle":"Veeam ONE","href":"/en/on-call/integration/alert-integration/alert-sources/veeam-one"},{"title":"Veeam Service Provider Console alert integration","sidebarTitle":"Veeam Service Provider Console","href":"/en/on-call/integration/alert-integration/alert-sources/veeam-service-provider-console"},{"title":"Veracode SCA alert integration","sidebarTitle":"Veracode SCA","href":"/en/on-call/integration/alert-integration/alert-sources/veracode-sca"},{"title":"Vigil alert integration","sidebarTitle":"Vigil","href":"/en/on-call/integration/alert-integration/alert-sources/vigil"},{"title":"Volcengine Cloud Monitor Event Center alert events","sidebarTitle":"Volcengine Cloud Monitor Event Center","href":"/en/on-call/integration/alert-integration/alert-sources/volcengine-cm-event"},{"title":"Volcengine Cloud Monitor alert events","sidebarTitle":"Volcengine Cloud Monitor","href":"/en/on-call/integration/alert-integration/alert-sources/volcengine-cm-metrics"},{"title":"Volcengine Cloud-Detect alert events","sidebarTitle":"Volcengine Cloud-Detect","href":"/en/on-call/integration/alert-integration/alert-sources/volcengine-dial"},{"title":"Volcengine RTC alert integration","sidebarTitle":"Volcengine RTC","href":"/en/on-call/integration/alert-integration/alert-sources/volcengine-rtc"},{"title":"Volcengine Log Service (TLS) alert events","sidebarTitle":"Volcengine Log Service (TLS)","href":"/en/on-call/integration/alert-integration/alert-sources/volcengine-tls"},{"title":"Wazuh alert integration","sidebarTitle":"Wazuh","href":"/en/on-call/integration/alert-integration/alert-sources/wazuh"},{"title":"WeCom Bot Compatible integration","sidebarTitle":"WeCom Bot Compatible","href":"/en/on-call/integration/alert-integration/alert-sources/wecom-alert"},{"title":"WhaTap alert integration","sidebarTitle":"WhaTap","href":"/en/on-call/integration/alert-integration/alert-sources/whatap"},{"title":"WhatsUp Gold alert integration","sidebarTitle":"WhatsUp Gold","href":"/en/on-call/integration/alert-integration/alert-sources/whatsup-gold"},{"title":"Wormly alert integration","sidebarTitle":"Wormly","href":"/en/on-call/integration/alert-integration/alert-sources/wormly"},{"title":"Xitoring alert integration","sidebarTitle":"Xitoring","href":"/en/on-call/integration/alert-integration/alert-sources/xitoring"},{"title":"Zabbix integration","sidebarTitle":"Zabbix","href":"/en/on-call/integration/alert-integration/alert-sources/zabbix"},{"title":"Zeek alert integration","sidebarTitle":"Zeek","href":"/en/on-call/integration/alert-integration/alert-sources/zeek"},{"title":"Zenoss alert integration","sidebarTitle":"Zenoss","href":"/en/on-call/integration/alert-integration/alert-sources/zenoss"},{"title":"Zilliz alert events","sidebarTitle":"Zilliz","href":"/en/on-call/integration/alert-integration/alert-sources/zilliz"},{"title":"zstack integration","sidebarTitle":"zstack","href":"/en/on-call/integration/alert-integration/alert-sources/zstack"}]},{"group":"Change Integration","pages":[{"title":"Apollo config center change integration","sidebarTitle":"Apollo config center","href":"/en/on-call/integration/change-integration/apollo"},{"title":"Argo Rollouts change integration","sidebarTitle":"Argo Rollouts","href":"/en/on-call/integration/change-integration/argo-rollouts"},{"title":"Argo CD change integration","sidebarTitle":"Argo CD","href":"/en/on-call/integration/change-integration/argocd"},{"title":"AWX / Ansible automation platform change integration","sidebarTitle":"AWX / Ansible automation platform","href":"/en/on-call/integration/change-integration/awx"},{"title":"Azure DevOps change integration","sidebarTitle":"Azure DevOps","href":"/en/on-call/integration/change-integration/azure-devops"},{"title":"Bitbucket change integration","sidebarTitle":"Bitbucket","href":"/en/on-call/integration/change-integration/bitbucket"},{"title":"Buildkite change integration","sidebarTitle":"Buildkite","href":"/en/on-call/integration/change-integration/buildkite"},{"title":"CircleCI change integration","sidebarTitle":"CircleCI","href":"/en/on-call/integration/change-integration/circleci"},{"title":"Coolify change integration","sidebarTitle":"Coolify","href":"/en/on-call/integration/change-integration/coolify"},{"title":"Custom change events","sidebarTitle":"Custom","href":"/en/on-call/integration/change-integration/custom-event"},{"title":"env0 change integration","sidebarTitle":"env0","href":"/en/on-call/integration/change-integration/env0"},{"title":"Expo EAS change integration","sidebarTitle":"Expo EAS","href":"/en/on-call/integration/change-integration/expo-eas"},{"title":"Flagsmith change integration","sidebarTitle":"Flagsmith","href":"/en/on-call/integration/change-integration/flagsmith"},{"title":"Flux CD change integration","sidebarTitle":"Flux CD","href":"/en/on-call/integration/change-integration/fluxcd"},{"title":"Gitea change integration","sidebarTitle":"Gitea","href":"/en/on-call/integration/change-integration/gitea"},{"title":"Gitee change integration","sidebarTitle":"Gitee","href":"/en/on-call/integration/change-integration/gitee"},{"title":"GitHub change integration","sidebarTitle":"GitHub","href":"/en/on-call/integration/change-integration/github"},{"title":"GitLab change integration","sidebarTitle":"GitLab","href":"/en/on-call/integration/change-integration/gitlab"},{"title":"GrowthBook change integration","sidebarTitle":"GrowthBook","href":"/en/on-call/integration/change-integration/growthbook"},{"title":"Harness FME change integration","sidebarTitle":"Harness FME","href":"/en/on-call/integration/change-integration/harness-fme"},{"title":"HCP Terraform change integration","sidebarTitle":"HCP Terraform","href":"/en/on-call/integration/change-integration/hcp-terraform"},{"title":"Heroku change integration","sidebarTitle":"Heroku","href":"/en/on-call/integration/change-integration/heroku"},{"title":"Jenkins change integration","sidebarTitle":"Jenkins","href":"/en/on-call/integration/change-integration/jenkins"},{"title":"JFrog Artifactory change integration","sidebarTitle":"JFrog Artifactory","href":"/en/on-call/integration/change-integration/jfrog-artifactory"},{"title":"Jira change integration","sidebarTitle":"Jira","href":"/en/on-call/integration/change-integration/jira"},{"title":"LaunchDarkly change integration","sidebarTitle":"LaunchDarkly","href":"/en/on-call/integration/change-integration/launchdarkly"},{"title":"Nautobot change integration","sidebarTitle":"Nautobot","href":"/en/on-call/integration/change-integration/nautobot"},{"title":"NetBox change integration","sidebarTitle":"NetBox","href":"/en/on-call/integration/change-integration/netbox"},{"title":"Netlify change integration","sidebarTitle":"Netlify","href":"/en/on-call/integration/change-integration/netlify"},{"title":"Octopus Deploy change integration","sidebarTitle":"Octopus Deploy","href":"/en/on-call/integration/change-integration/octopus-deploy"},{"title":"Pulumi Cloud change integration","sidebarTitle":"Pulumi Cloud","href":"/en/on-call/integration/change-integration/pulumi"},{"title":"Railway change integration","sidebarTitle":"Railway","href":"/en/on-call/integration/change-integration/railway"},{"title":"Rundeck change integration","sidebarTitle":"Rundeck","href":"/en/on-call/integration/change-integration/rundeck"},{"title":"Scalr change integration","sidebarTitle":"Scalr","href":"/en/on-call/integration/change-integration/scalr"},{"title":"Semaphore change integration","sidebarTitle":"Semaphore","href":"/en/on-call/integration/change-integration/semaphore"},{"title":"TeamCity change integration","sidebarTitle":"TeamCity","href":"/en/on-call/integration/change-integration/teamcity"},{"title":"Unleash change integration","sidebarTitle":"Unleash","href":"/en/on-call/integration/change-integration/unleash"},{"title":"Vercel change integration","sidebarTitle":"Vercel","href":"/en/on-call/integration/change-integration/vercel"},{"title":"Alibaba Cloud DevOps AppStack change integration","sidebarTitle":"Alibaba Cloud DevOps AppStack","href":"/en/on-call/integration/change-integration/yunxiao-appstack"},{"title":"Zadig change integration","sidebarTitle":"Zadig","href":"/en/on-call/integration/change-integration/zadig"}]},{"group":"Instant Messaging","pages":[{"title":"Feishu/Lark","href":"/en/on-call/integration/instant-messaging/lark"},{"title":"WeCom","href":"/en/on-call/integration/instant-messaging/wecom"},{"title":"Dingtalk","href":"/en/on-call/integration/instant-messaging/dingtalk"},{"title":"Slack","href":"/en/on-call/integration/instant-messaging/slack"},{"title":"Microsoft Teams","href":"/en/on-call/integration/instant-messaging/microsoft-teams"},{"title":"Zoom","href":"/en/on-call/integration/instant-messaging/zoom-app"}]},{"group":"SSO","pages":[{"title":"Authing","href":"/en/on-call/integration/sso/authing"},{"title":"Keycloak","href":"/en/on-call/integration/sso/keycloak"},{"title":"OpenLDAP","href":"/en/on-call/integration/sso/openldap"},{"title":"Role and team sync","href":"/en/on-call/integration/sso/role-team-sync"}]},{"group":"Webhooks","pages":[{"title":"Alert Webhook","href":"/en/on-call/integration/webhooks/alert-webhook"},{"title":"Incident Webhook","href":"/en/on-call/integration/webhooks/incident-webhook"},{"title":"Webhook custom actions","sidebarTitle":"Webhook custom actions","href":"/en/on-call/integration/webhooks/custom-actions"},{"title":"Jira sync","href":"/en/on-call/integration/webhooks/jira-sync"},{"title":"ServiceNow sync","href":"/en/on-call/integration/webhooks/servicenow-sync"},{"title":"ServiceDesk Plus sync","href":"/en/on-call/integration/webhooks/servicedesk-plus-sync"},{"title":"BlueKing ITSM synchronization","href":"/en/on-call/integration/webhooks/blueking-sync"}]},{"group":"Other Integrations","pages":[{"title":"Link integration","href":"/en/on-call/integration/other-integration/link"}]},{"group":"Referenced APIs","pages":[{"title":"Image Upload API","href":"/en/on-call/integration/alert-integration/alert-sources/image-upload"},{"title":"Label Mapping API","href":"/en/on-call/integration/alert-integration/alert-sources/label-mapping-api"}]}]},{"group":"Best Practices","icon":"lightbulb","pages":[{"title":"Dynamic dispatch with external data","href":"/en/on-call/practices/dynamic-dispatch-with-external-data"},{"title":"WeCom bot @ mention for responders","href":"/en/on-call/practices/wecom-bot-mention"}]}]},{"tab":"RUM","icon":"monitor-waveform","pages":[{"title":"RUM","href":"/en/rum/quickstart/quickstart"}]},{"tab":"Monitors","icon":"chart-area","pages":[{"title":"Monitors","href":"/en/monitors/quickstart/quickstart"}]},{"tab":"API Reference","icon":"terminal","hidden":true,"pages":[{"title":"API Reference","href":"/en/openapi/introduction"}]}]}]},"basePath":"","title":"Noise reduction - Flashduty Docs","deploymentId":"dpl_vSEmv961Ncyvz1psVwgUnTXQMSYk","buildId":"dpl_vSEmv961Ncyvz1psVwgUnTXQMSYk","dynamics":["07c022d89b","a74be98ba7"],"chunks":["Frame-BRsfsIIG.js","DynamicMarkdown-NFqqduU7.js","zoom-image-lightbox-BguUeq2N.js","lightbox-handle-r17bVUz3.js"]}