

Core concepts
Understanding these concepts before configuration will help you better plan your schedules: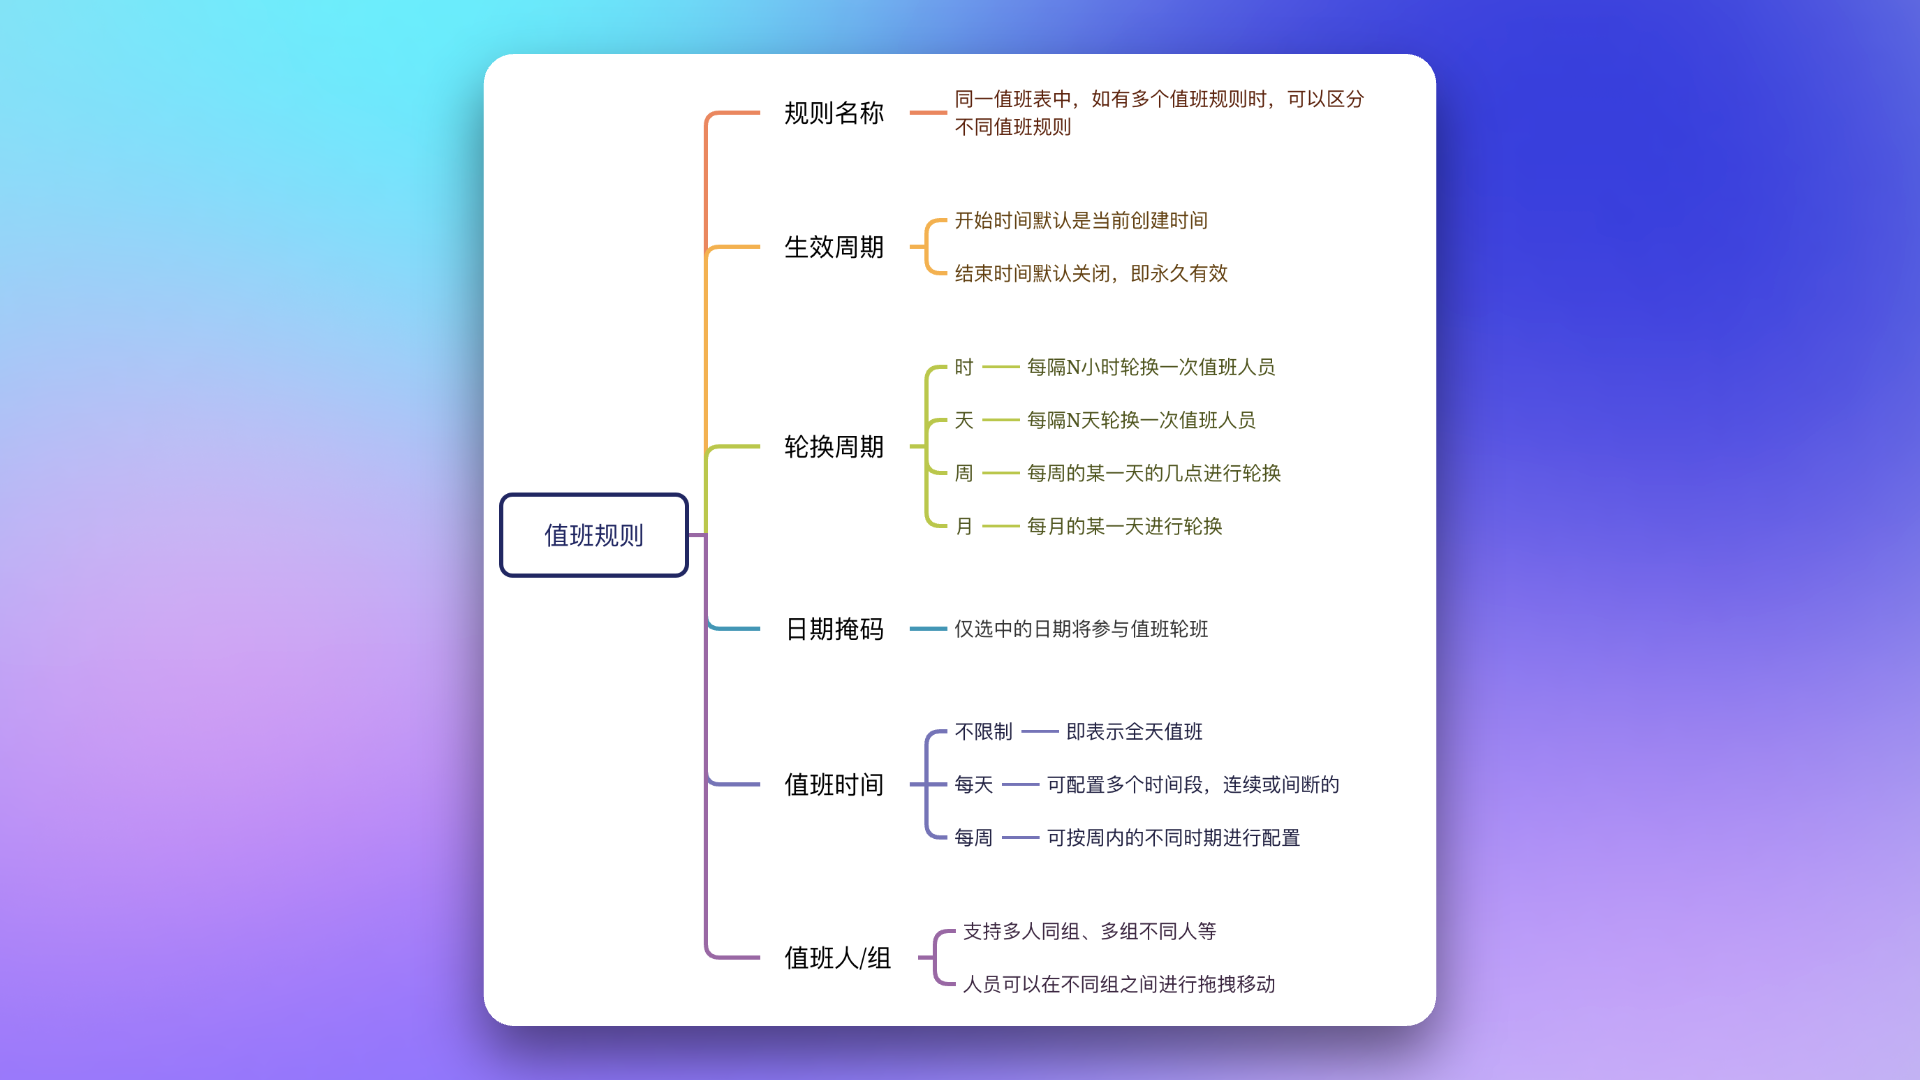
Configuration process
1
Create a Schedule
Go to Schedule Management, click Create schedule
- Schedule Name: 1–40 characters, must be unique within the account
- Owning Team: Specifies which team manages this schedule; team members gain edit permissions for this schedule
- Schedule Description: Supports Markdown syntax, content can be included in notifications; up to 500 characters
- Time Zone: Required. Flashduty computes the schedule’s rotations and shifts on the local time of this zone (for example, “handover at 09:00 daily” means 09:00 in the schedule’s own zone). It cannot be changed after creation; to use a different zone, create a new schedule and migrate the dispatch policy references
The schedule list shows a Time Zone column. The roster page labels two zones side by side. “Times on this page are shown in your time zone” is the viewer’s effective zone: the personal time zone, or the organization zone if none is set. The schedule time zone is the zone the shifts are defined in. Times on screen are in the viewer’s zone.
Older schedules created without a time zone use Asia/Shanghai.
The Free plan allows you to create only 1 schedule. Upgrade to the Standard plan or higher to create more.
2
Set Shift Notifications
To prevent forgetting shifts or handoffs, the system provides two notification triggers. You can enable either or both:
Scheduled notifications remind who is currently on-call. Flashduty reads the fixed time as local time in the schedule’s time zone. If your time zone differs, a badge next to the time input shows the schedule’s time zone.After enabling either notification trigger, configure notification channels:
The Feishu, WeCom, and Zoom bot forms include an Enable @ mentions switch. When it is on, the notification mentions only the people on duty for that notification; the next shift is listed by name without a mention. DingTalk bots always mention people by member phone number and have no switch; Slack and Telegram bots mention no one.
For Feishu and Zoom, Enable @ mentions requires a User information mapping, and saving fails with “User information mapping is required” without one. The mapping’s source label takes the member’s registered email, and its target label holds the Feishu user ID or Zoom JID; members with no match are listed by name only. Create and maintain mappings under Configuration → Mappings; Quick create mapping schema below the switch opens the create page for the matching type. Mappings that don’t fit the bot type are greyed out in the dropdown, and if a selected mapping is later changed to an incompatible structure, saving fails with “The selected user information mapping is incompatible. Please select another one.”
When selecting a group chat: disabled IM apps stay in the dropdown, labeled “(Disabled)”, but you can’t select them; re-enable the app in Integrations first. The picker excludes platform-created chats such as war rooms. Stale targets show as Chat unavailable, and you can remove them.
3
Define On-call Rules
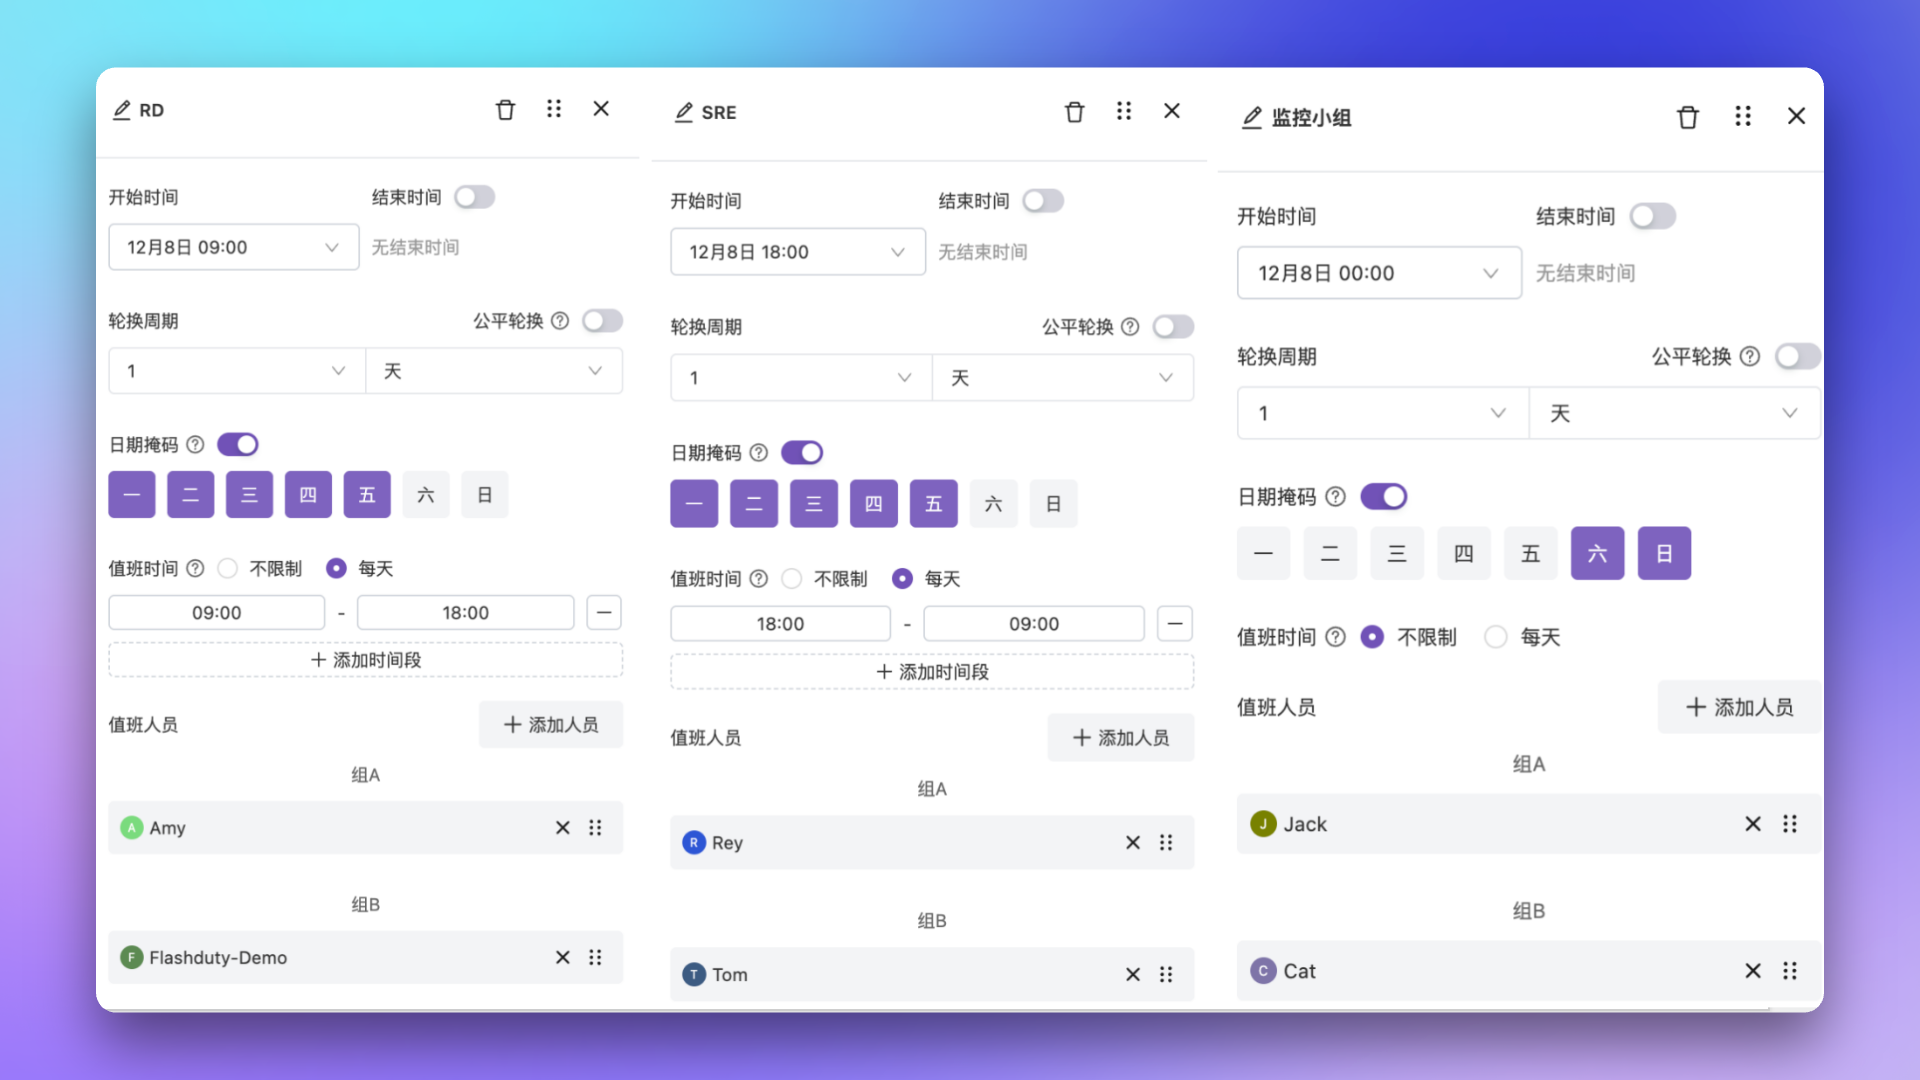
This is the core step. You can add one or more layers of rules. Each layer includes the following fields:
The three Time Restriction modes:
- No restriction: Members are on-call for the entire rotation cycle
- Daily: Set daily on-call time ranges (for example, 09:00–18:00), multiple periods can be added. Input uses HH:MM format, which cannot express 24:00 — so an end time of
00:00means end of day, and00:00–00:00means on-call for the full day - Weekly: Set day+time on-call ranges (for example, Monday 09:00 – Friday 18:00), multiple periods can be added
When date mask is enabled, the “Weekly” restriction mode is unavailable since the date mask already provides day-of-week control. If you enable the date mask while the time restriction is already in “Weekly” mode, the system automatically resets it to “No restriction”.
After setting time restrictions, there may be gaps with no one on-call — ensure other rules provide coverage.
Delete a schedule
You can delete a schedule from the schedule list or the schedule detail page. The system asks for confirmation before deletion.On-call roles
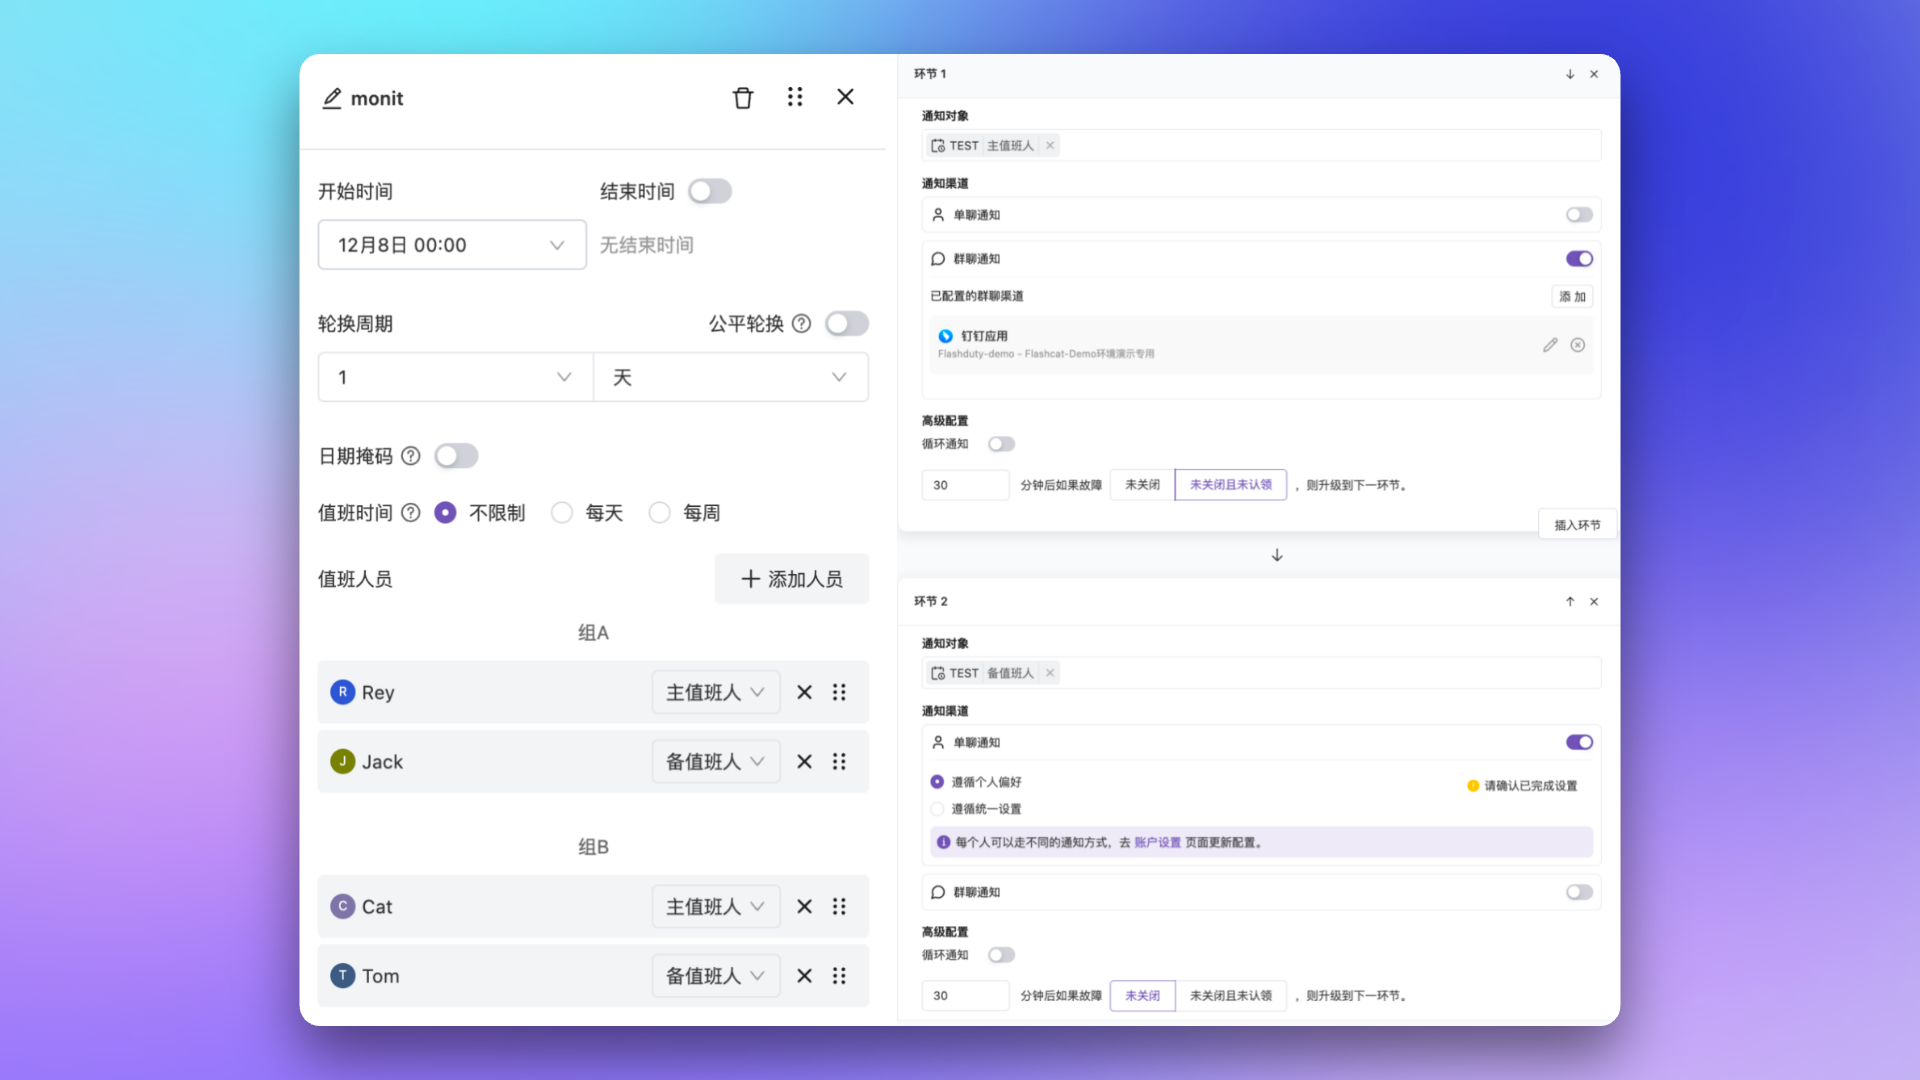
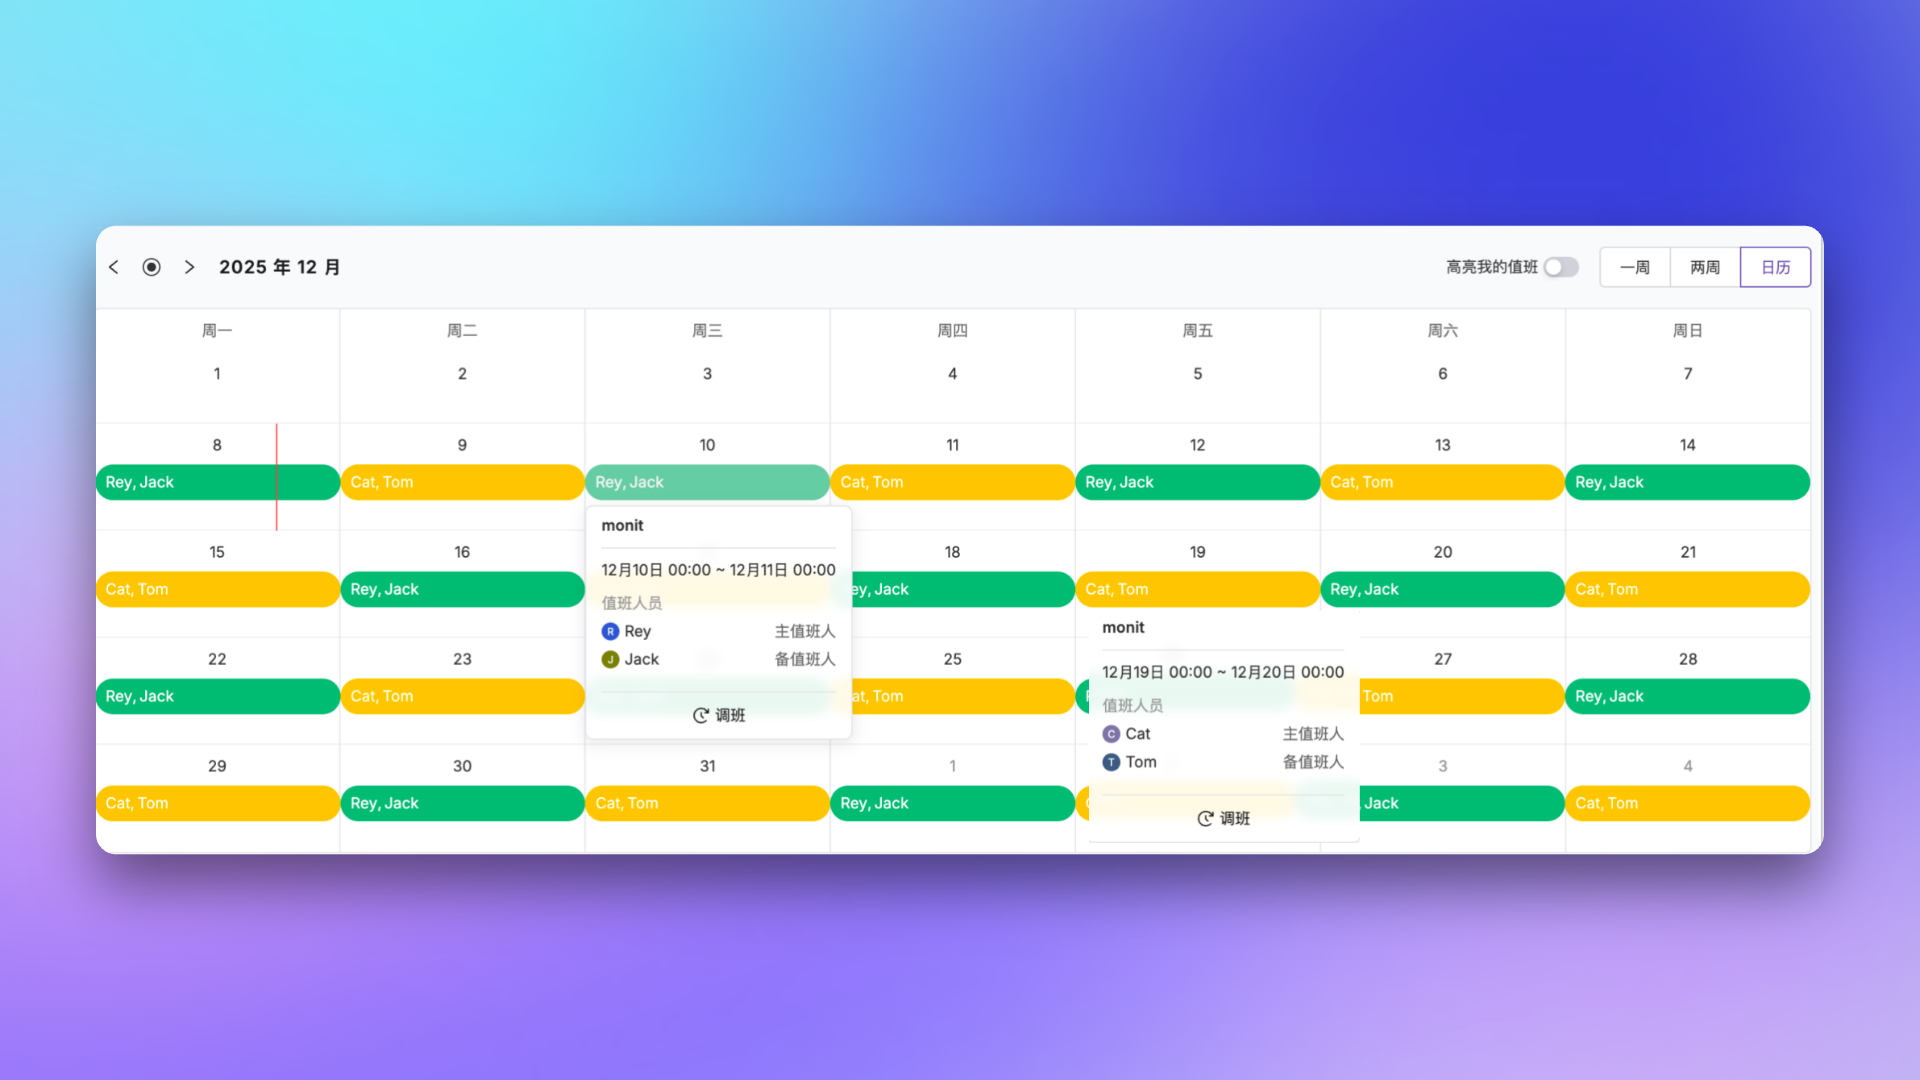
On-call roles distinguish responders with different responsibilities within the same schedule (for example, “primary” and “backup”) and are an account-level resource:- Shared across the account: Roles take effect at the account level and are shared by all schedules
- Grouped by role inside a rule: When adding personnel to a schedule rule, you can bind members to a specific role, forming a “role → member” mapping
- Escalation rules target by role: Escalation rules support notifying all on-call personnel, specific roles (for example, notify primary only), or specific members, enabling finer-grained alert routing
By default, each account has only one on-call role, so you don’t need to choose a role when adding responders. If you need multiple roles (such as primary/backup), contact Flashduty support to enable them. Once enabled, you can assign roles to members both in schedule rules and in overrides. Self-service role management is not available in the console.
Override and time off
When on-call personnel need time off or have a temporary conflict, don’t modify permanent rules — use the “Override” feature instead. An override is an independent rule type that fully preempts the normal on-call rules within its effective window. Once the window ends, the original rules resume automatically.Two ways to create an override
1
Create from the calendar
On the schedule details page, click the time slot you want to adjust in the calendar view, and choose Override. The default window covers the selected day in the schedule’s time zone. You can adjust its start and end times.
2
Create from the override entry
Below the schedule calendar, select Overrides to add an override directly. The adjacent Schedule rules entry adds regular rules.
Configurable fields
Overrides have a smaller field set than regular rules and only include:- Start Time / End Time: Define the override window. Defaults to
[today 00:00, next day 00:00] - Replacement Person: The member who replaces the original on-call person within that window
Within its time window, an override fully replaces all regular on-call rules (regardless of which layer they belong to), rather than stacking with them. When rules of the same type overlap, the rule lower in the list takes precedence. Non-overlapping periods remain unchanged. Reorder rules to change who is on call during overlaps. Flashduty keeps all override records for later review.
Date mask and continuous rotation
Date mask
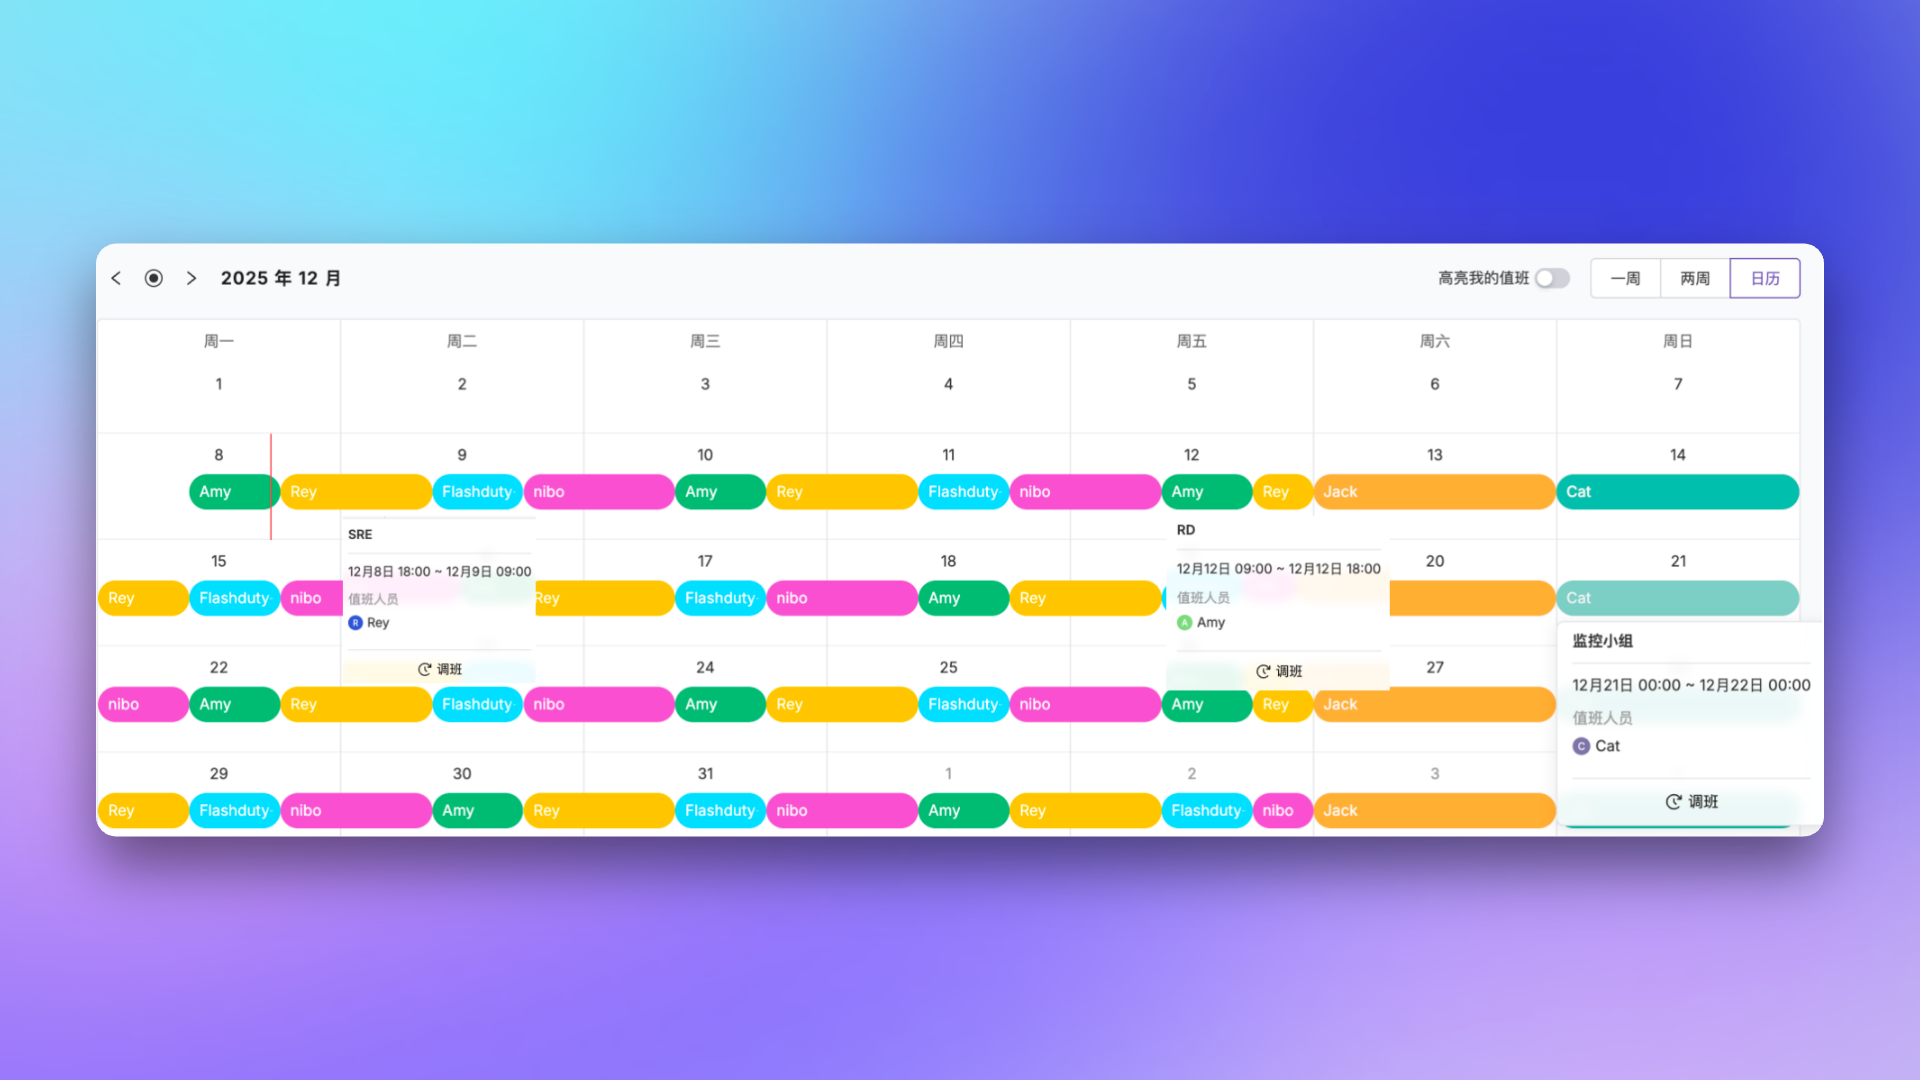
Date mask controls which days of the week an on-call rule takes effect. By selecting different day combinations, you can flexibly implement differentiated scheduling between weekdays and weekends. Common use cases:- Weekday/weekend separation: Team A on-call during weekdays, Team B on weekends
- Specific day scheduling: Assign certain personnel only on Monday, Wednesday, and Friday
- Day/night shift by day: Configure day and night shift rules for weekdays, and full-day on-call rules for weekends
Continuous rotation
By default, Flashduty divides schedules at 00:00 each calendar day and splits a shift that spans midnight into separate segments.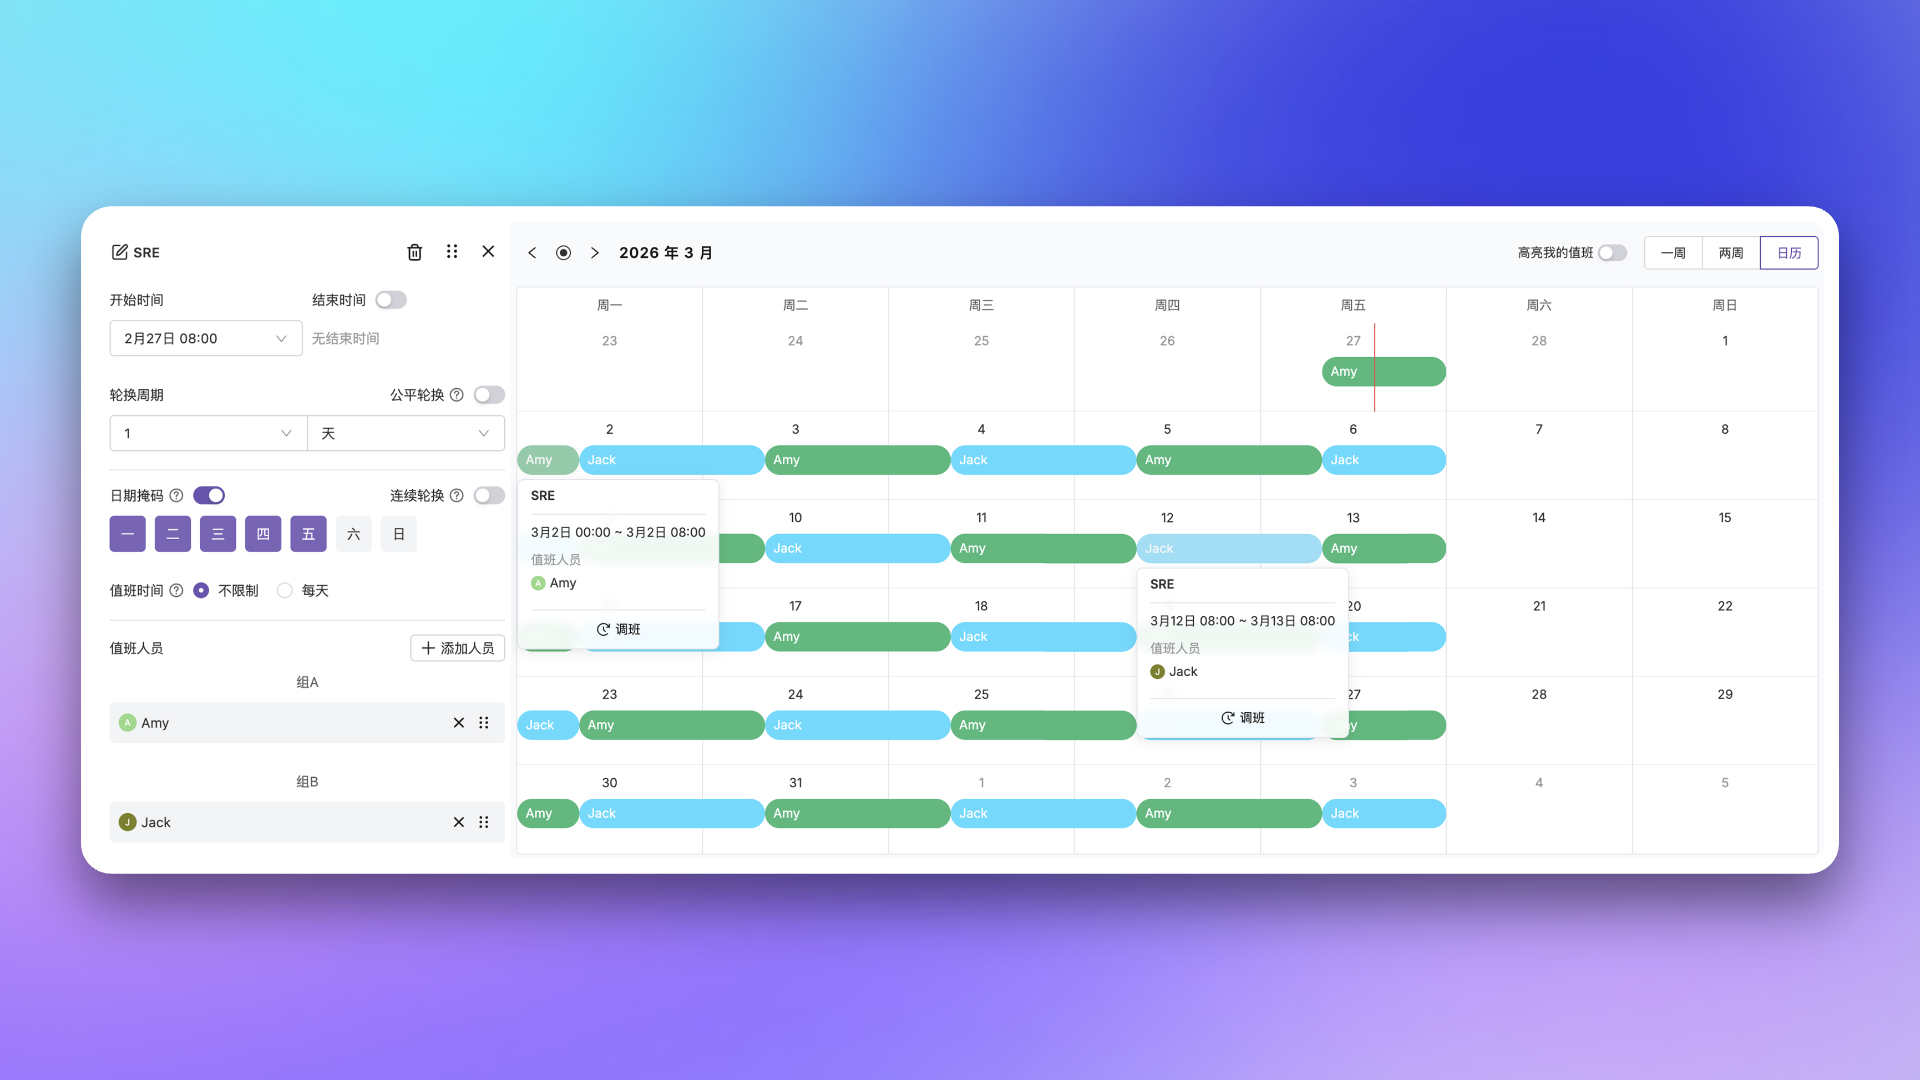 When continuous rotation is enabled, Flashduty calculates rotation boundaries from the shift start time instead of the 00:00 cutoff. Each on-call member will complete a full rotation cycle without being split at midnight.
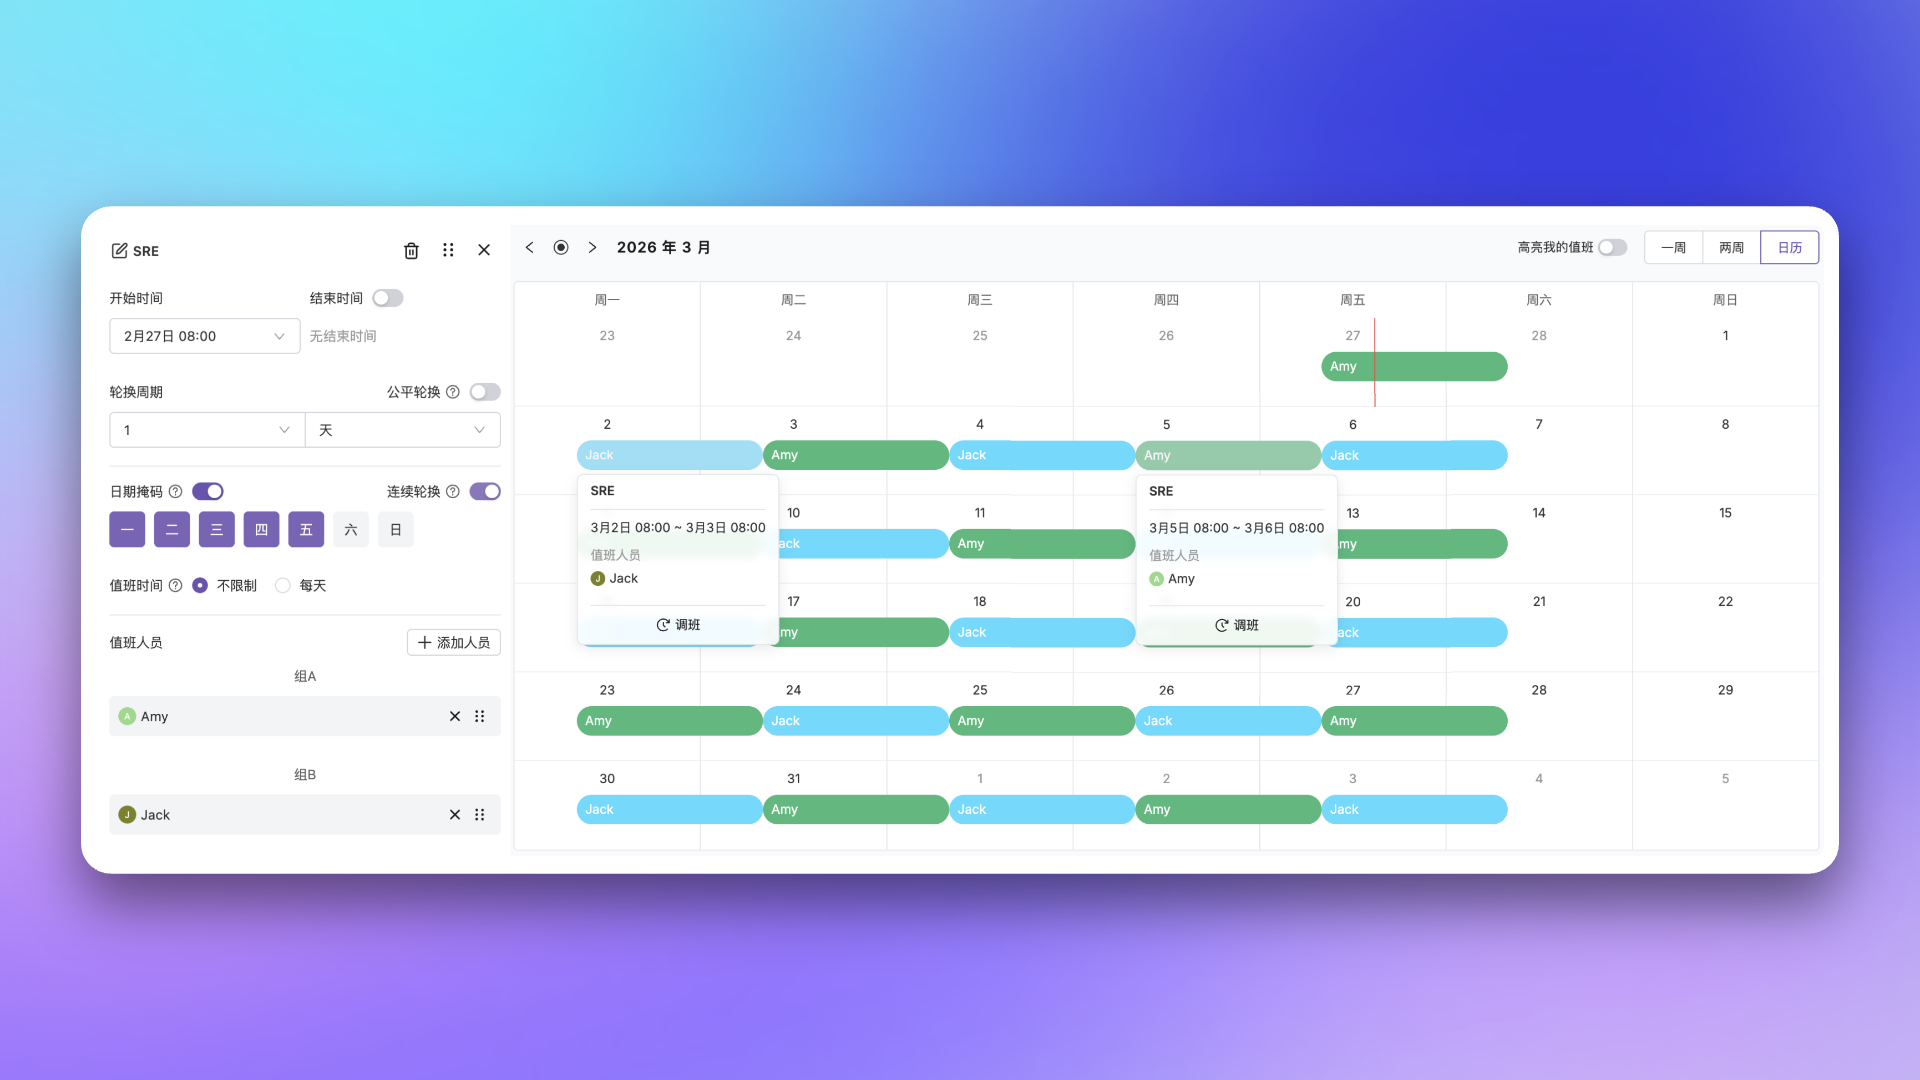
Consider enabling continuous rotation in the following scenarios:
- Rotation cycle is 24 hours
- Shift start time is not 00:00
- Day-of-week date mask is configured
- Different rotation rules for weekdays and weekends
Common scheduling scenarios
- 24/7 Simple Rotation
- Day/Night Shift Separation
- Primary/Backup On-call
Requirement: Ops team has A, B, C—each person on-call for one week, handoff Monday at 10:00 AM.Configuration: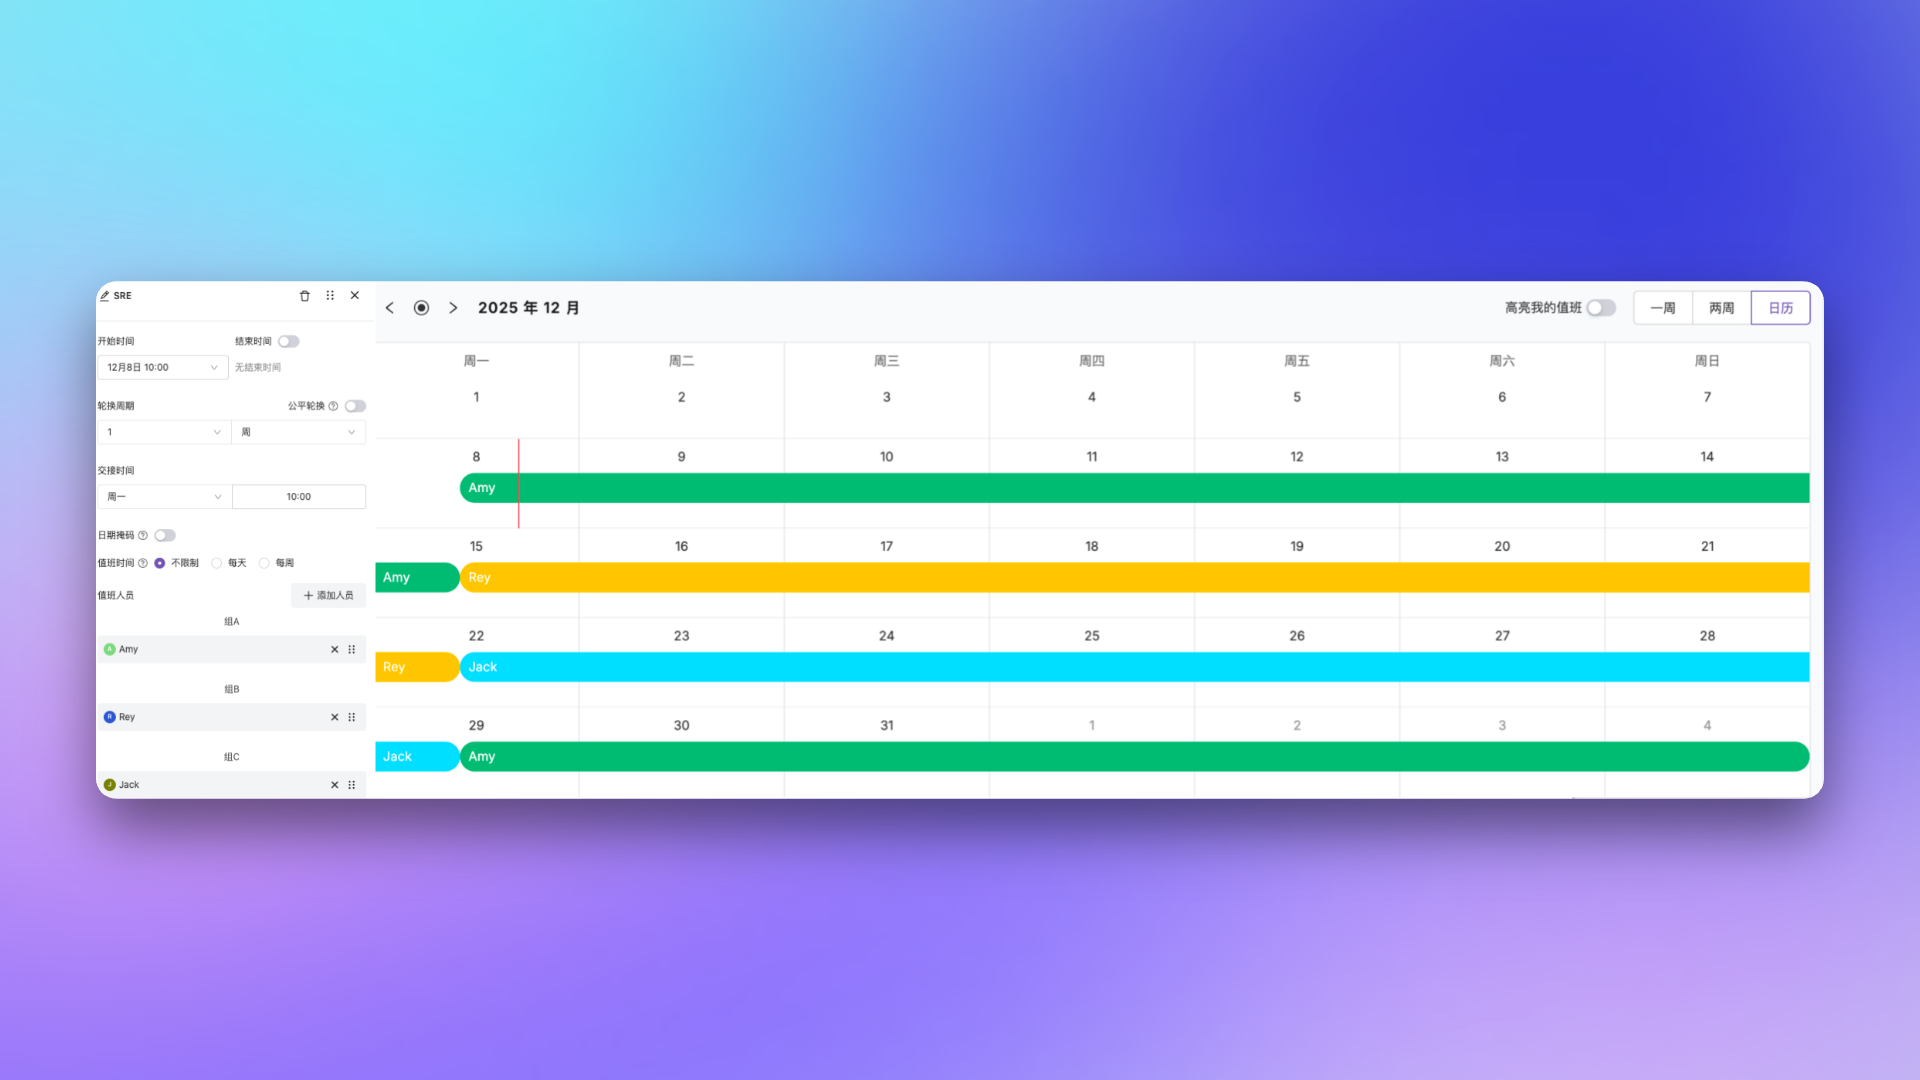
- Personnel sequence: A, B, C
- Rotation cycle: 1 week
- Handoff time: Monday 10:00
View schedule details
Click a schedule name to enter the detail page, where you can view the scheduling calendar and manage on-call rules. The upper right corner provides these options:- View switcher: Toggle between “Week”, “Two Weeks”, and “Calendar” (month view)
- Highlight my shifts: When enabled, the roster highlights your on-call shifts
On a self-hosted deployment with the phone turned off, only the app status is shown. The parentheses are omitted when readiness can’t be read. Only the subject account and account administrators see other members’ readiness; everyone else sees only their own. Your organization can require a number of high-urgency methods. See Readiness requirement.
View my schedule
The Schedules list page embeds a My Schedule section at the top, with a week view of your on-call assignments. The left column lists schedules where you have shifts this week. The calendar on the right shows your time slots in each schedule. Use the arrows next to the section title to browse other weeks. Click the dot between them to return to the current week. Shift times appear in your effective time zone. If a schedule’s time zone differs from yours, an extra line shows the same slot in the schedule’s time zone.Related topics
Escalation Rules
Configure alert notification rules and escalation paths
Service Calendar
Define workdays and rest days