

Get the app from Microsoft Teams
1
Find Flashduty
In Microsoft Teams, select Apps, search for Flashduty, and open its details page.
2
Add the App
Select Add. Choose the destination that matches your use case: a team/channel, a group chat, or your personal chat.
In the commands below, replace
{ID} with the Flashduty Microsoft Teams integration ID. Replace {ChatName} with the group chat name.Notification targets
The top of the Configuration tab on the integration detail page is the Notification targets card: Flashduty sends incident notifications only to the teams and group chats listed here. The card has two tabs, Teams and Group chat, and the number after each tab label is how many targets are linked:- Teams lists each linked team with the channels the Flashduty app was read from in that team (shown as
Channel: General). When no channel can be read, the row warns that the Flashduty app may have been removed from the team; select Retry to read that team again. - Both tabs embed a three-step guide for adding a target: install the app in Teams and pick the destination (a team must use the General channel), send the link command in the target conversation, then select Link Now in the bot reply.
- Unlink on a row opens a confirmation dialog that states the team or group chat stops receiving incident notifications once unlinked; select Confirm in the dialog to actually unlink. The dialog also folds in “How to remove Flashduty Bot after unlinking?”.
/ambient on or /ambient off; see AI SRE settings in IM integrations.
Link team
1
Find App
In Teams, open Apps, find Flashduty, and select Add to a team.
2
Add to Team
Add the app to the target Team.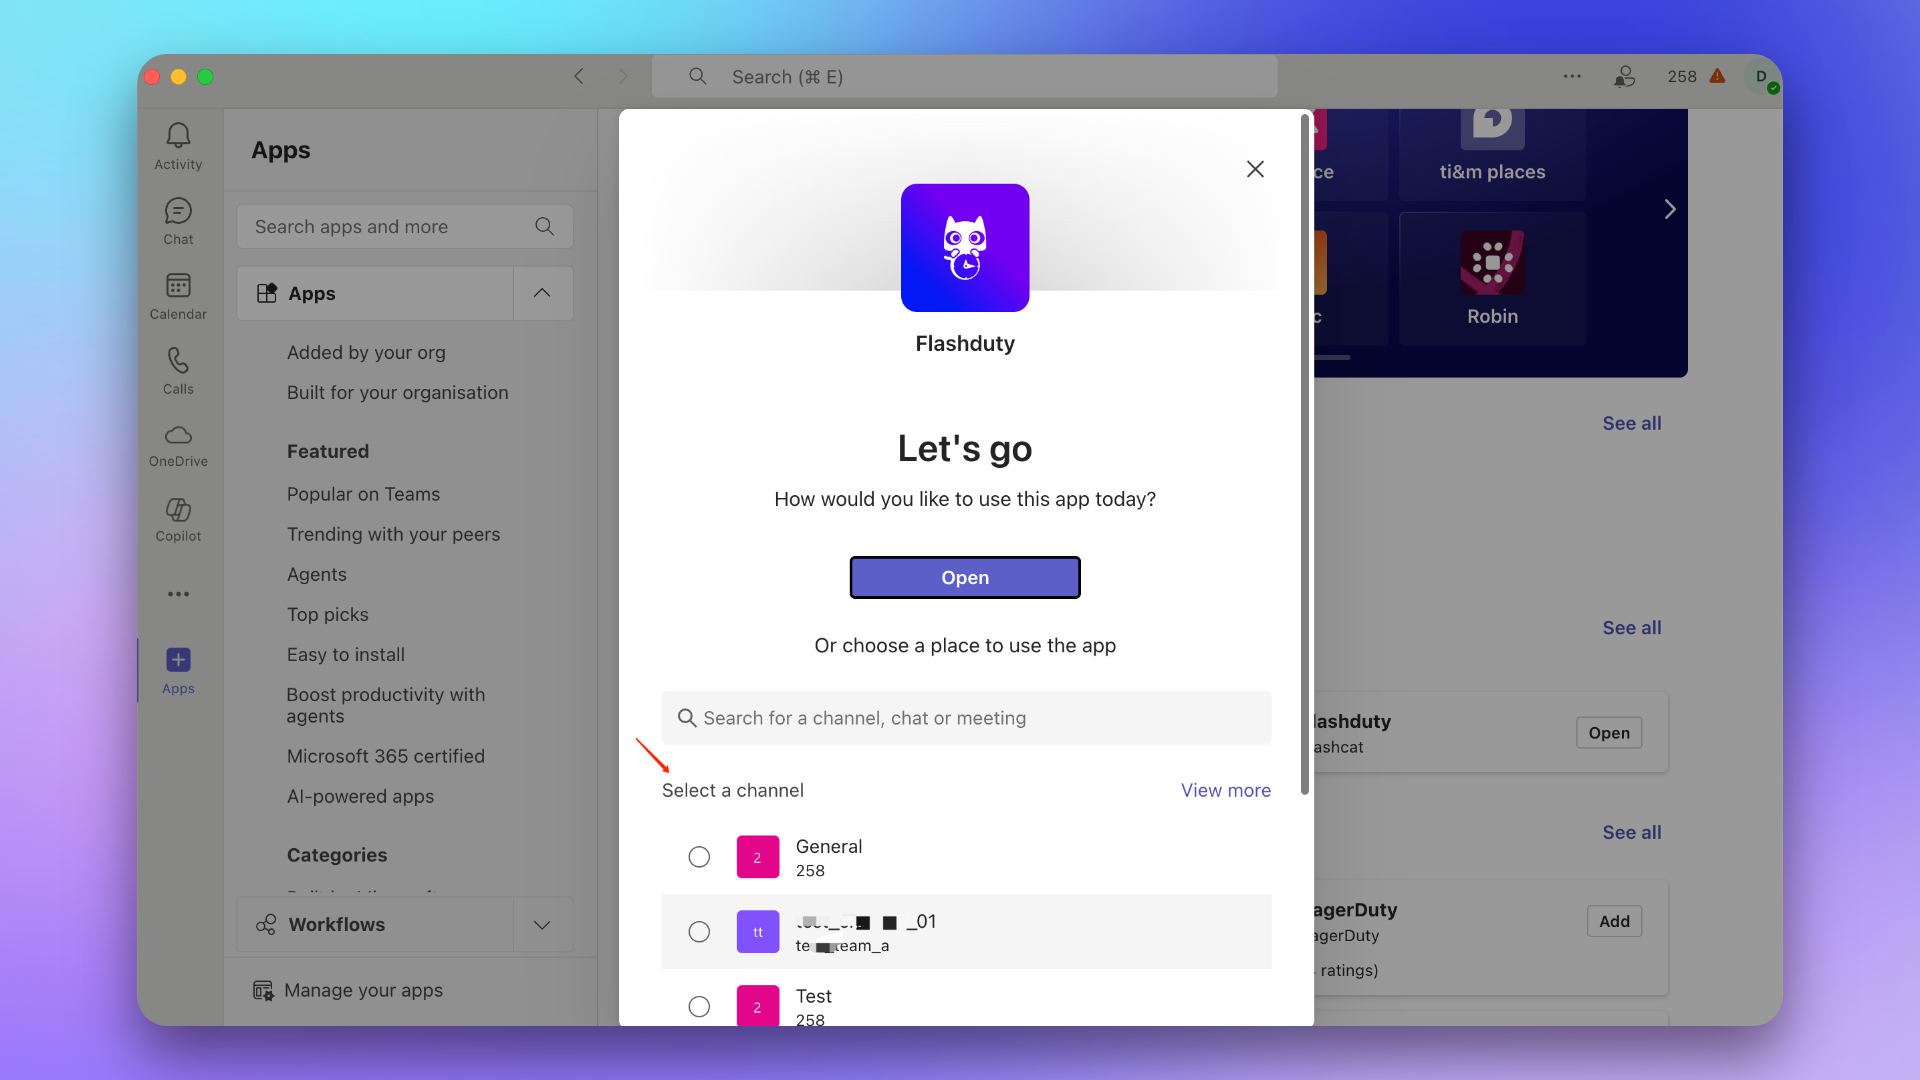
3
Send Link Command
In the Team’s General channel, type @Flashduty and send 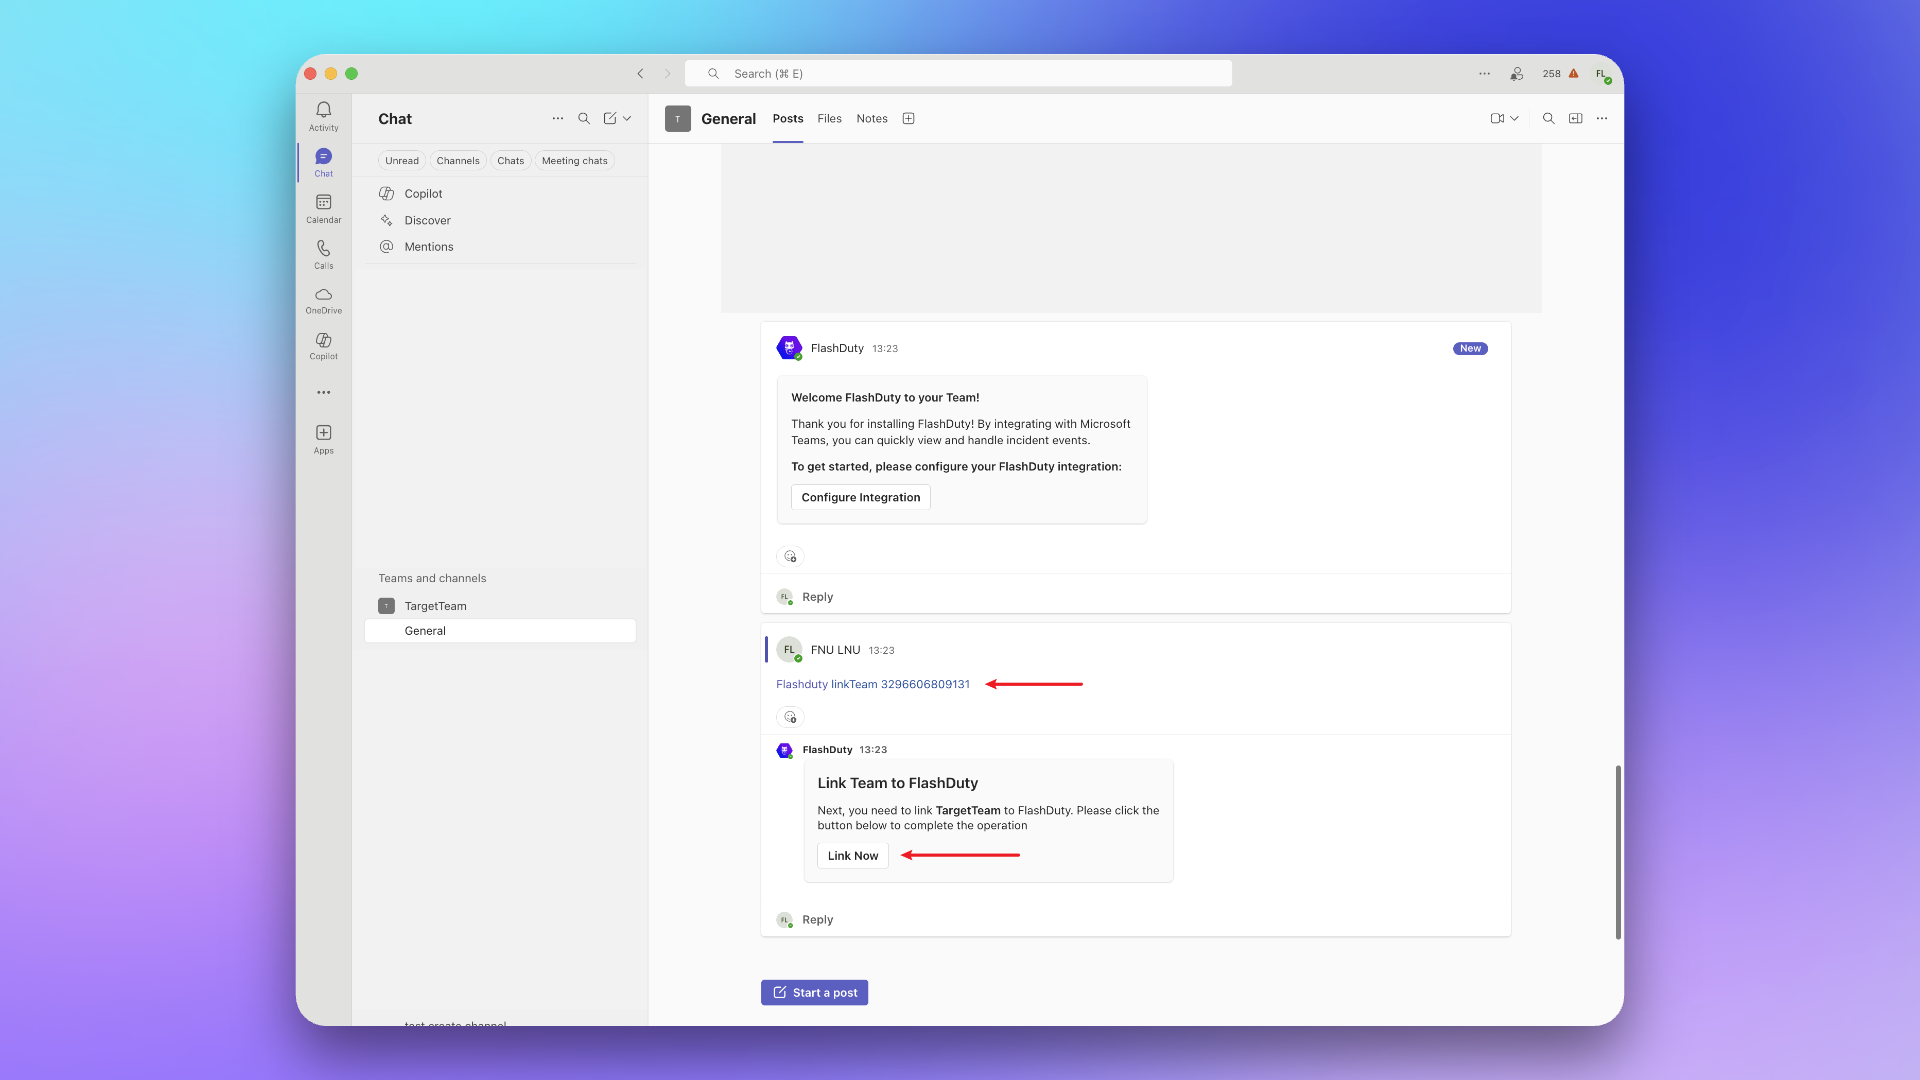
linkTeam {ID}, then select Link Now in the bot reply. You must type @Flashduty yourself and pick the bot from the popup list; a pasted @ is not a mention.Selecting Link Now brings you back to the integration detail page and completes the link automatically, so the team appears under Notification targets > Teams.4
Unlink the Team
To remove this Team’s link, go to Integration Center → Instant Messaging → Microsoft Teams → Configuration → Notification targets → Teams, select Unlink on the team, and then select Confirm in the dialog. You can also send
@Flashduty unlinkTeam {ID} in the same channel and follow the prompts on the response card.Link chat
1
Find App
In Teams, open Apps, find Flashduty, and select Add to a chat.
2
Add to Chat
Add the app to the target Chat.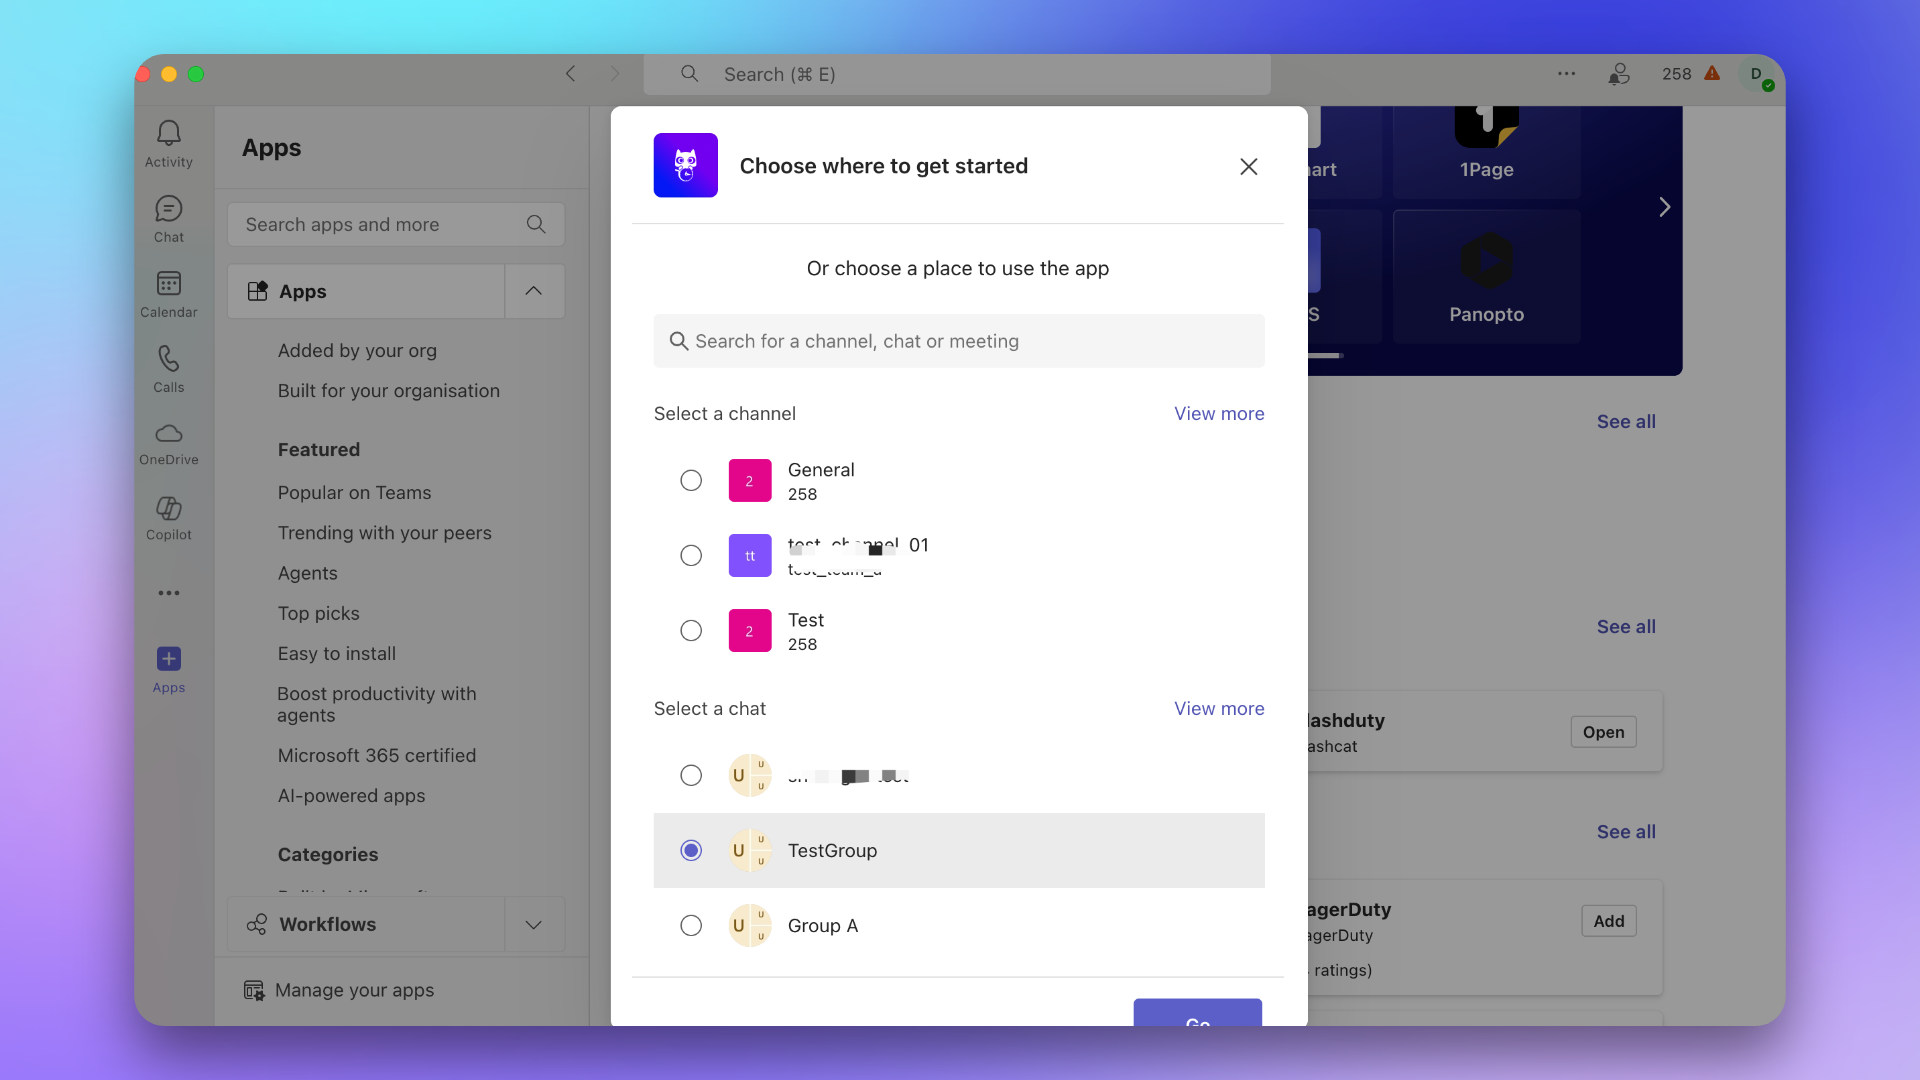
3
Send Link Command
First fill in Chat name in the input below the step (it is only used to display the chat in Flashduty, and the command on the page can’t be copied until it’s filled in). Then, in the group chat, type @Flashduty and send 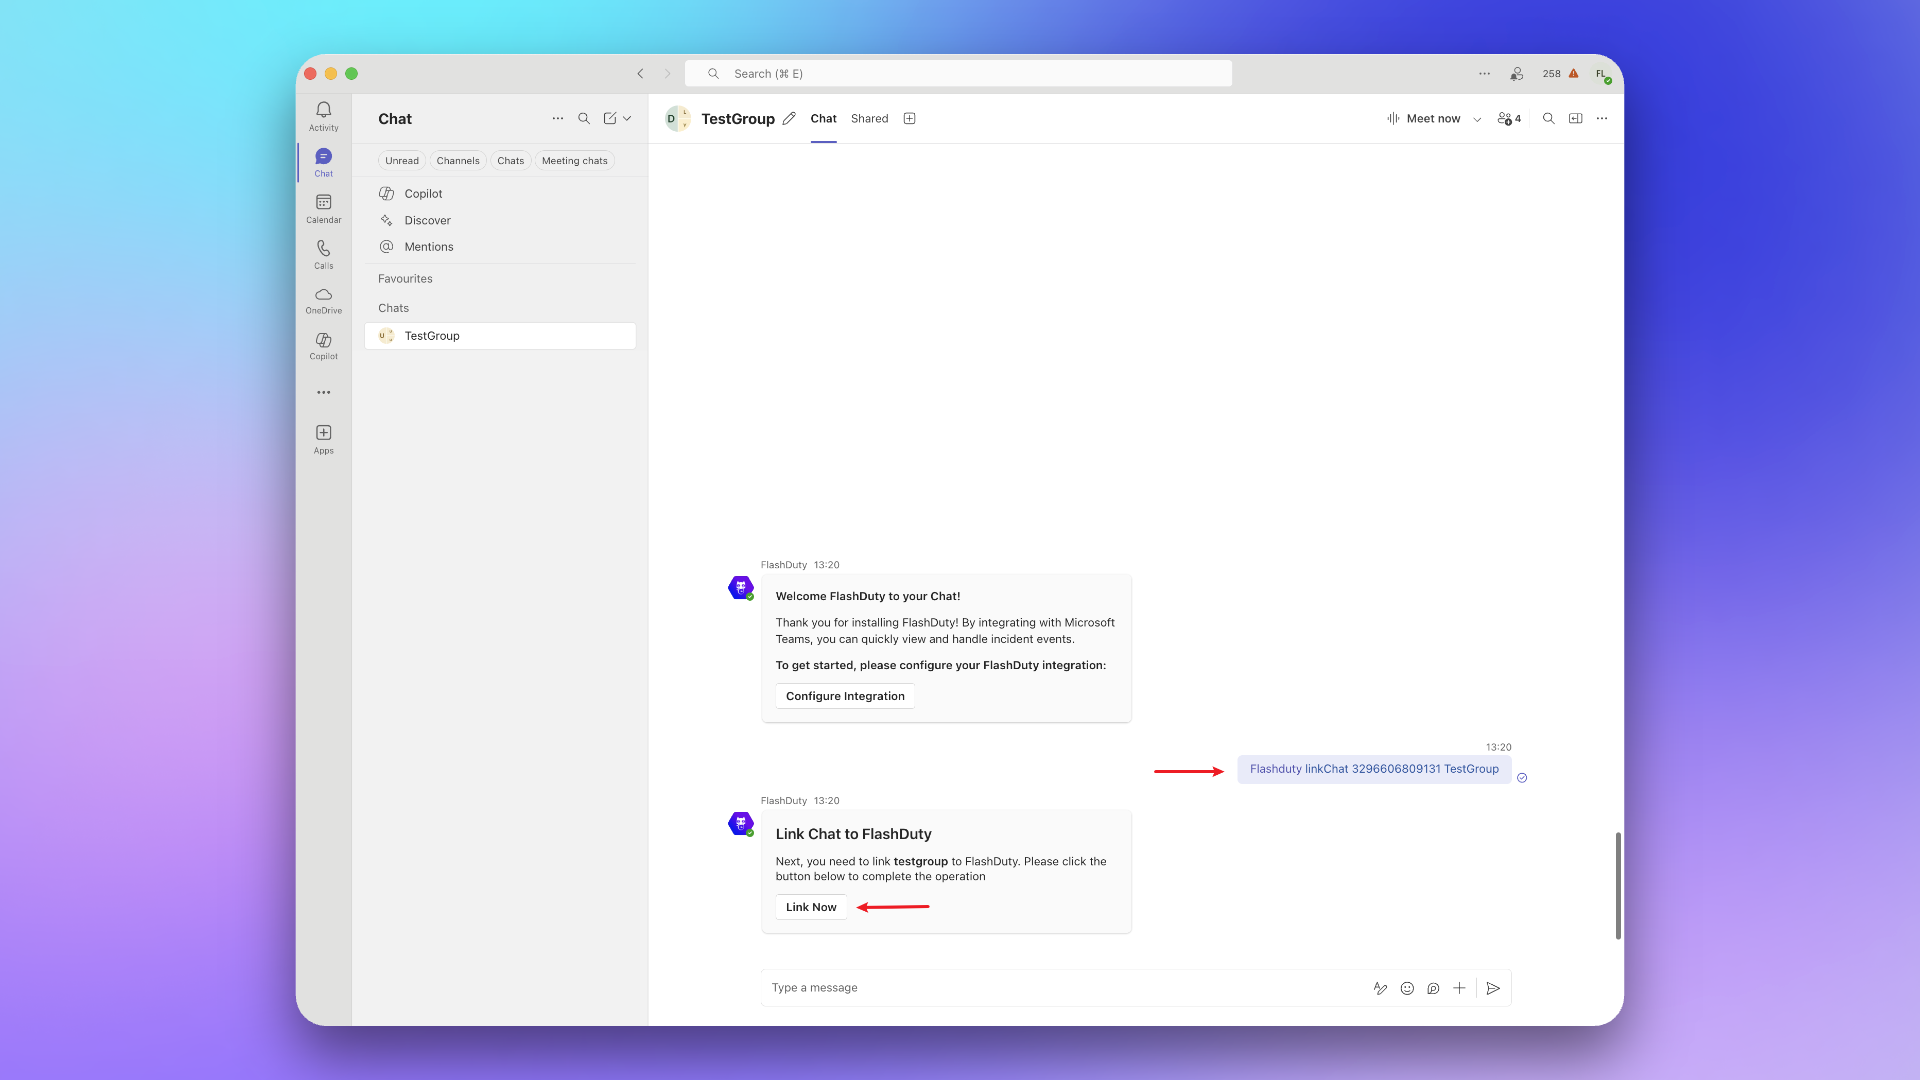
linkChat {ID} {ChatName}, and select Link Now in the bot reply. You must type @Flashduty yourself and pick the bot from the popup list; a pasted @ is not a mention.Selecting Link Now brings you back to the integration detail page and completes the link automatically, so the group chat appears under Notification targets > Group chat.4
Unlink the Chat
To remove this chat’s link, go to Integration Center → Instant Messaging → Microsoft Teams → Configuration → Notification targets → Group chat, select Unlink on the group chat, and then select Confirm in the dialog. You can also send
@Flashduty unlinkChat {ID} in the same group chat and follow the prompts on the response card.Notification card actions
When incident notifications are pushed to Microsoft Teams, the notification cards may include the following interactive actions. The available buttons depend on the Flashduty card you receive and the backend configuration:- Acknowledge: Mark that you have started handling the incident
- Resolve: Mark the incident as resolved and close it
- Snooze: Temporarily suspend the incident and receive a reminder after a specified time
- Custom Actions: Trigger your pre-configured custom actions (such as restarting services, rolling back changes, and so on)
- Create War Room: When enabled in the notification template and eligible for the incident, renders a button to create a dedicated Microsoft Teams war room group chat
Configure war room
Flashduty can create a standalone Microsoft Teams group chat for an incident war room, add linked responders and stakeholders automatically, and install the Flashduty Teams app into the chat for incident updates and AI SRE initial diagnosis.1
Link at least one target or user first
Flashduty resolves your Microsoft Entra tenant from a linked team, linked group chat, or linked personal user account in this integration. Complete at least one link before editing the war room settings.
2
Grant Microsoft Entra admin consent
Open Integration Center → Instant Messaging → Microsoft Teams → Edit → Advanced Features. Flashduty automatically checks whether your tenant has consented to the required Microsoft Graph application permissions:
Chat.Create: Create standalone war room group chatsTeamsAppInstallation.ReadWriteForChat.All: Install the Flashduty Teams app into newly created war room chatsChatMember.ReadWrite.All: Add members and sync responders to war room chatsAppCatalog.Read.All: Read your tenant’s Teams app catalog entry whenTEAMS_CATALOG_APP_IDis not preconfigured (read-only)
3
Ensure at least two members are linked
Creating a Microsoft Teams group chat requires at least 2 members resolved from linked responders, stakeholders, or the incident operator. Have members complete Link user before creating a war room.
Dissolve behavior: Flashduty never requests Microsoft Graph chat-deletion or message-reading permissions. Dismissing a Teams war room sends a best-effort archival notice card to the group chat, unlinks it in Flashduty, and stops further sync while preserving the Teams group chat and message history for post-incident review. System-created war room chats stay filtered out of standing notification target pickers.
Link user
1
Find App
In Teams, open Apps, find Flashduty, and select Open.
2
Open App
Click Open App.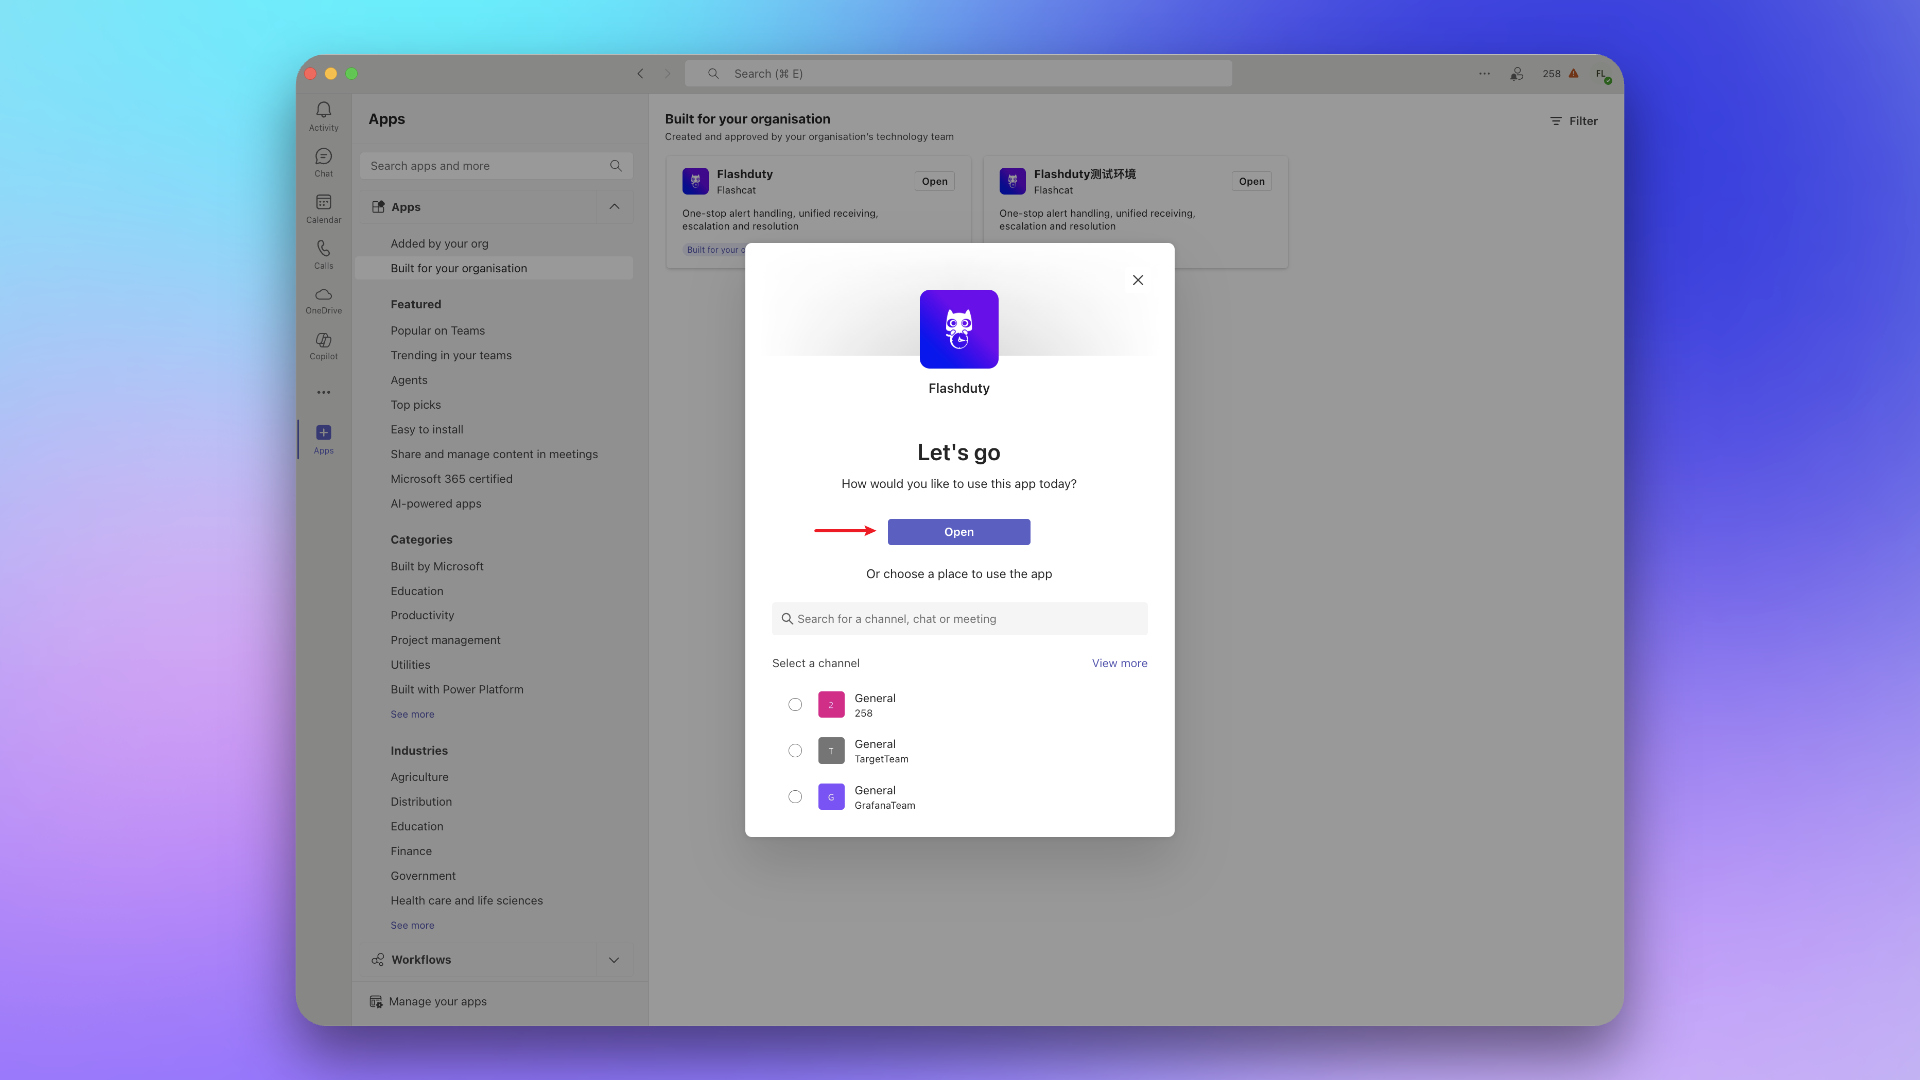
3
Send Link Command
Send 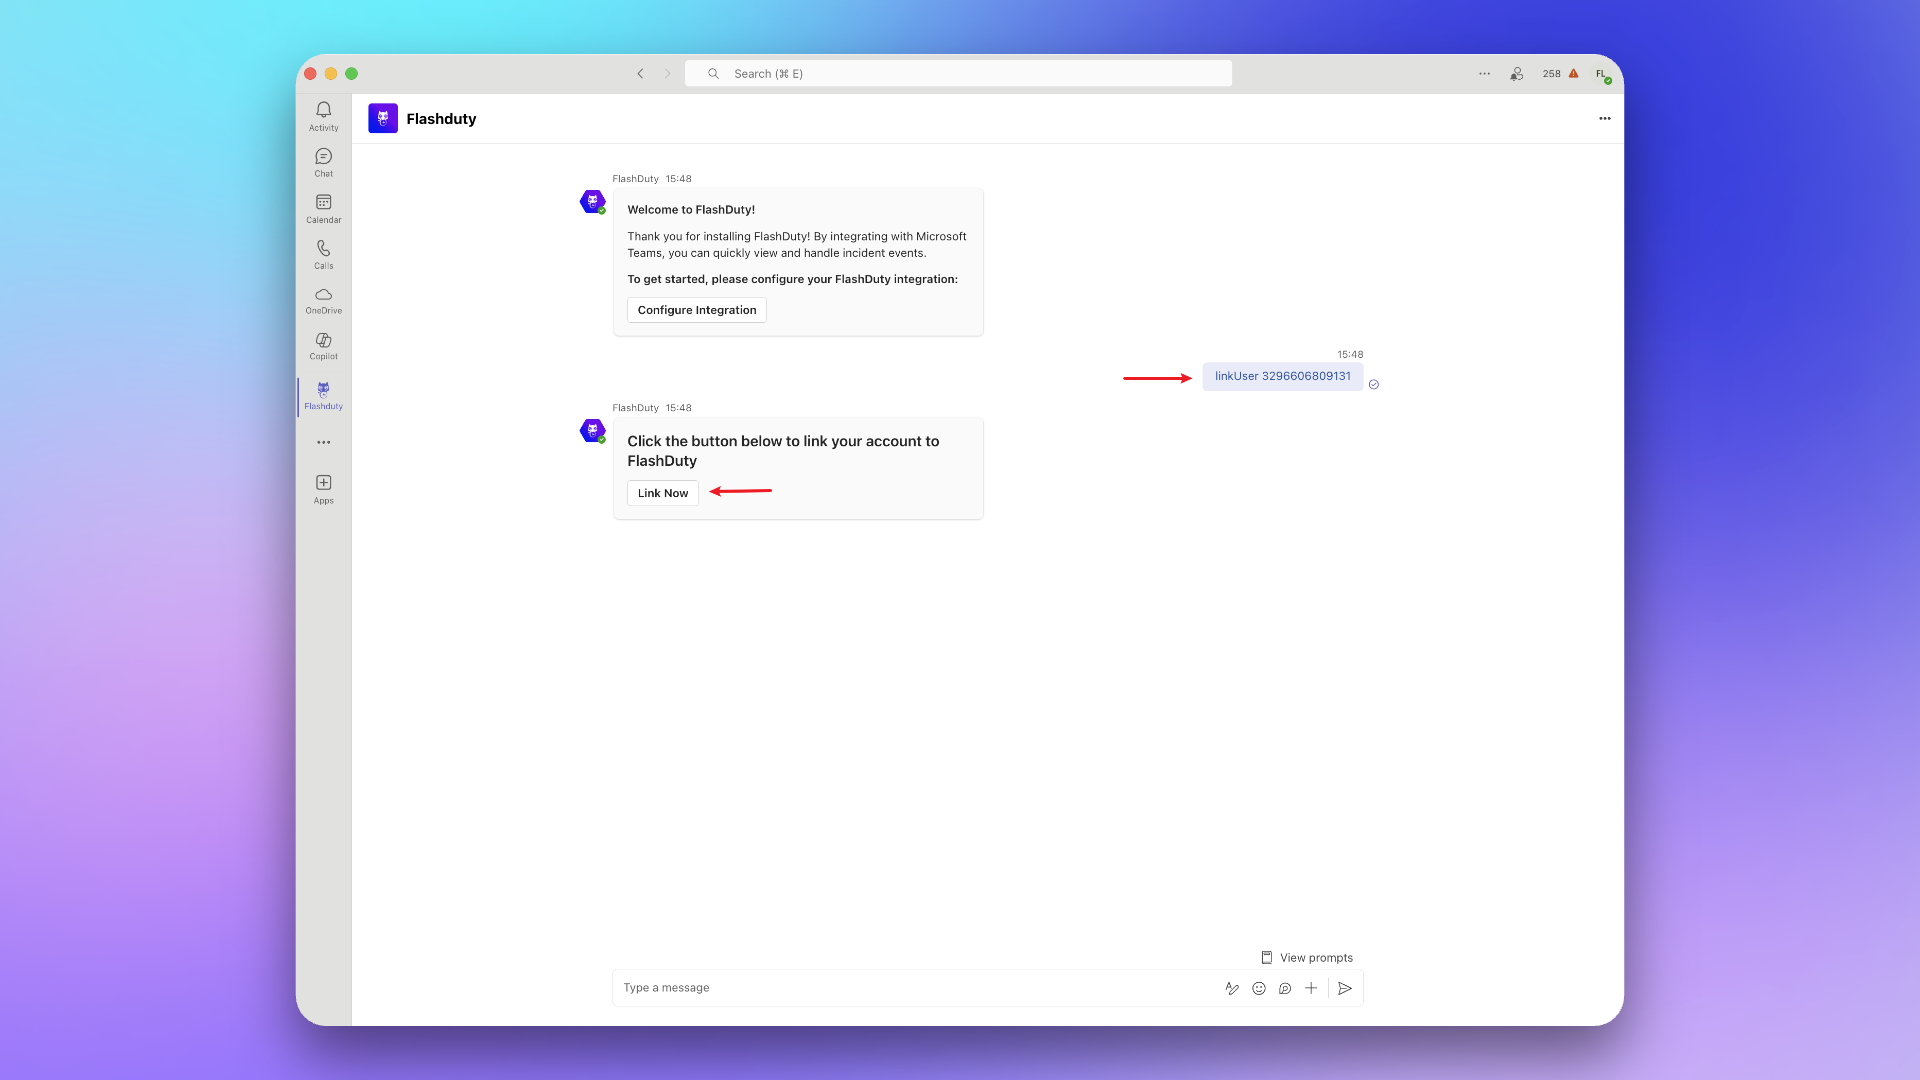
linkUser {ID} in your personal chat with Flashduty, then select Link Now in the bot reply.Selecting Link Now brings you back to the integration detail page, landing on the Linked users tab where the link completes.4
Unlink Your Account
To remove your Teams account link, send
unlinkUser {ID} in the same personal chat. After you select Unlink in FlashDuty in the response card, Flashduty removes the link automatically and shows a success message. If your account is linked, you can also unlink it in the console. Go to Integration Center → Instant Messaging → Microsoft Teams → Linked Users, select Unlink me, and then select Confirm.Data and permissions
The Flashduty Teams app processes only the data needed to send alert notifications, complete linking configuration, create and manage war room group chats, and handle incident card actions. It doesn’t read Teams chats unrelated to Flashduty, and it doesn’t request Microsoft Graph permissions for reading organization-wide chat content or deleting chats. For the data it handles, see the Flashduty Microsoft Teams app privacy policy and Flashduty Microsoft Teams app terms of use.FAQ
Team or individual not receiving messages?
Team or individual not receiving messages?
Go to Integration Center → Instant Messaging → Microsoft Teams, check if teams and users have been successfully linked.
How to view linked teams and users?
How to view linked teams and users?
Go to Integration Center → Instant Messaging → Microsoft Teams → the Configuration tab, and view linked teams and group chats under Notification targets > Teams and Notification targets > Group chat. Users are listed on the Linked users tab.
How to unlink teams and users?
How to unlink teams and users?
Unlink teams and group chats on the Configuration tab under Notification targets: open the Teams or Group chat tab, select Unlink on the entry, and then select Confirm in the dialog. You can also use the matching command in its original Teams context:
unlinkTeam {ID} in a Team channel, unlinkChat {ID} in a group chat, or unlinkUser {ID} in your personal chat, and follow the prompts on the response card. If your account is already linked, you can also select Unlink me under Linked users, then select Confirm in the dialog.