

In Flashduty On-call
You can get the integration push URL in either of the following ways.Use a dedicated integration
Choose this option if all alerts go to one channel. It’s the simpler setup.View dedicated integration setup steps
View dedicated integration setup steps
- In the Flashduty console, select Channel and open a channel
- Select Configuration → Integrations → Private integration, then click Add integration
- Choose Zabbix integration, click Save to generate a card
- Open the generated integration card and copy the Push URL
Use a shared integration
Choose this method when you need to route alerts to different channels based on alert event payload information.Configure Zabbix
Choose your Zabbix version and complete all four steps in that section.Zabbix 7.x
Step 1: Import the Flashduty media type in Zabbix
A media type is the channel Zabbix uses to send notifications. The download URL requires aReferer header and returns 403 without it, so keep the --header option in the command.
Where: Zabbix › Alerts › Media types › Import
-
Download the configuration file in a terminal:
- On the Import page, select the file and click Import
-
In the Media types list, click the imported media type’s name, fill in the parameters below, and click Update:
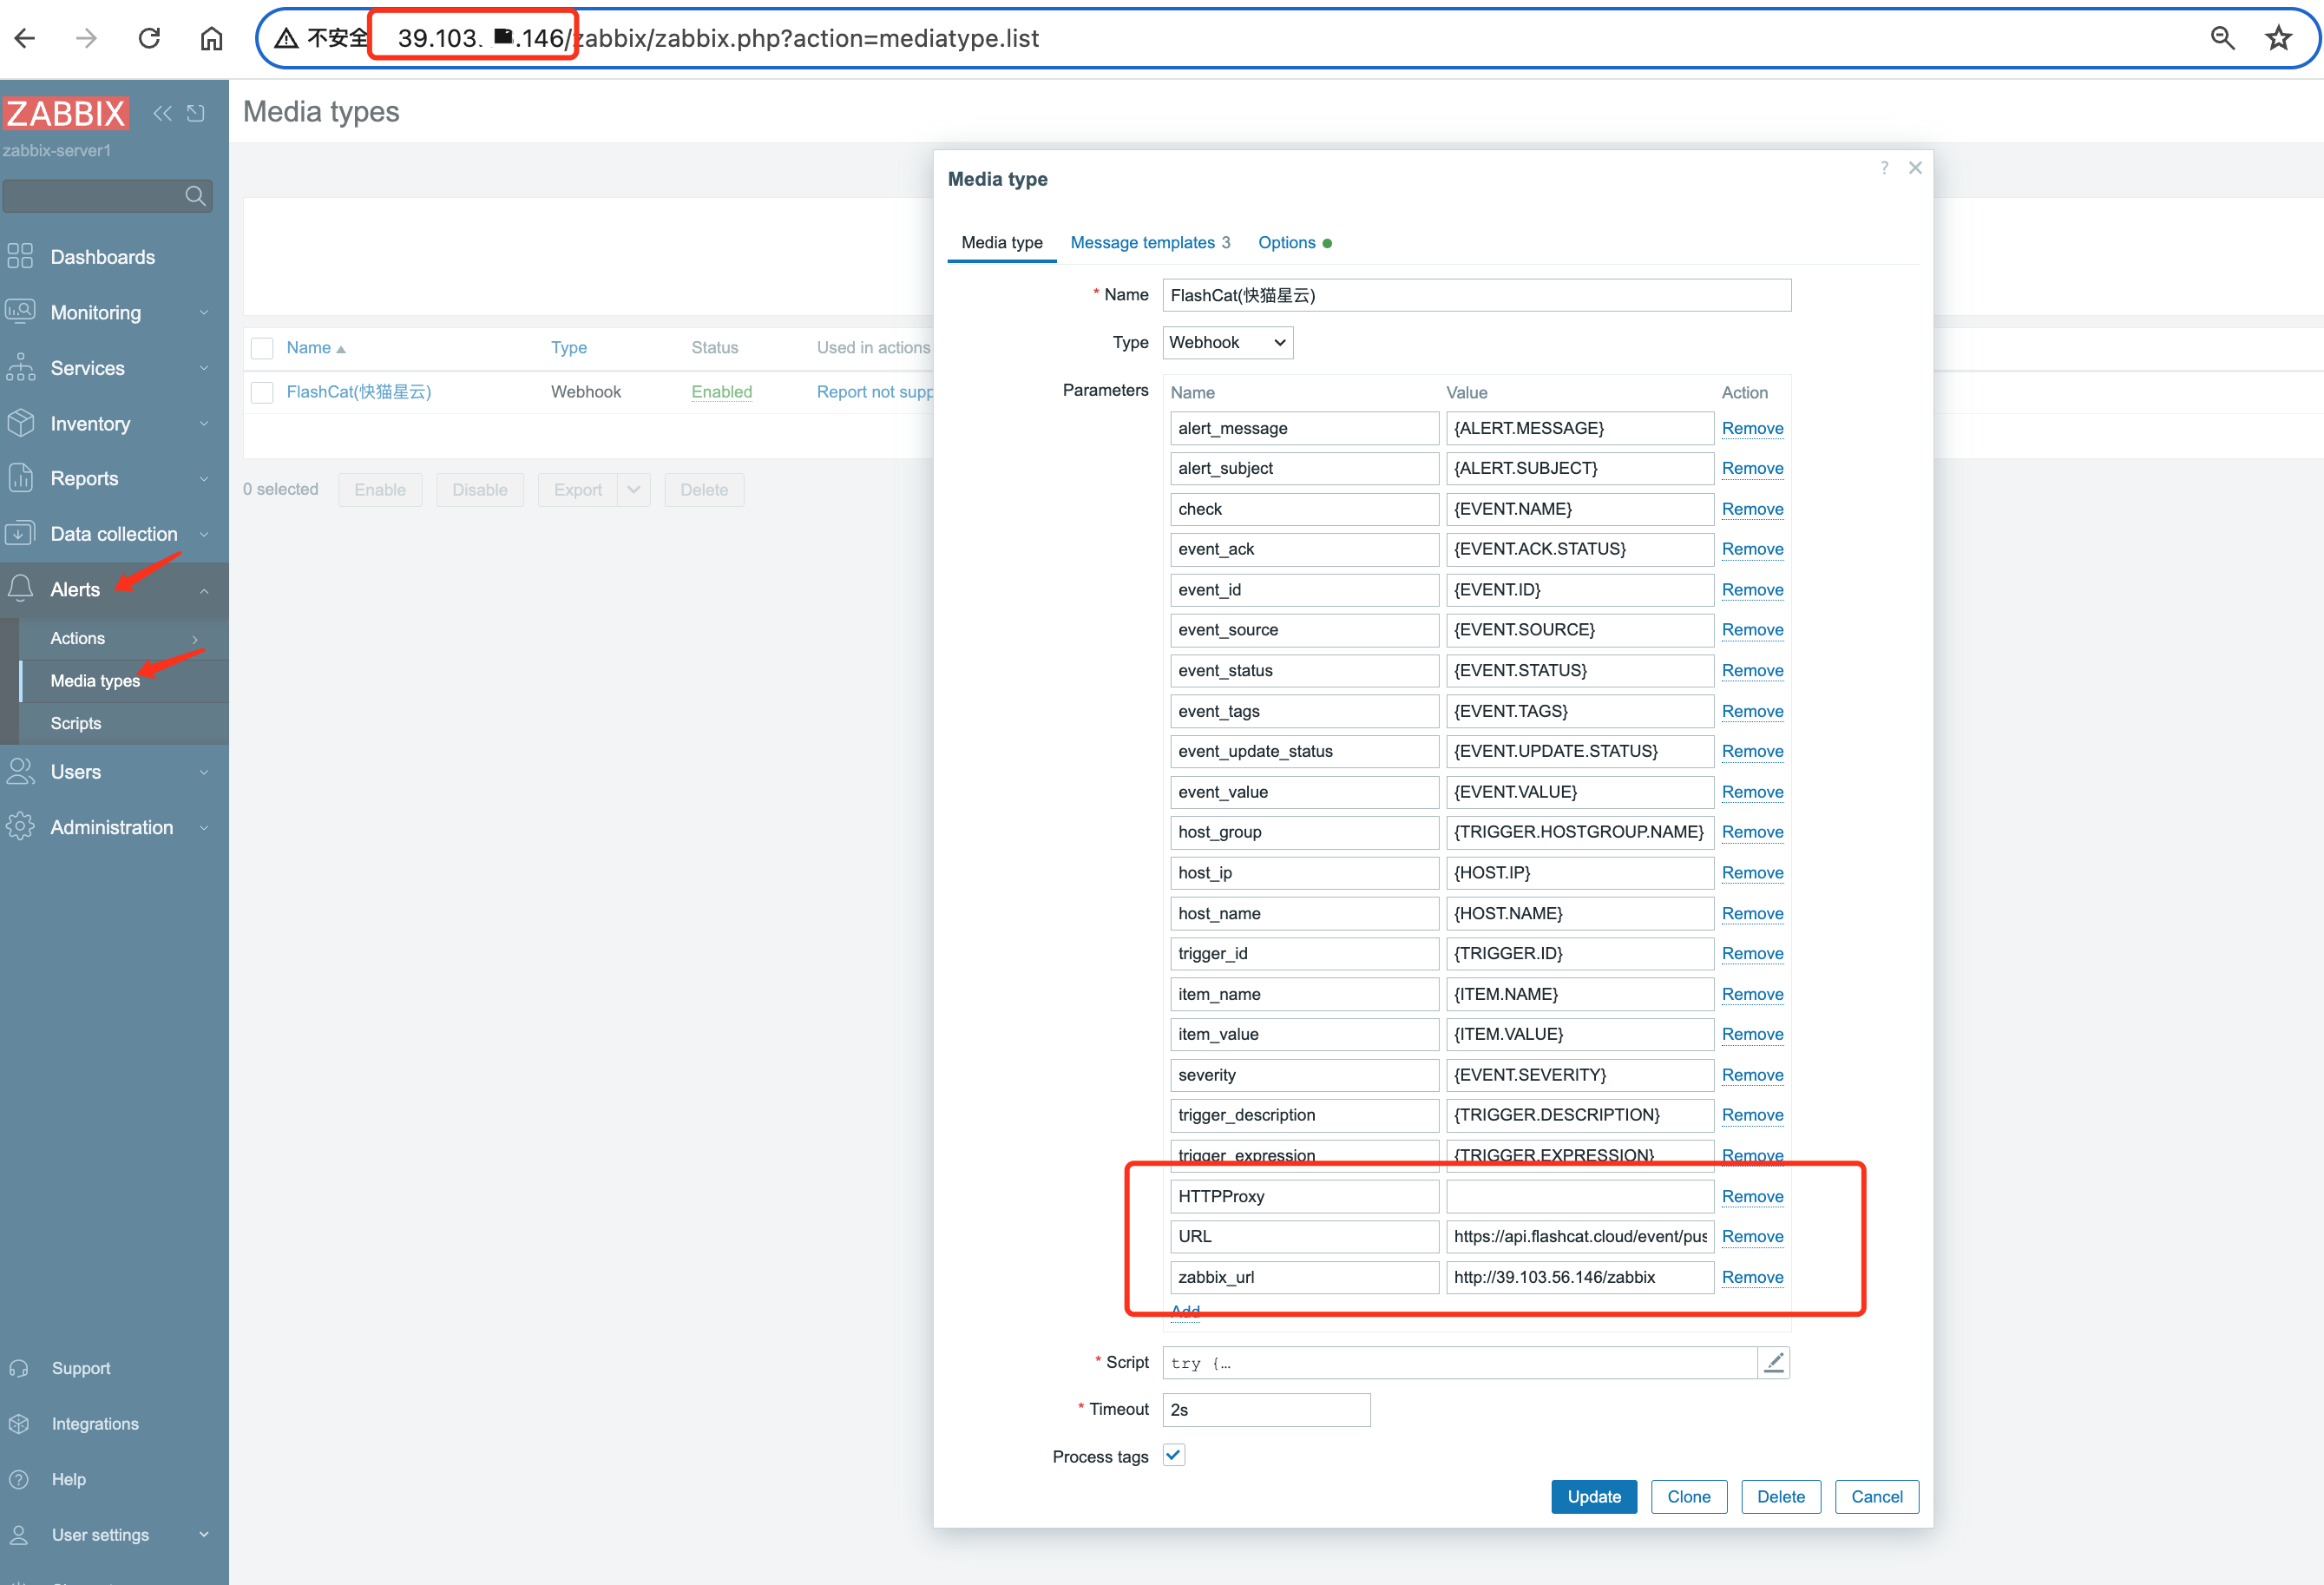
Step 2: Add the Flashduty media to a user in Zabbix
Where: Zabbix › Users › Users › Admin › Media › Add A media type must be linked to a user to send events, and the user needs at least read permission on the hosts. We recommend linking it to the Admin user.
Click Add to close the dialog, then click Update to save the user.
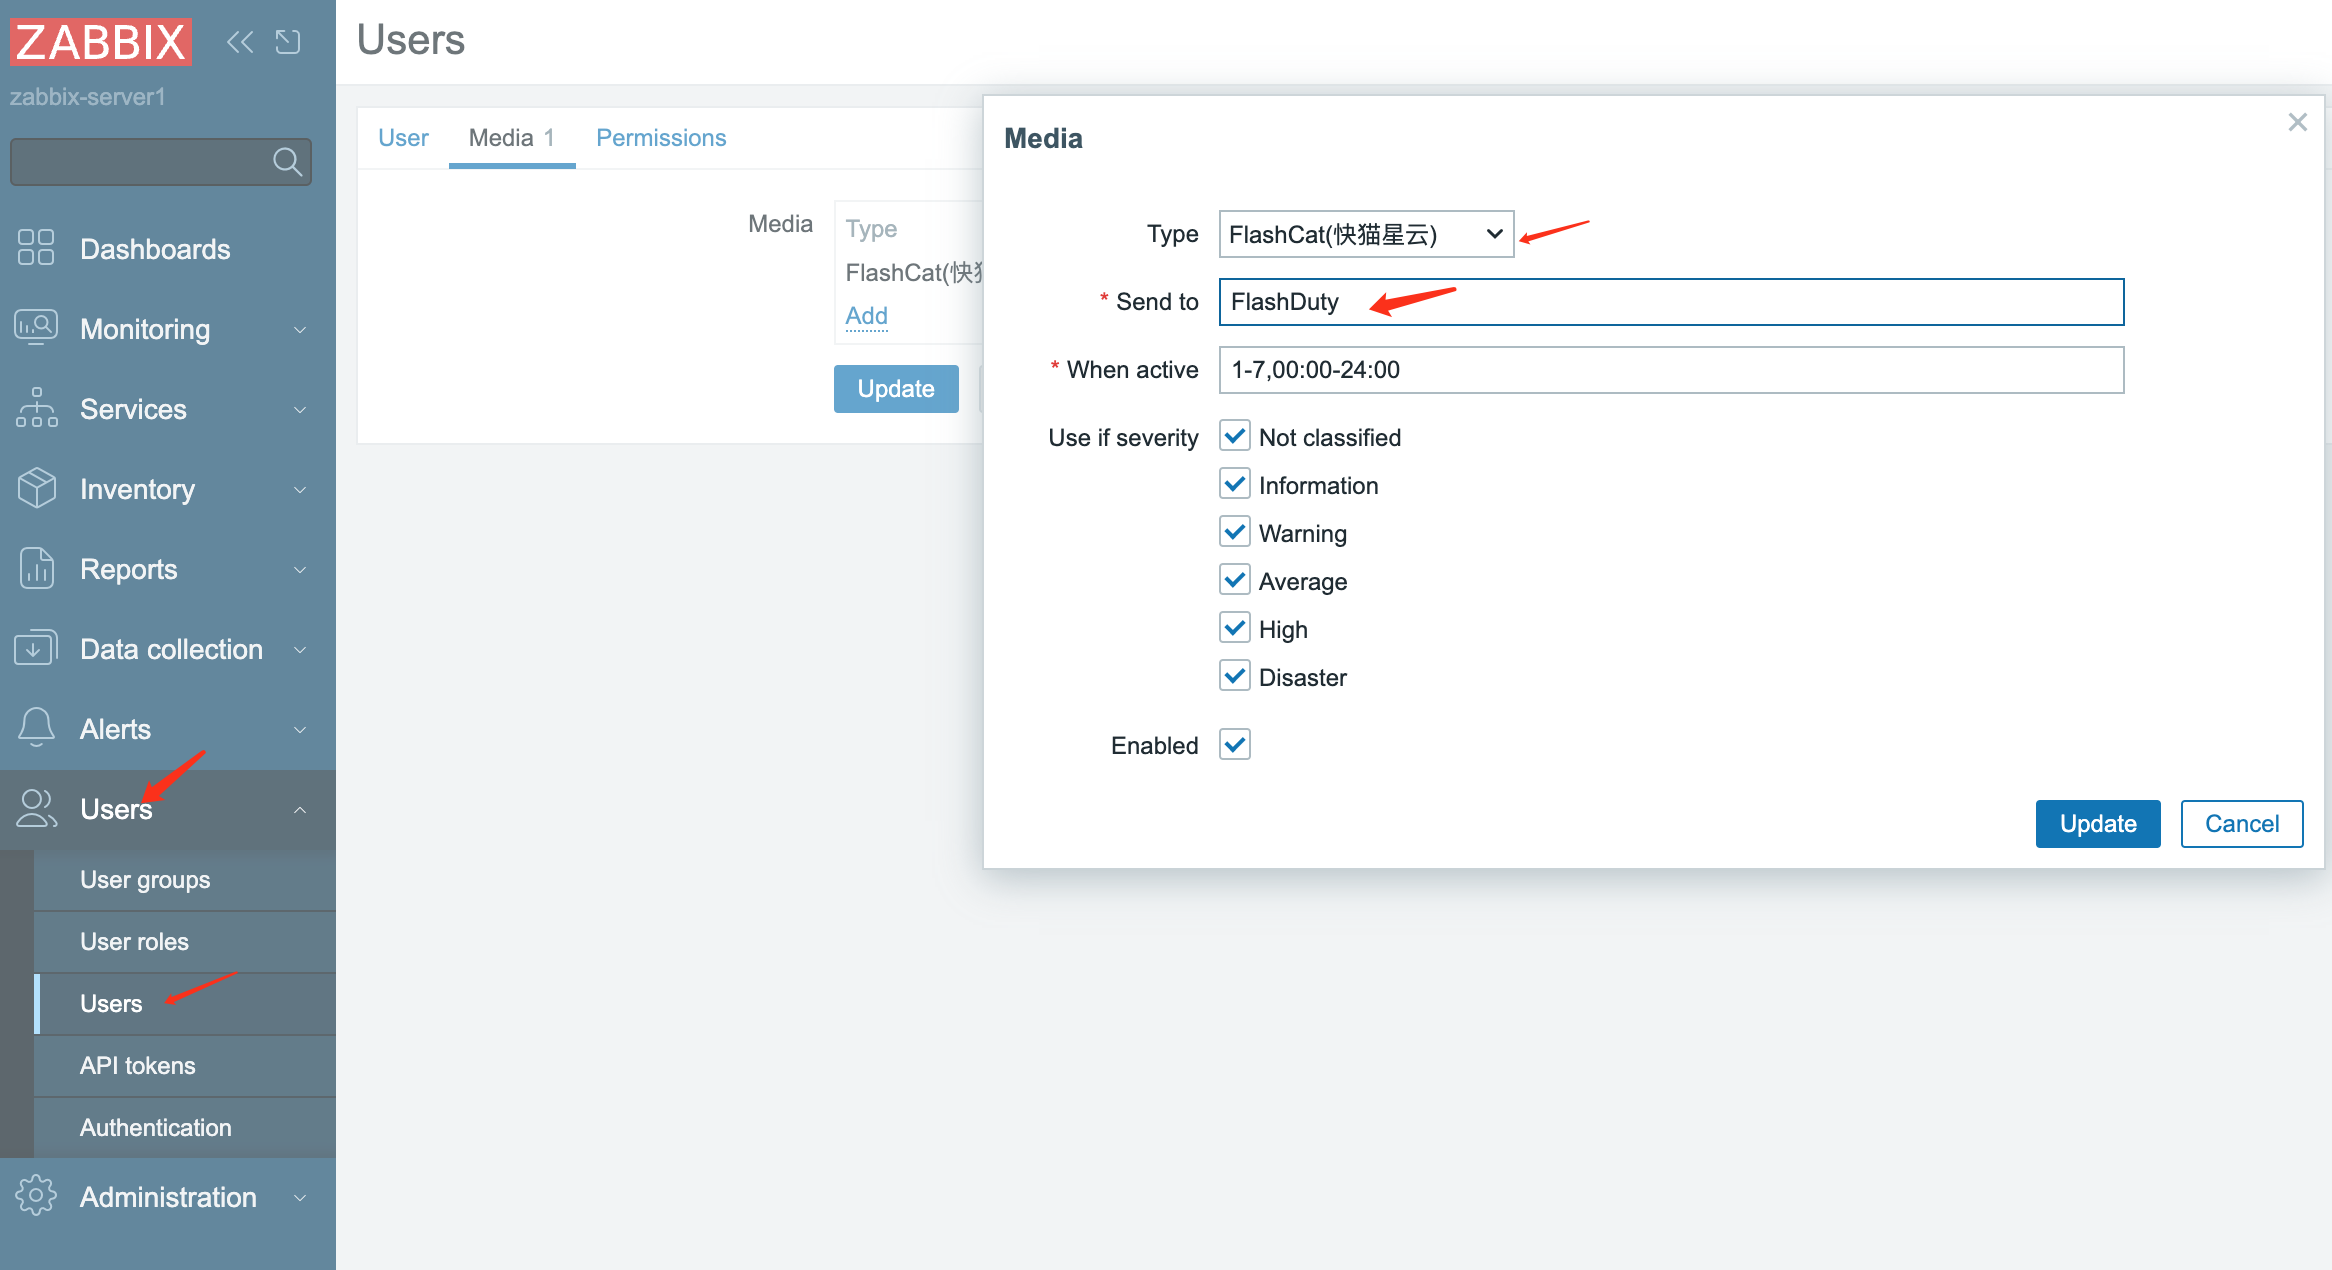
Step 3: Create a trigger action that sends to Flashduty in Zabbix
Where: Zabbix › Alerts › Actions › Trigger actions › Create action-
Set Name to
Send To Flashduty -
Under Operations, configure Operations, Recovery operations, and Update operations. For each, click Add, fill in the fields, and click Add again:
- Click Add to save the action
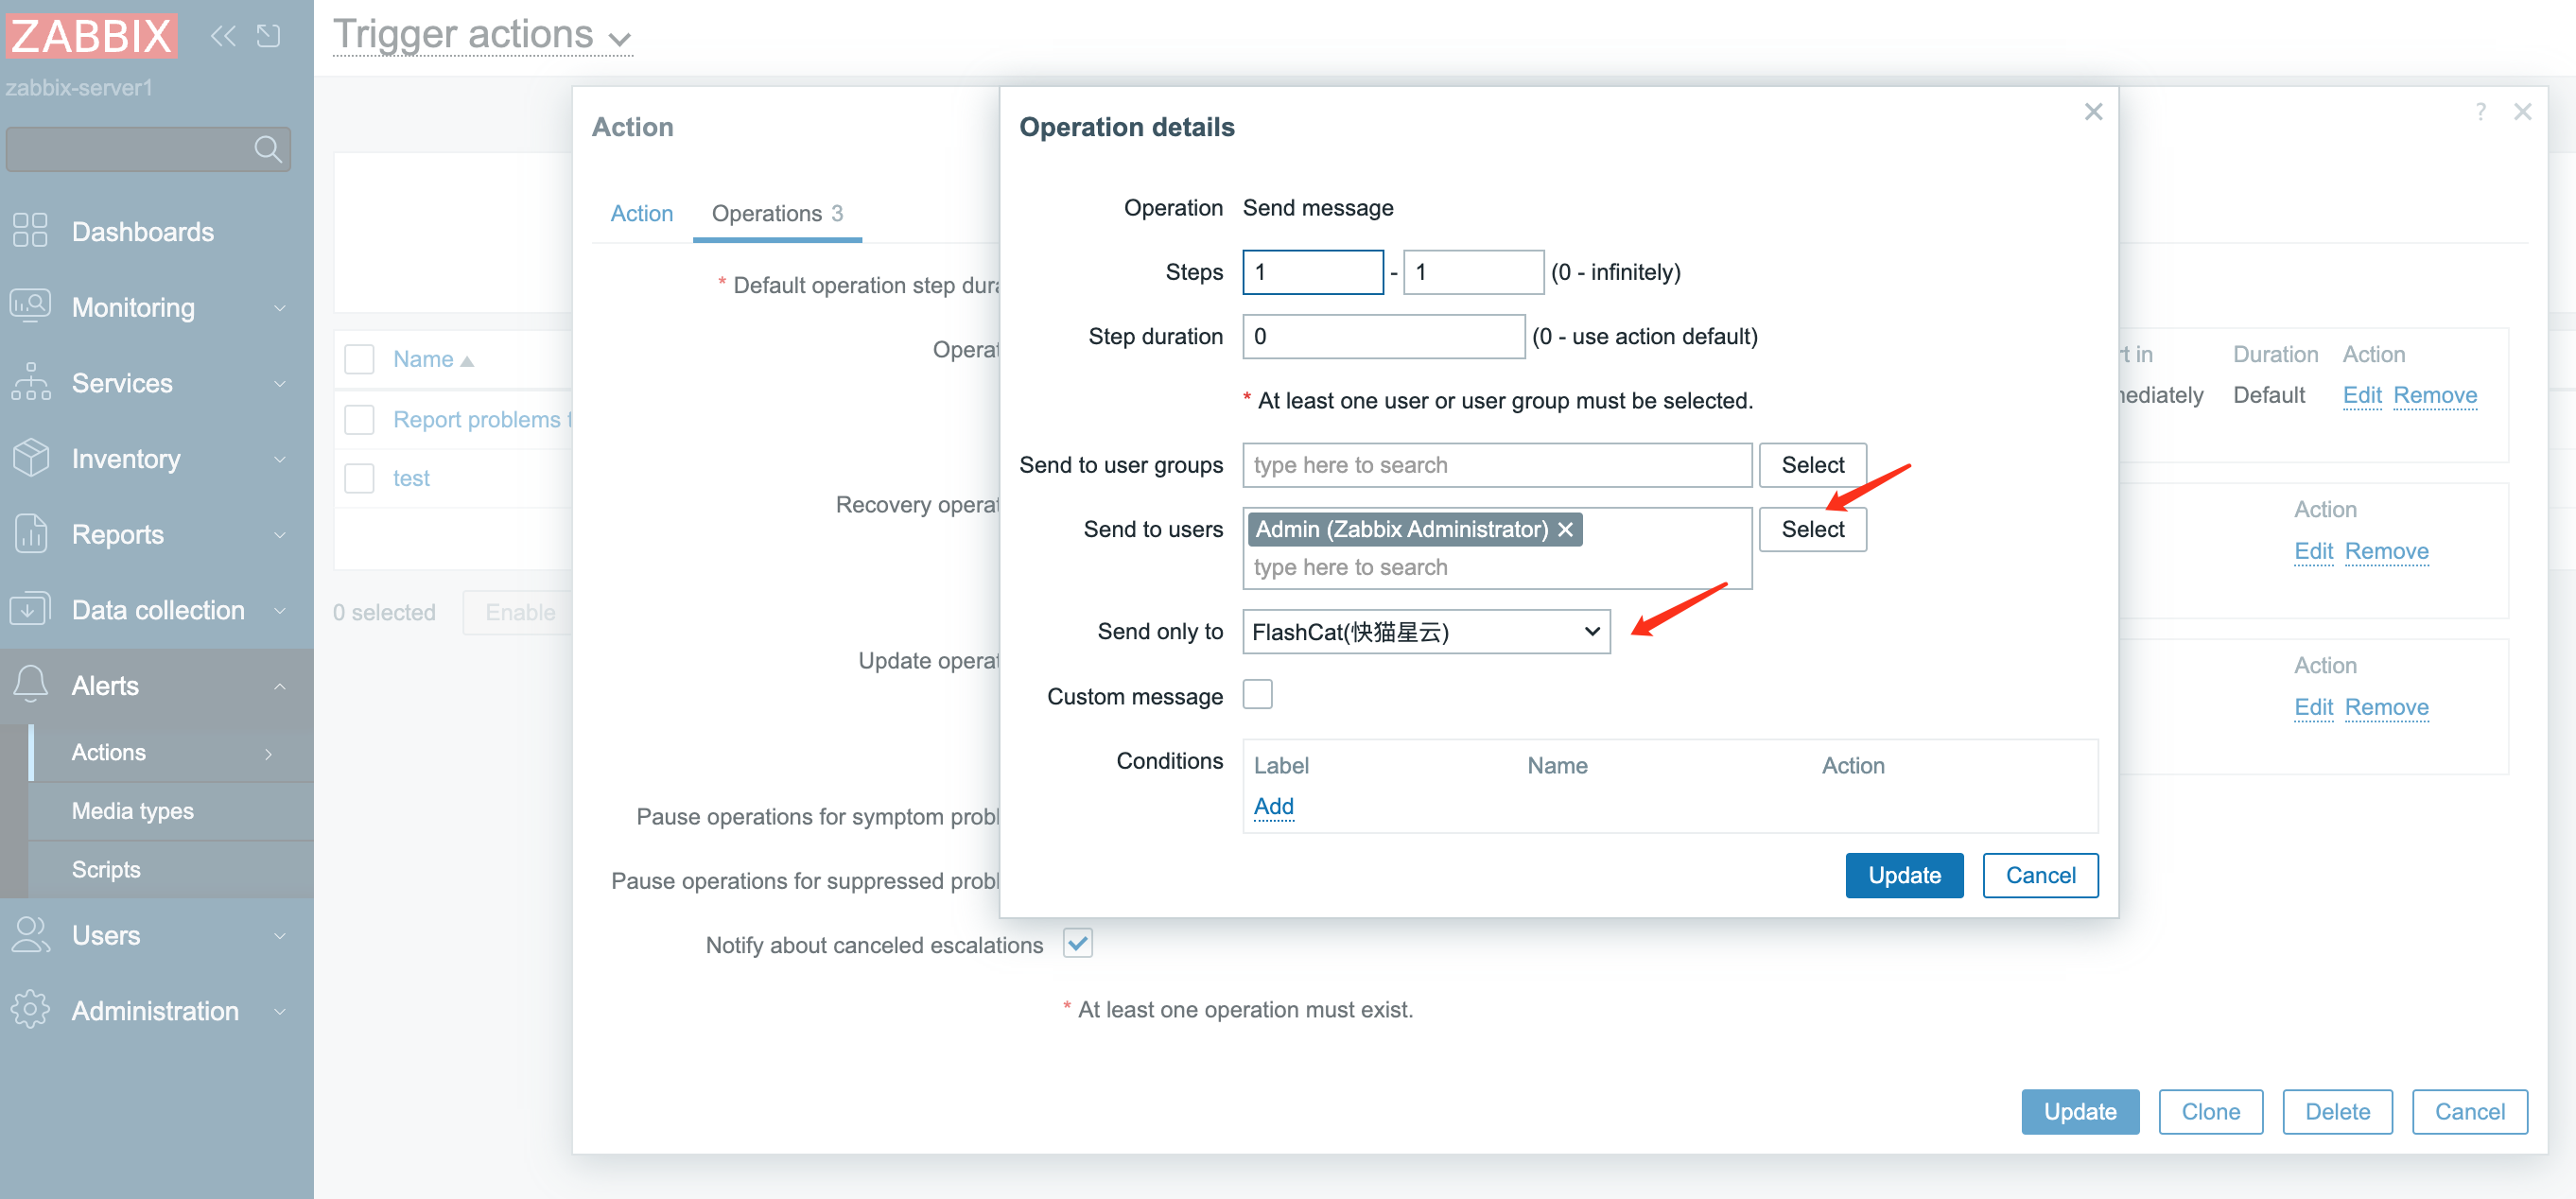
Step 4: Trigger an alert in Zabbix and confirm
Where: Zabbix › Monitoring › Problems › Actions The Test link in the Media types list sends the raw macros (such as{EVENT.SEVERITY}) as parameter values, and Flashduty rejects the request because the severity is invalid. Verify with a real alert instead:
- Wait for or cause an alert that fires the action. In Monitoring › Problems, click the alert’s Actions column to see the notification results
- If the Flashduty media type’s entry shows Status
Sent, the notification went out. Otherwise, follow the message to troubleshoot - Go back to Flashduty. If the integration shows a Latest event time, the setup works

Zabbix 6.x
Step 1: Import the Flashduty media type in Zabbix
A media type is the channel Zabbix uses to send notifications. The download URL requires aReferer header and returns 403 without it, so keep the --header option in the command.
Where: Zabbix 6.4 › Alerts › Media types › Import; Zabbix 6.0 › Administration › Media types › Import
-
Download the configuration file in a terminal:
- On the Import page, select the file and click Import
-
In the Media types list, click the imported media type’s name, fill in the parameters below, and click Update:
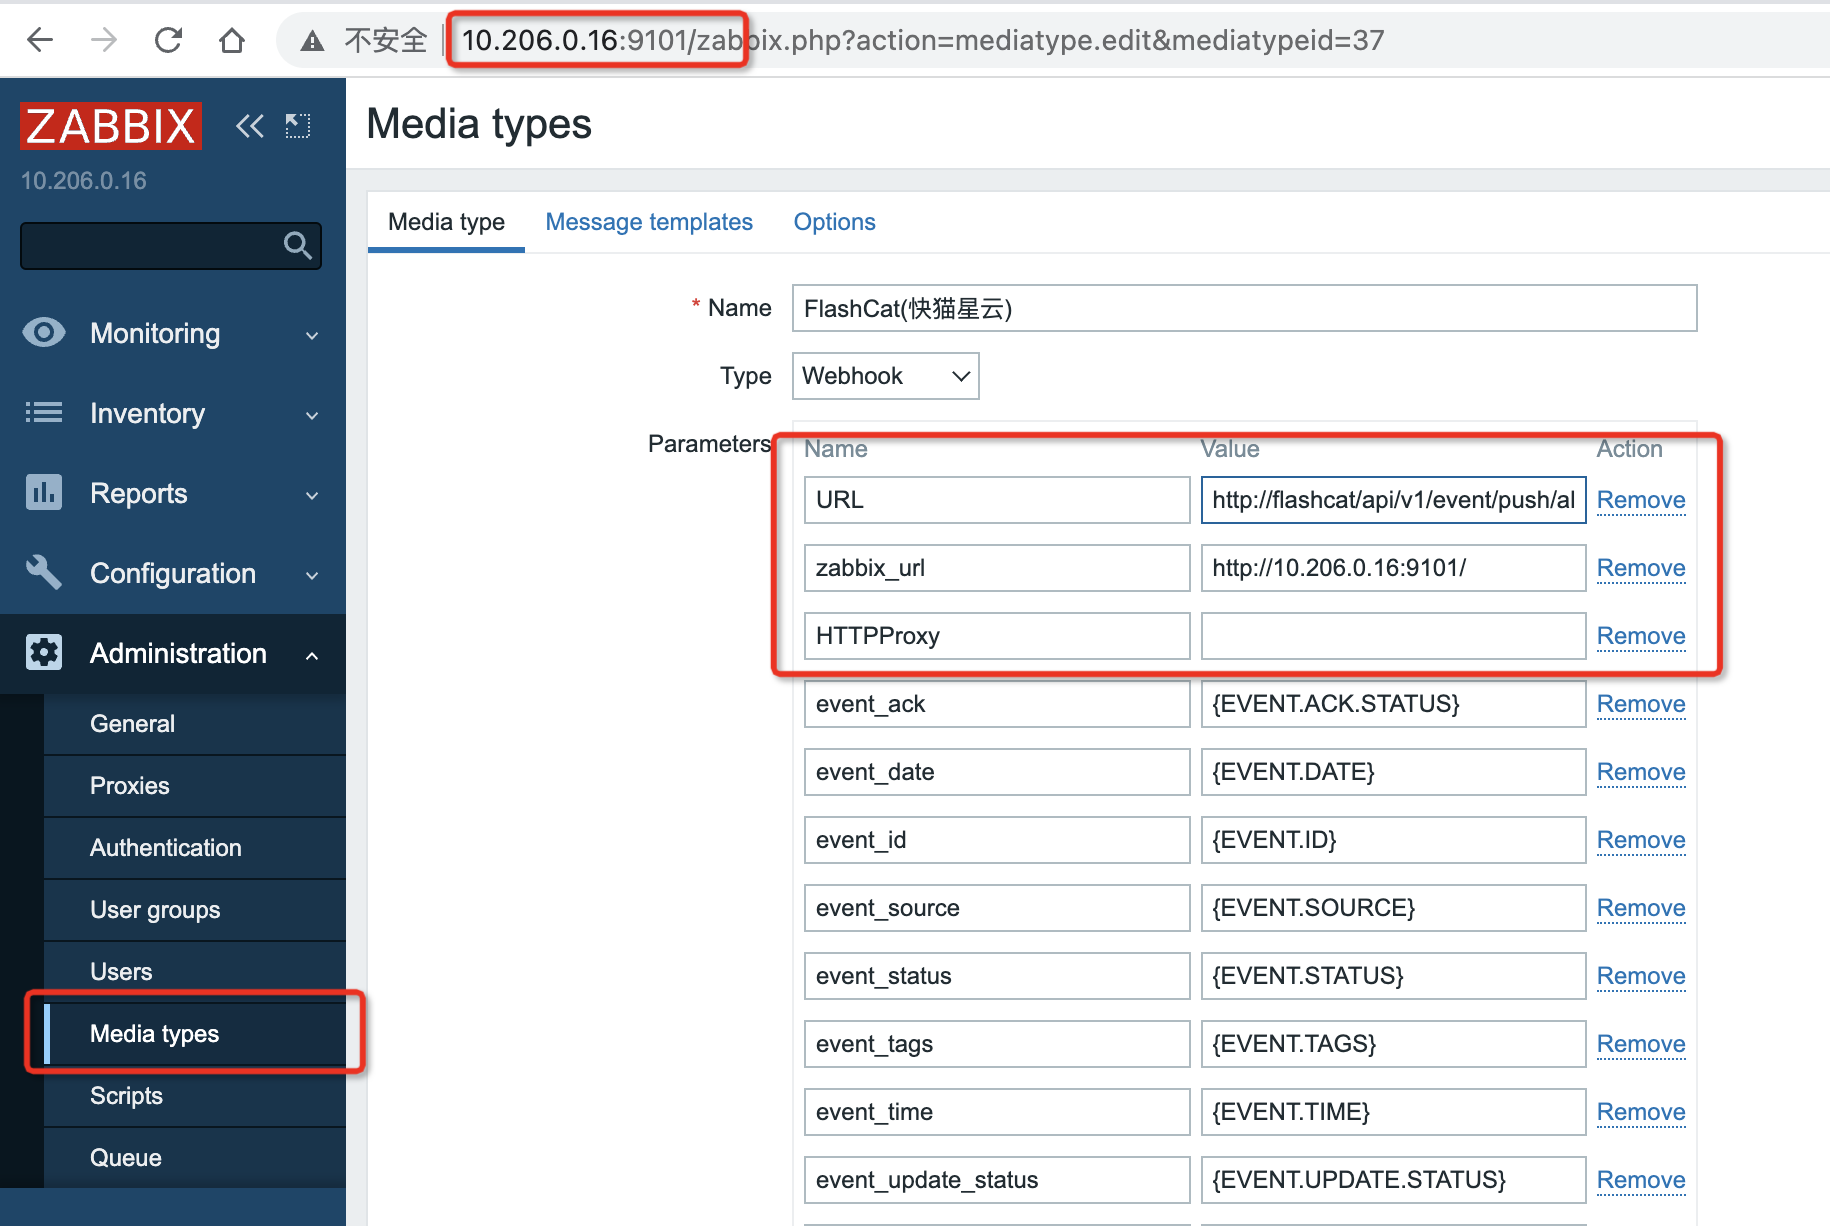
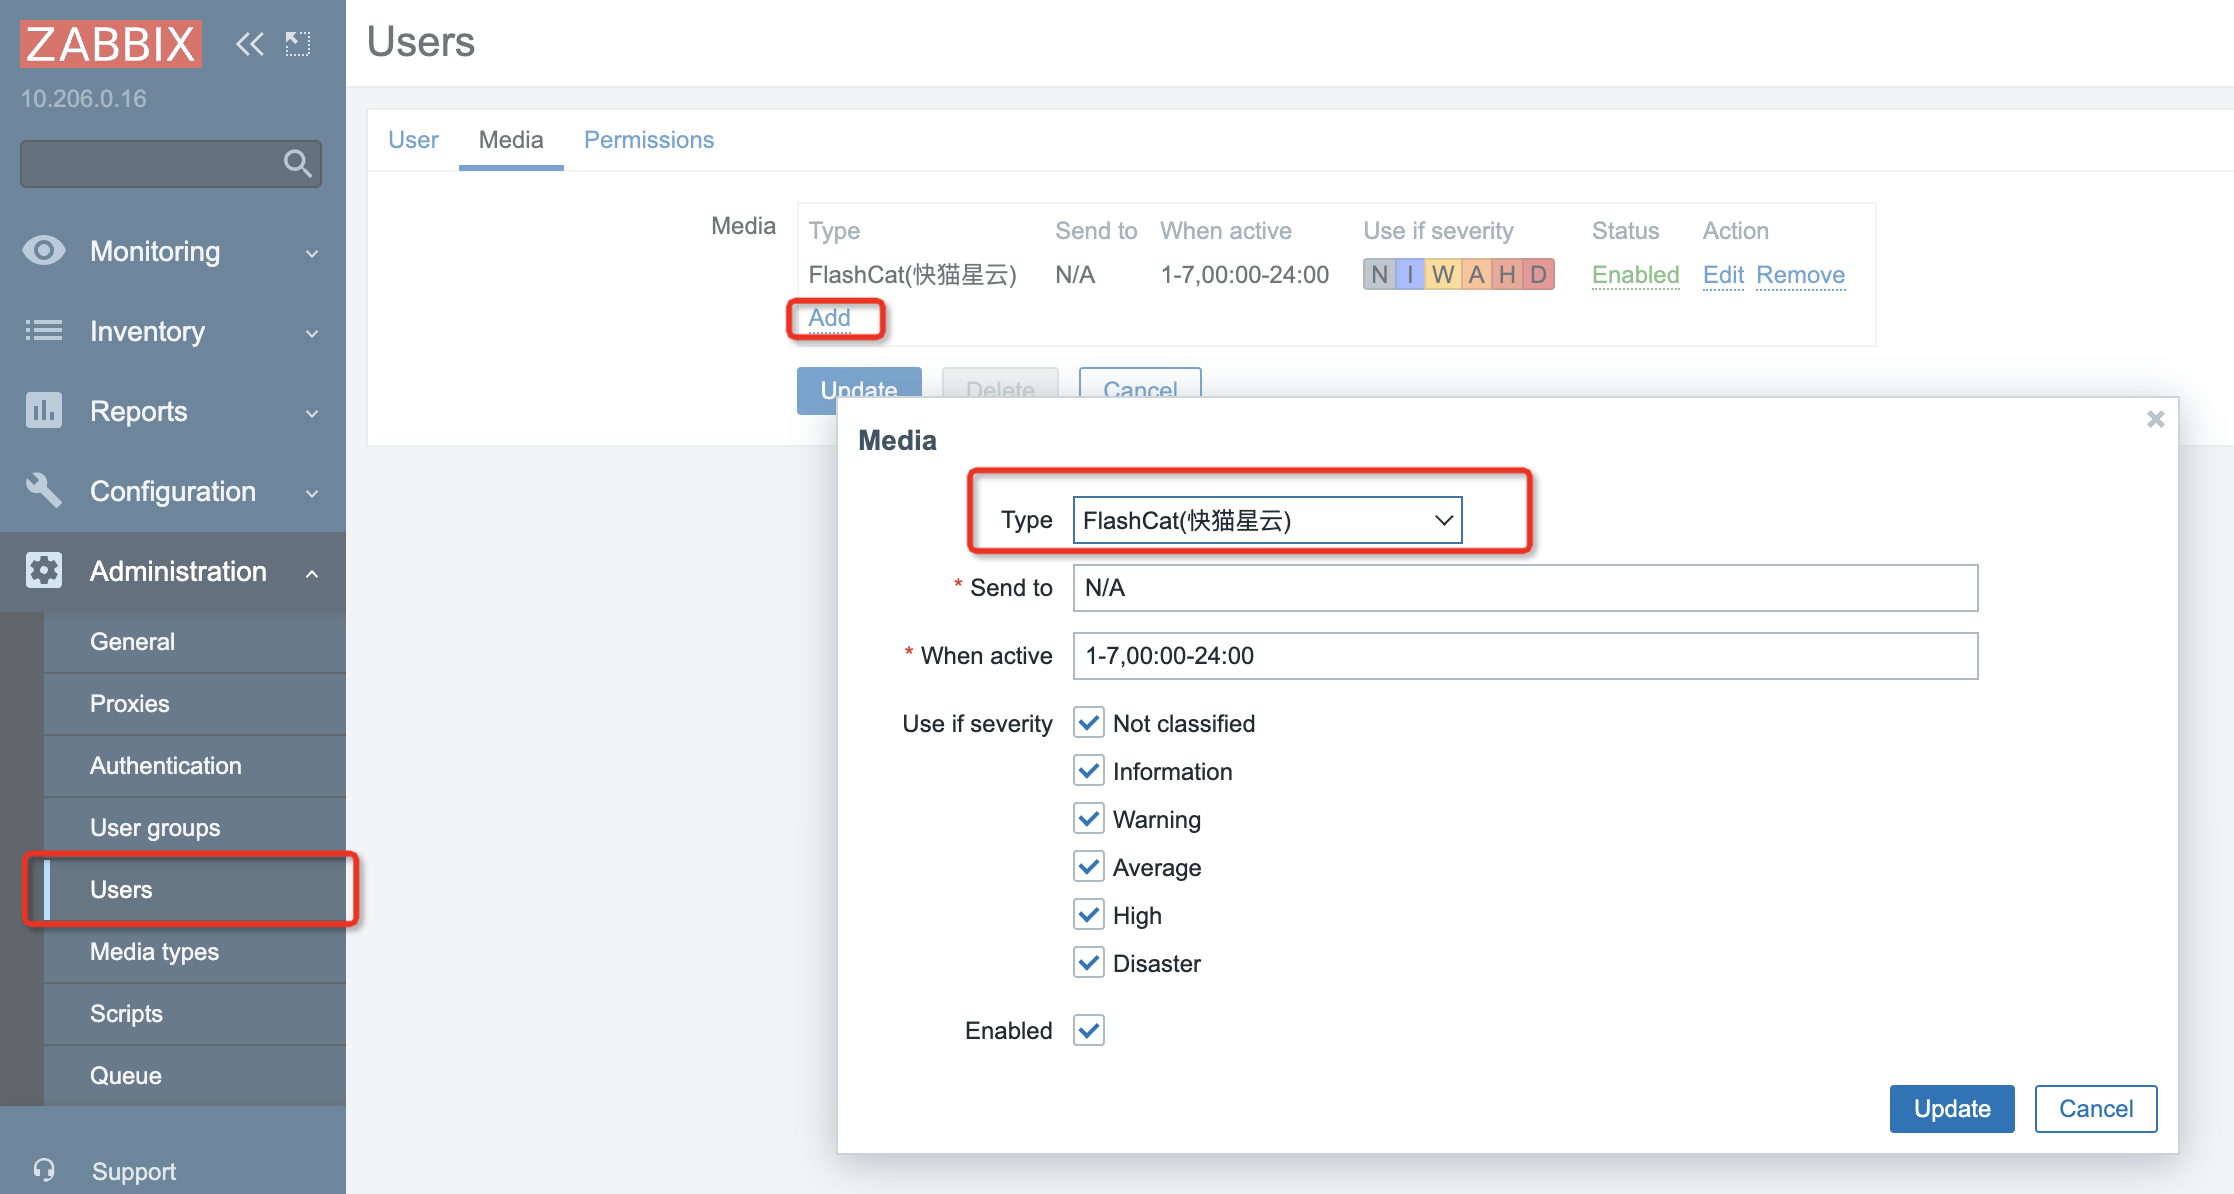
Step 2: Add the Flashduty media to a user in Zabbix
Where: Zabbix 6.4 › Users › Users › Admin › Media › Add; Zabbix 6.0 › Administration › Users › Admin › Media › Add A media type must be linked to a user to send events, and the user needs at least read permission on the hosts. We recommend linking it to the Admin user.
Click Add to close the dialog, then click Update to save the user.
Step 3: Create a trigger action that sends to Flashduty in Zabbix
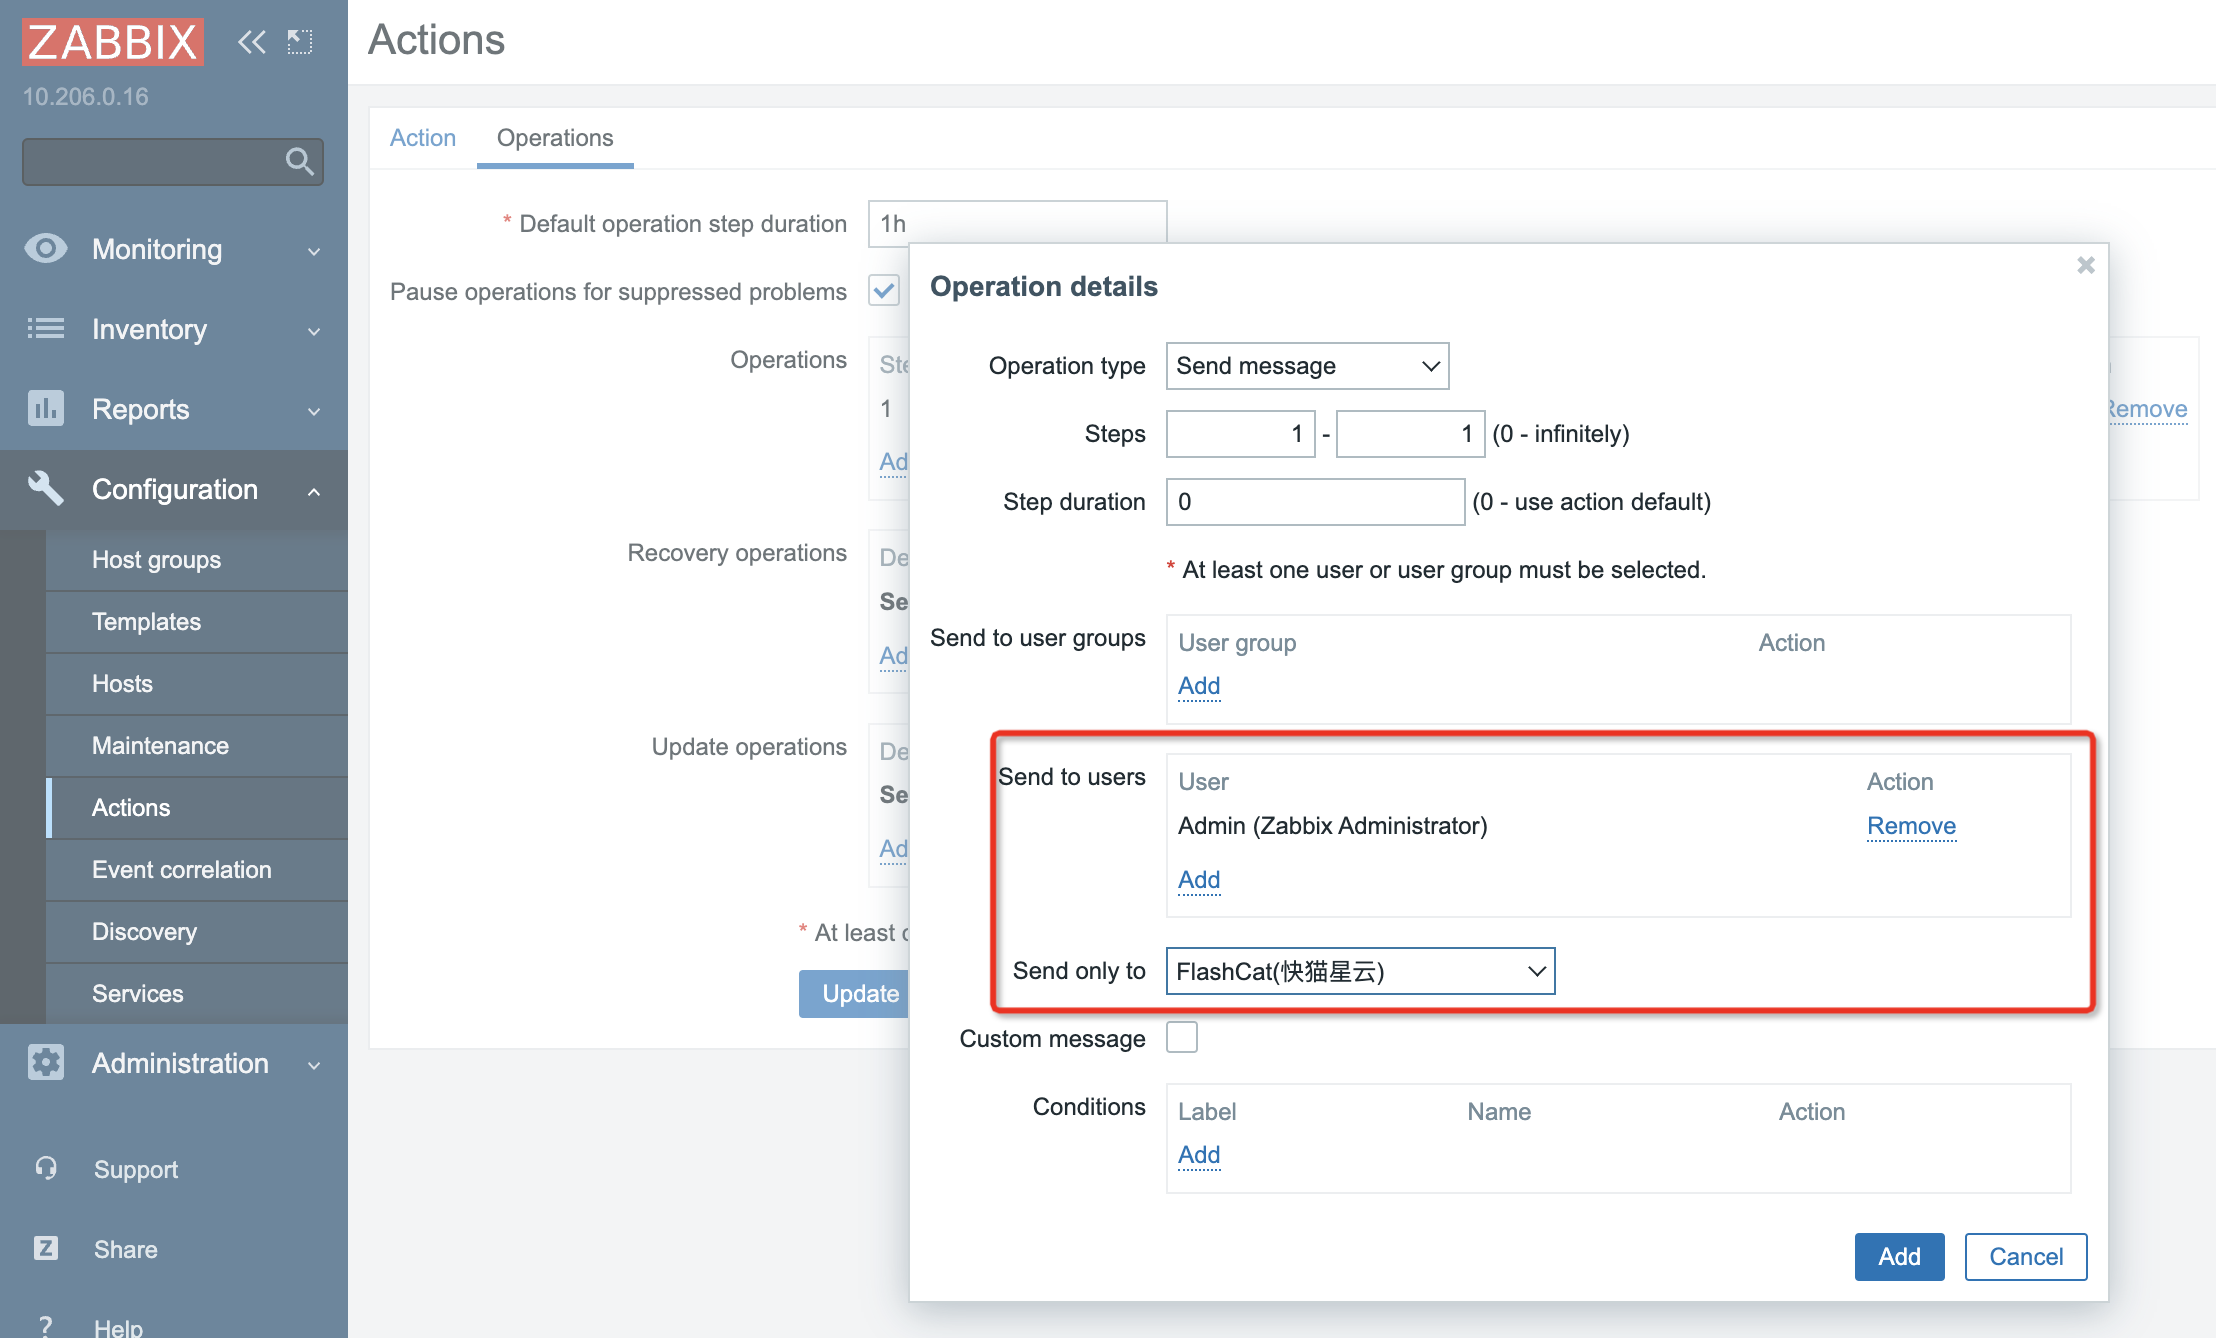
Where: Zabbix 6.4 › Alerts › Actions › Trigger actions › Create action; Zabbix 6.0 › Configuration › Actions › Create action-
Set Name to
Send To Flashduty -
Under Operations, configure Operations, Recovery operations, and Update operations. For each, click Add, fill in the fields, and click Add again:
- Click Add to save the action
Step 4: Trigger an alert in Zabbix and confirm
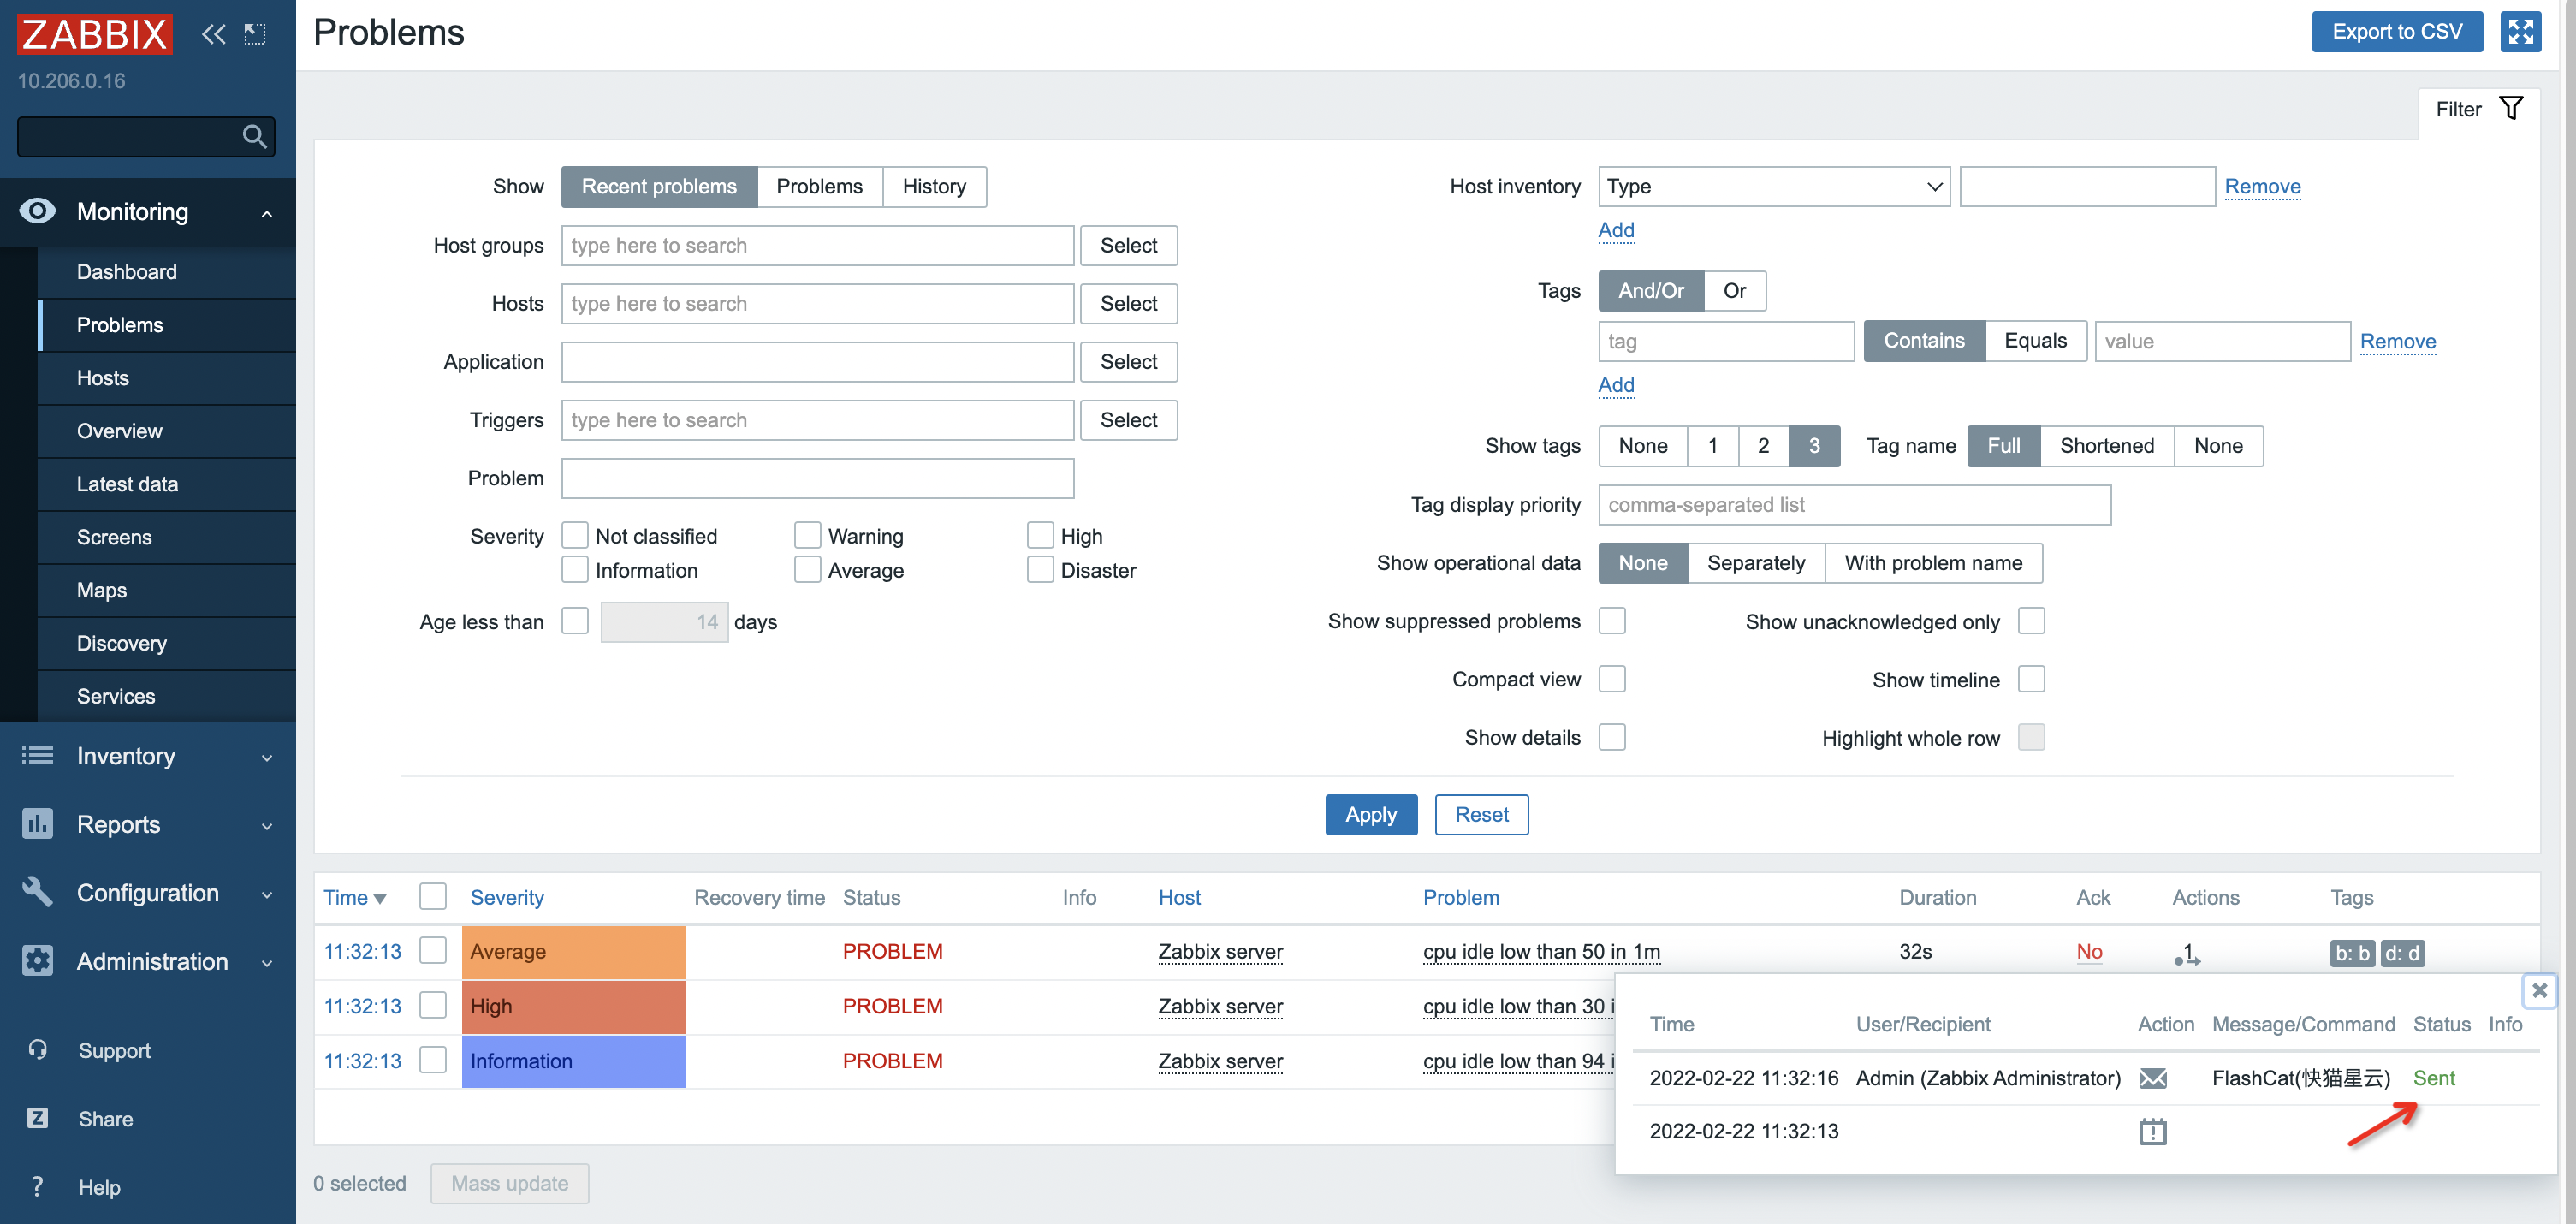
Where: Zabbix › Monitoring › Problems › Actions The Test link in the Media types list sends the raw macros (such as{EVENT.SEVERITY}) as parameter values, and Flashduty rejects the request because the severity is invalid. Verify with a real alert instead:
- Wait for or cause an alert that fires the action. In Monitoring › Problems, click the alert’s Actions column to see the notification results
- If the Flashduty media type’s entry shows Status
Sent, the notification went out. Otherwise, follow the message to troubleshoot - Go back to Flashduty. If the integration shows a Latest event time, the setup works
Zabbix 5.x
Step 1: Import the Flashduty media type in Zabbix
A media type is the channel Zabbix uses to send notifications. The download URL requires aReferer header and returns 403 without it, so keep the --header option in the command.
Where: Zabbix › Administration › Media types › Import
-
Download the configuration file in a terminal (5.x uses XML):
- On the Import page, select the file and click Import
-
In the Media types list, click the imported media type’s name, fill in the parameters below, and click Update:
Step 2: Add the Flashduty media to a user in Zabbix
Where: Zabbix › Administration › Users › Admin › Media › Add A media type must be linked to a user to send events, and the user needs at least read permission on the hosts. We recommend linking it to the Admin user.
Click Add to close the dialog, then click Update to save the user.
Step 3: Create a trigger action that sends to Flashduty in Zabbix
Where: Zabbix › Configuration › Actions › Create action-
Set Name to
Send To Flashduty -
Under Operations, configure Operations, Recovery operations, and Update operations. For each, click Add, fill in the fields, and click Add again:
- Click Add to save the action
Step 4: Trigger an alert in Zabbix and confirm
Where: Zabbix › Monitoring › Problems › Actions The Test link in the Media types list sends the raw macros (such as{EVENT.SEVERITY}) as parameter values, and Flashduty rejects the request because the severity is invalid. Verify with a real alert instead:
- Wait for or cause an alert that fires the action. In Monitoring › Problems, click the alert’s Actions column to see the notification results
- If the Flashduty media type’s entry shows Status
Sent, the notification went out. Otherwise, follow the message to troubleshoot - Go back to Flashduty. If the integration shows a Latest event time, the setup works
Zabbix 3.x–4.x
Step 1: Create the Flashduty media type and install the script
A media type is the channel Zabbix uses to send notifications. The download URL requires aReferer header and returns 403 without it, so keep the --header option in the command.
Where: Zabbix › Administration › Media types › Create media type
-
Set Type to
Scriptand Script name tosend-to-flashduty.sh -
Enter these five Script parameters in order. Don’t reorder them, and leave empty ones blank; the script reads them by position:
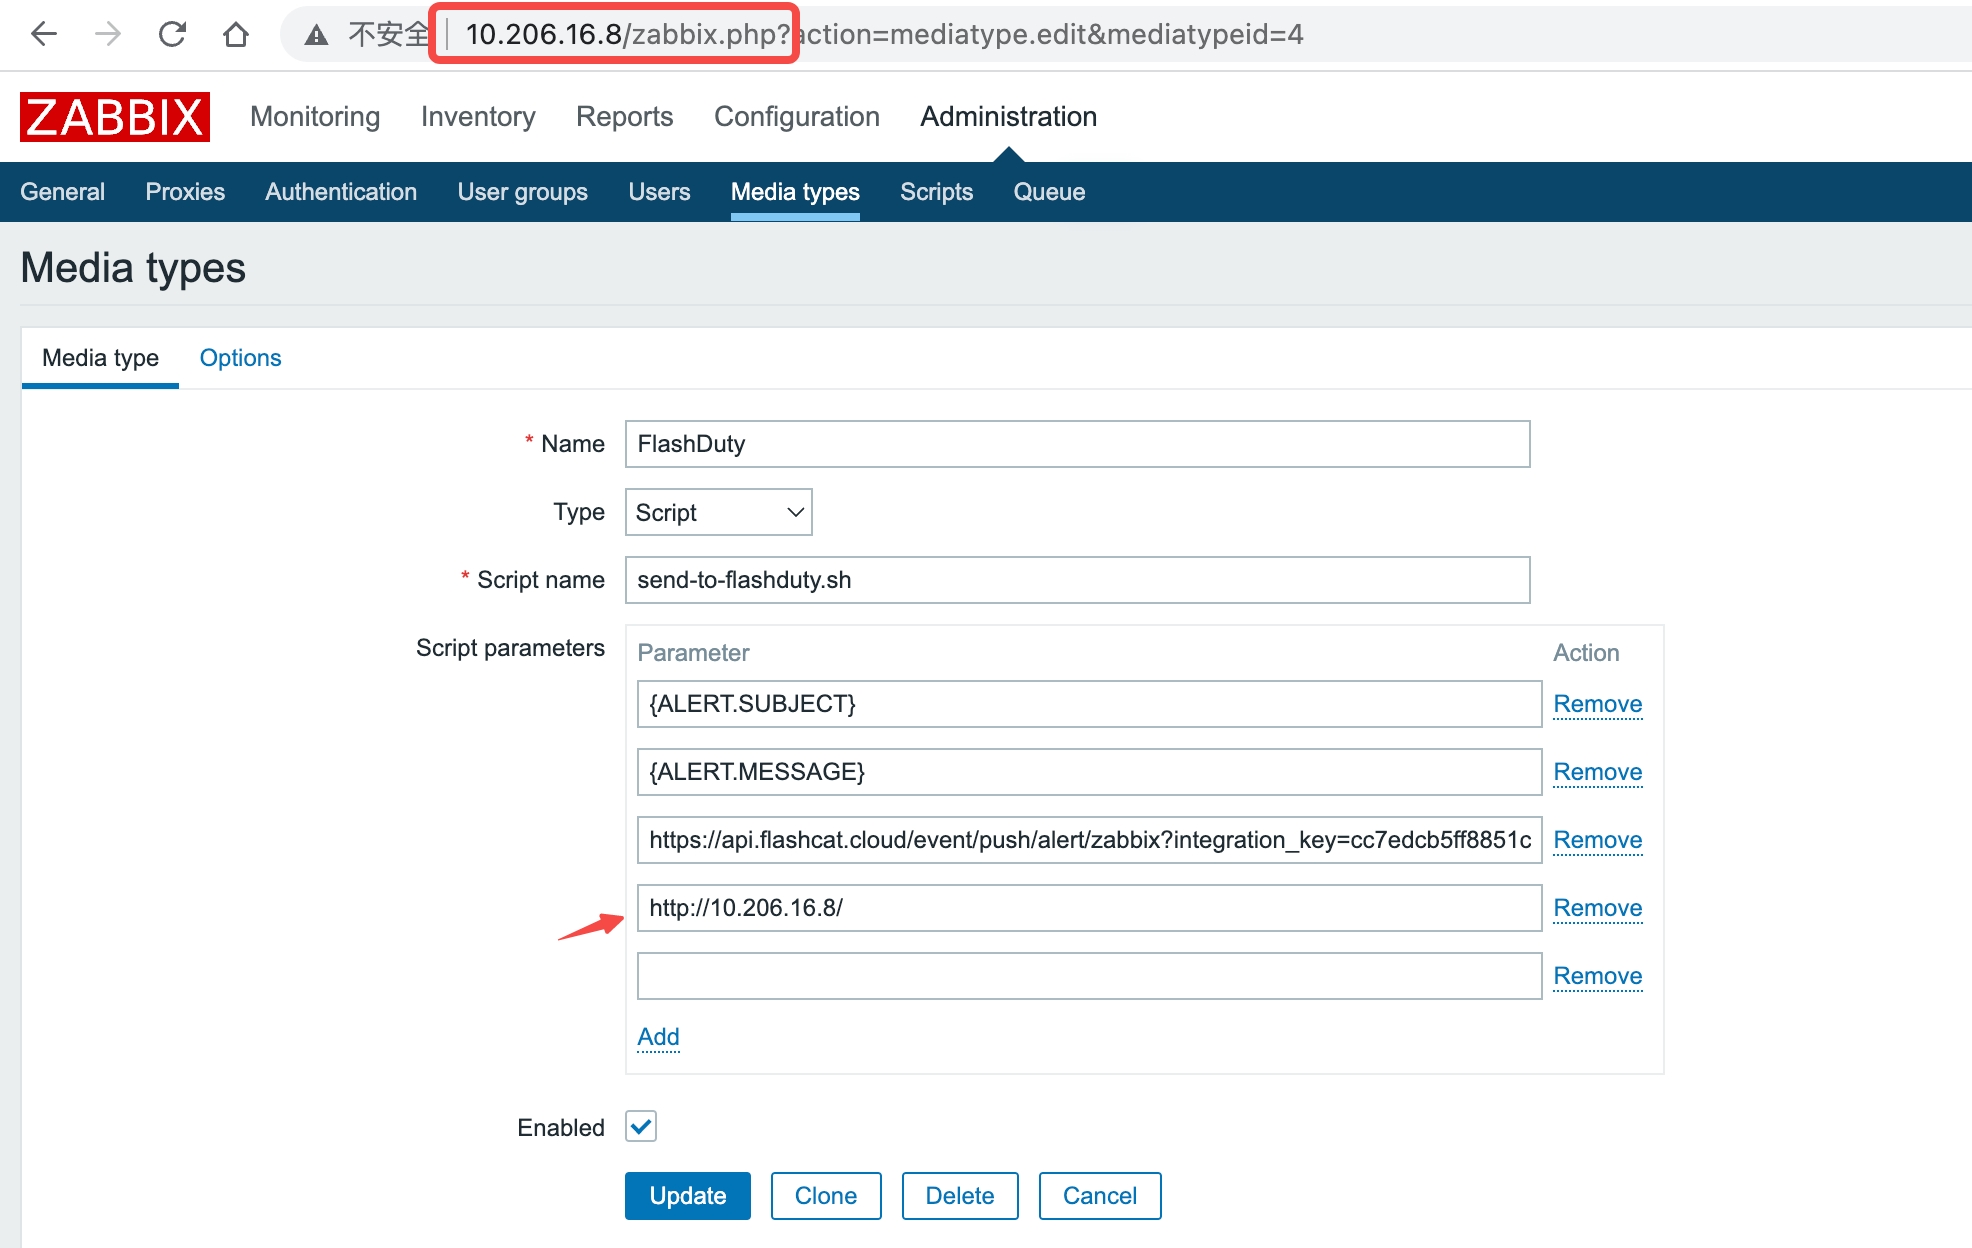
- Click Update to save
-
Log in to the Zabbix Server host and download the script to the alert scripts directory. The directory is set by
AlertScriptsPathin the Zabbix Server configuration file, usually/usr/lib/zabbix/alertscripts:The script usescurlandjq. Make sure the Zabbix Server process can find and run both, and install them if needed.
Step 2: Add the Flashduty media to a user in Zabbix
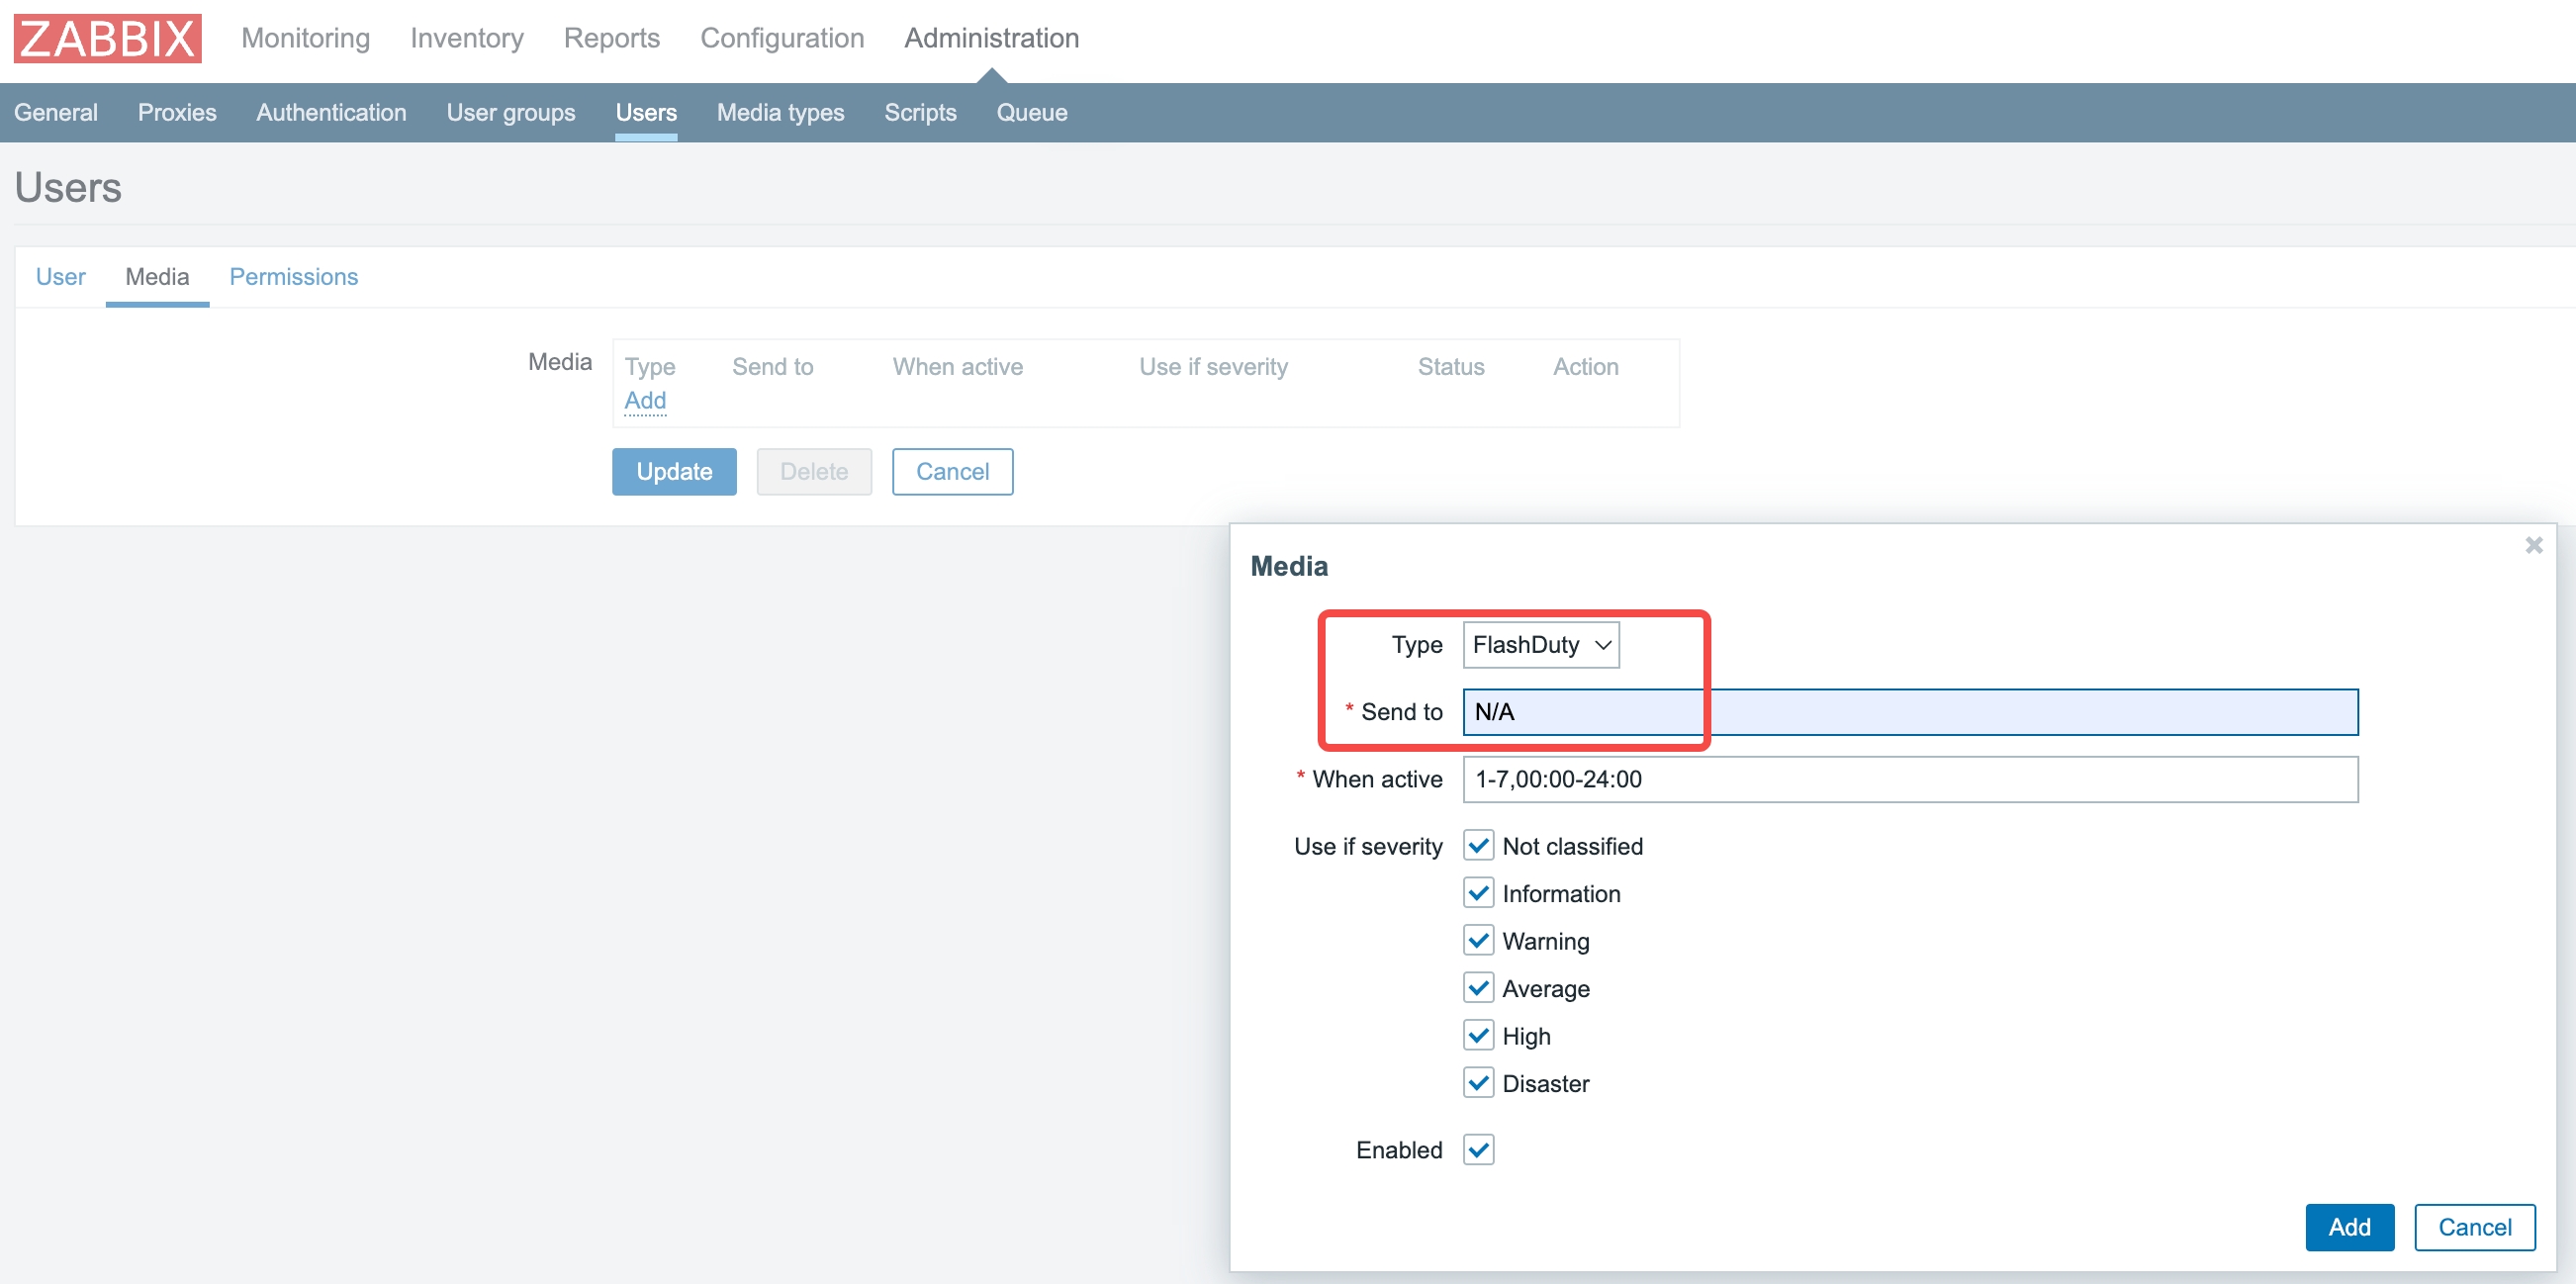
Where: Zabbix › Administration › Users › Admin › Media › Add A media type must be linked to a user to send events, and the user needs at least read permission on the hosts. We recommend linking it to the Admin user.
Click Add to close the dialog, then click Update to save the user.
Step 3: Create a trigger action that sends to Flashduty in Zabbix
Where: Zabbix › Configuration › Actions › Create action-
Set Name to
Send To Flashduty -
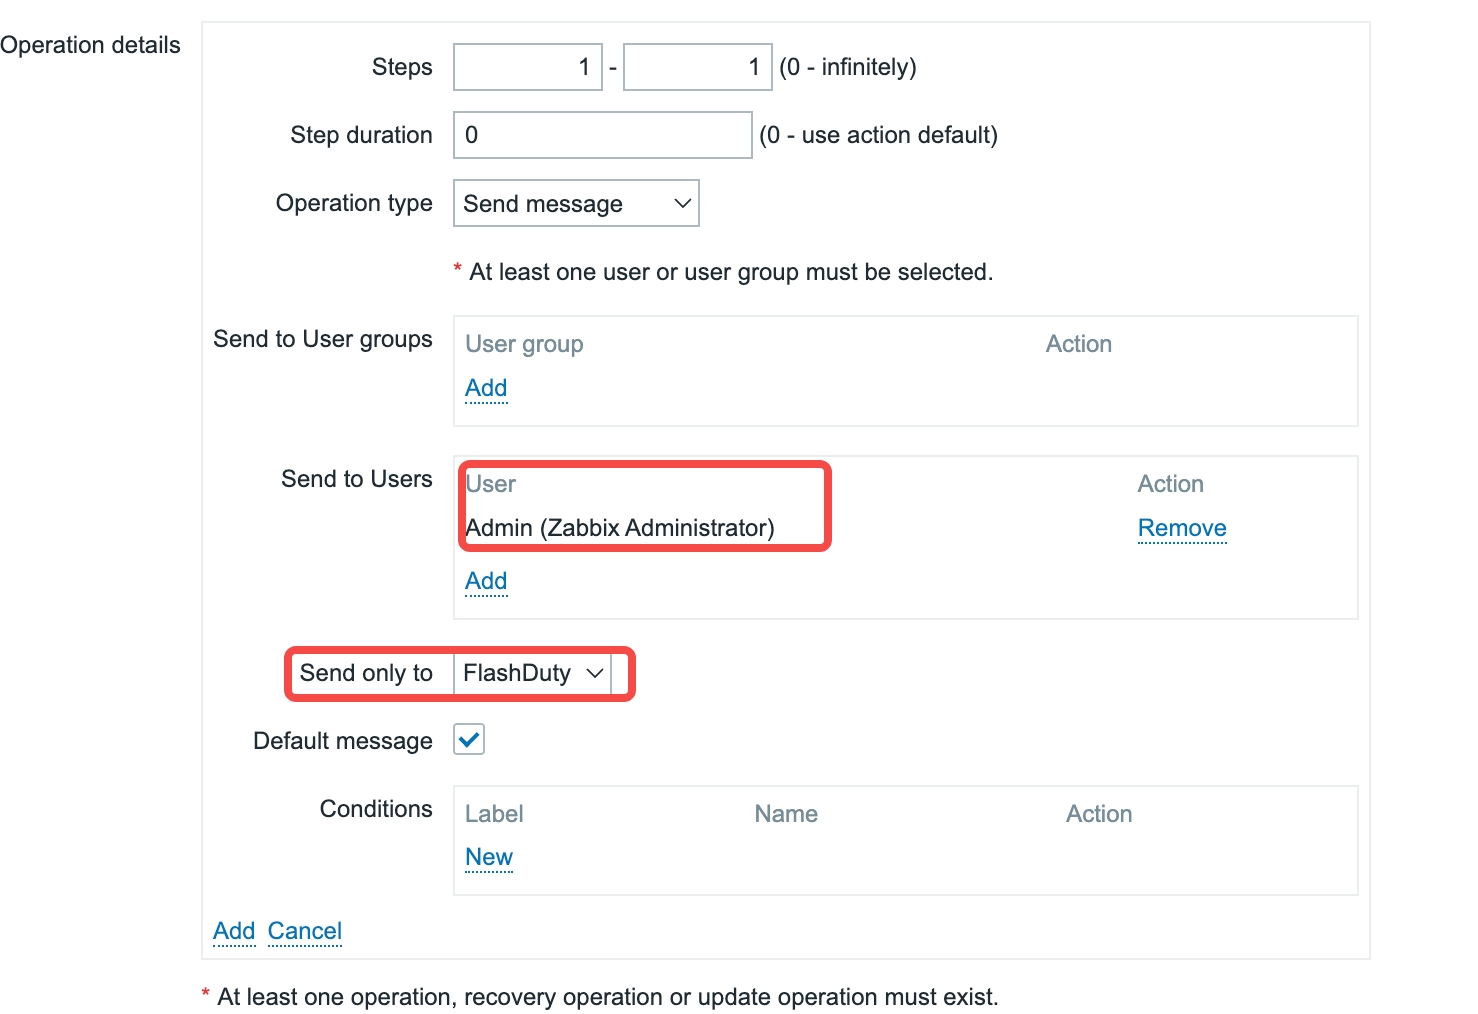
Under Operations, configure Operations, Recovery operations, and Update operations (Acknowledgement operations on 3.x). For each, click Add, fill in the fields, and click Add again:
-
In the Default message of all three, paste the following after the default content. Flashduty parses this text to read the alert attributes:
- Click Add to save the action
Step 4: Trigger an alert in Zabbix and confirm
Where: Zabbix › Monitoring › Problems › Actions Verify with a real alert:- Wait for or cause an alert that fires the action. In Monitoring › Problems, click the alert’s Actions column to see the notification results
- If the Flashduty media type’s entry shows Status
Sent, the notification went out. Otherwise, follow the message to troubleshoot - Go back to Flashduty. If the integration shows a Latest event time, the setup works

Status and severity
Zabbix to Flashduty severity mapping: